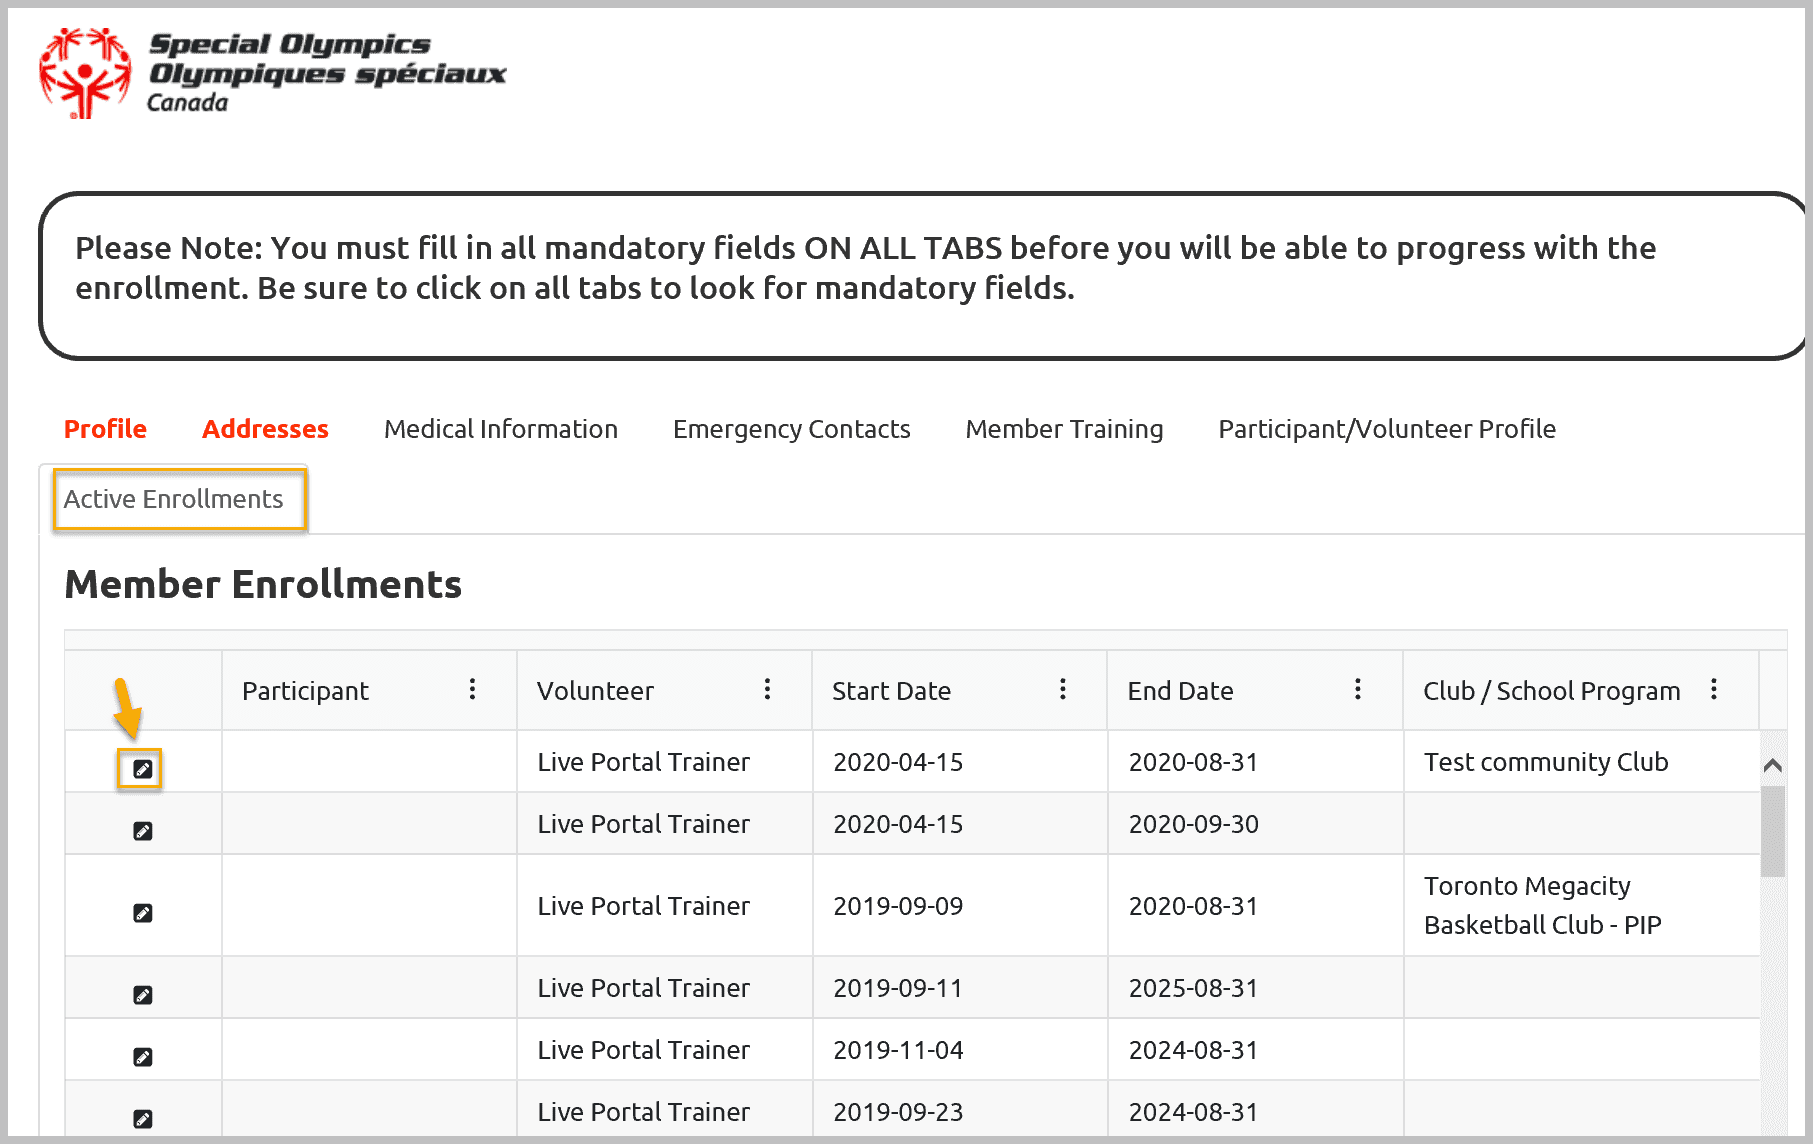
To view details of the individuals enrollment click on the Edit button
Usability Membership Portal – Head Coach/Team Manager Role Instructions
Open Membership Portal link in your browser:
https://portal.specialolympics.ca
If you already have Membership Portal Account as an registered Volunteer
Follow the instructions to login
Membership Portal Login Instructions
If you do not have Membership Portal Account as an registered Volunteer
Follow the instructions to create portal account
Membership Portal Account Creation Instructions
After Login/Account Creation following will be your Landing Page
After login you will see the following window (not exact same, you will see your roles only)
To review/update your information, Click on My options dropdown at top right corner of the screen to get menu options.
You will not be able to see your Role Menu options until you select your role.
To update your information follow these instructions for My Options menu (add Link)
Manage Your Club
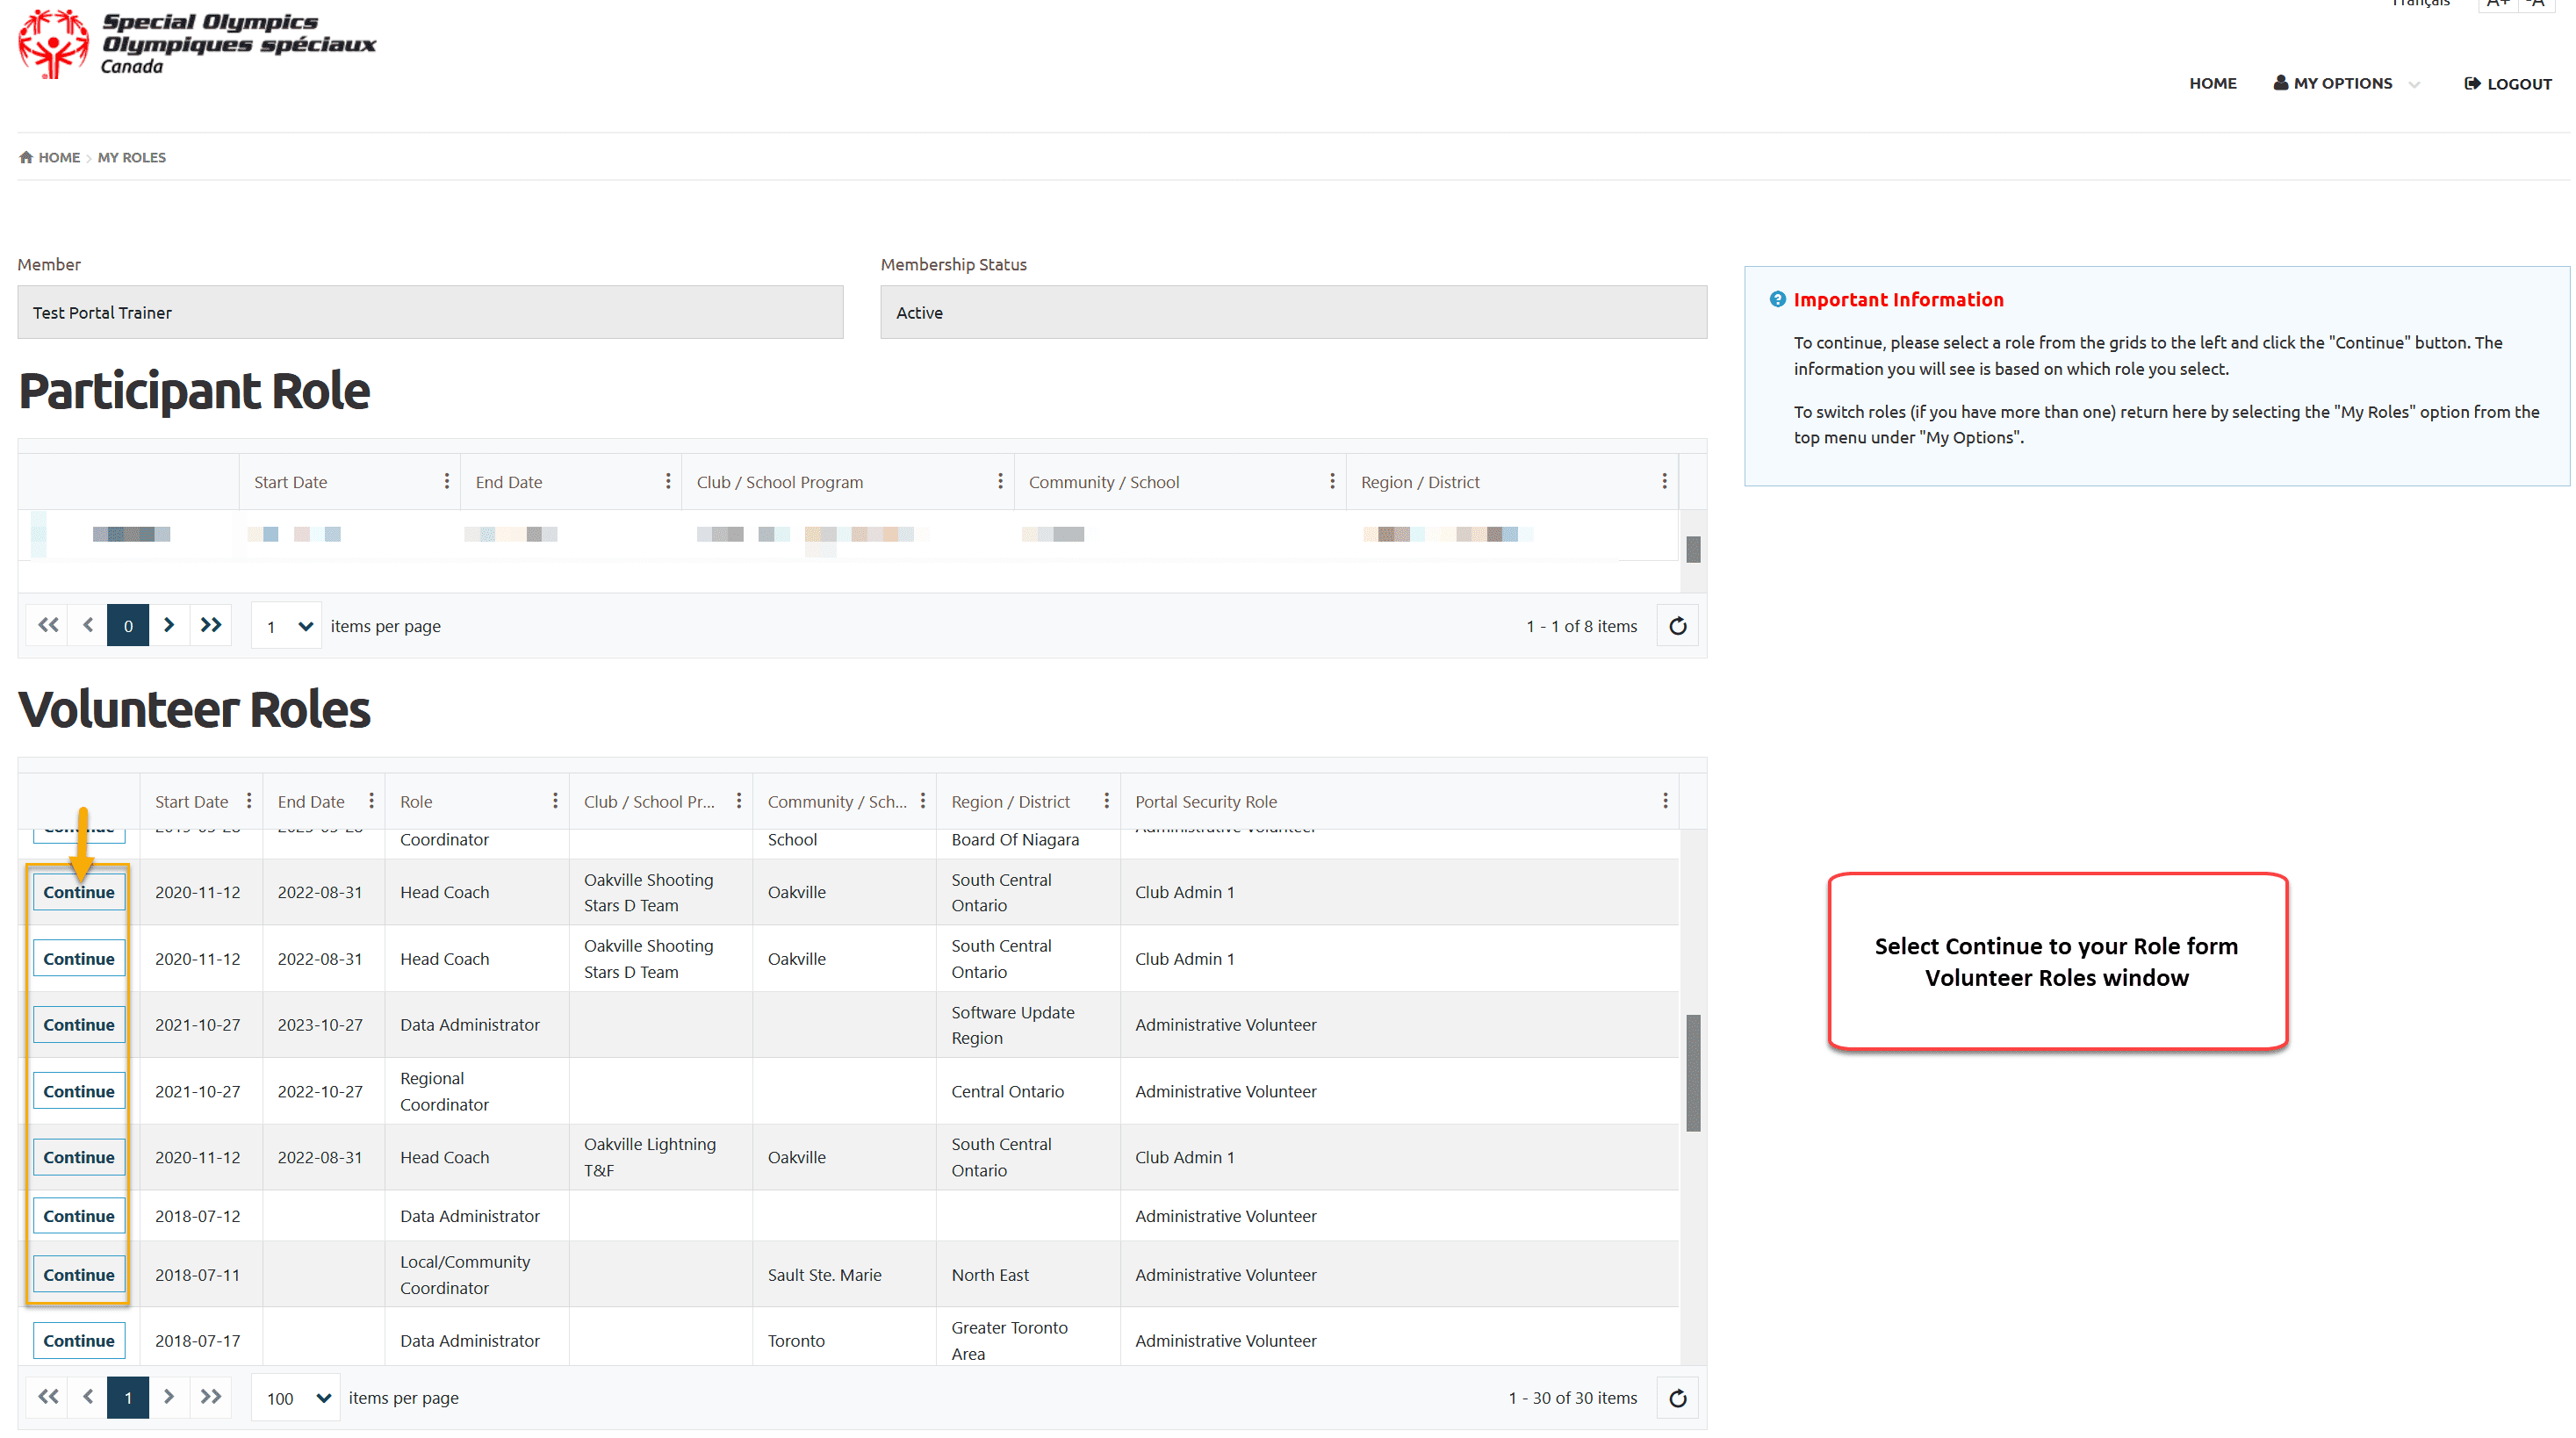
Select Your Role
From Volunteer Roles window select Head Coach by clicking on Continue button
After role selection as Head Coach you will see Head Coach menu beside My Options. showing your role information and Organization Notifications .
Announcements – you will see notifications posted by SOO or club related notifications posted by by your Community.
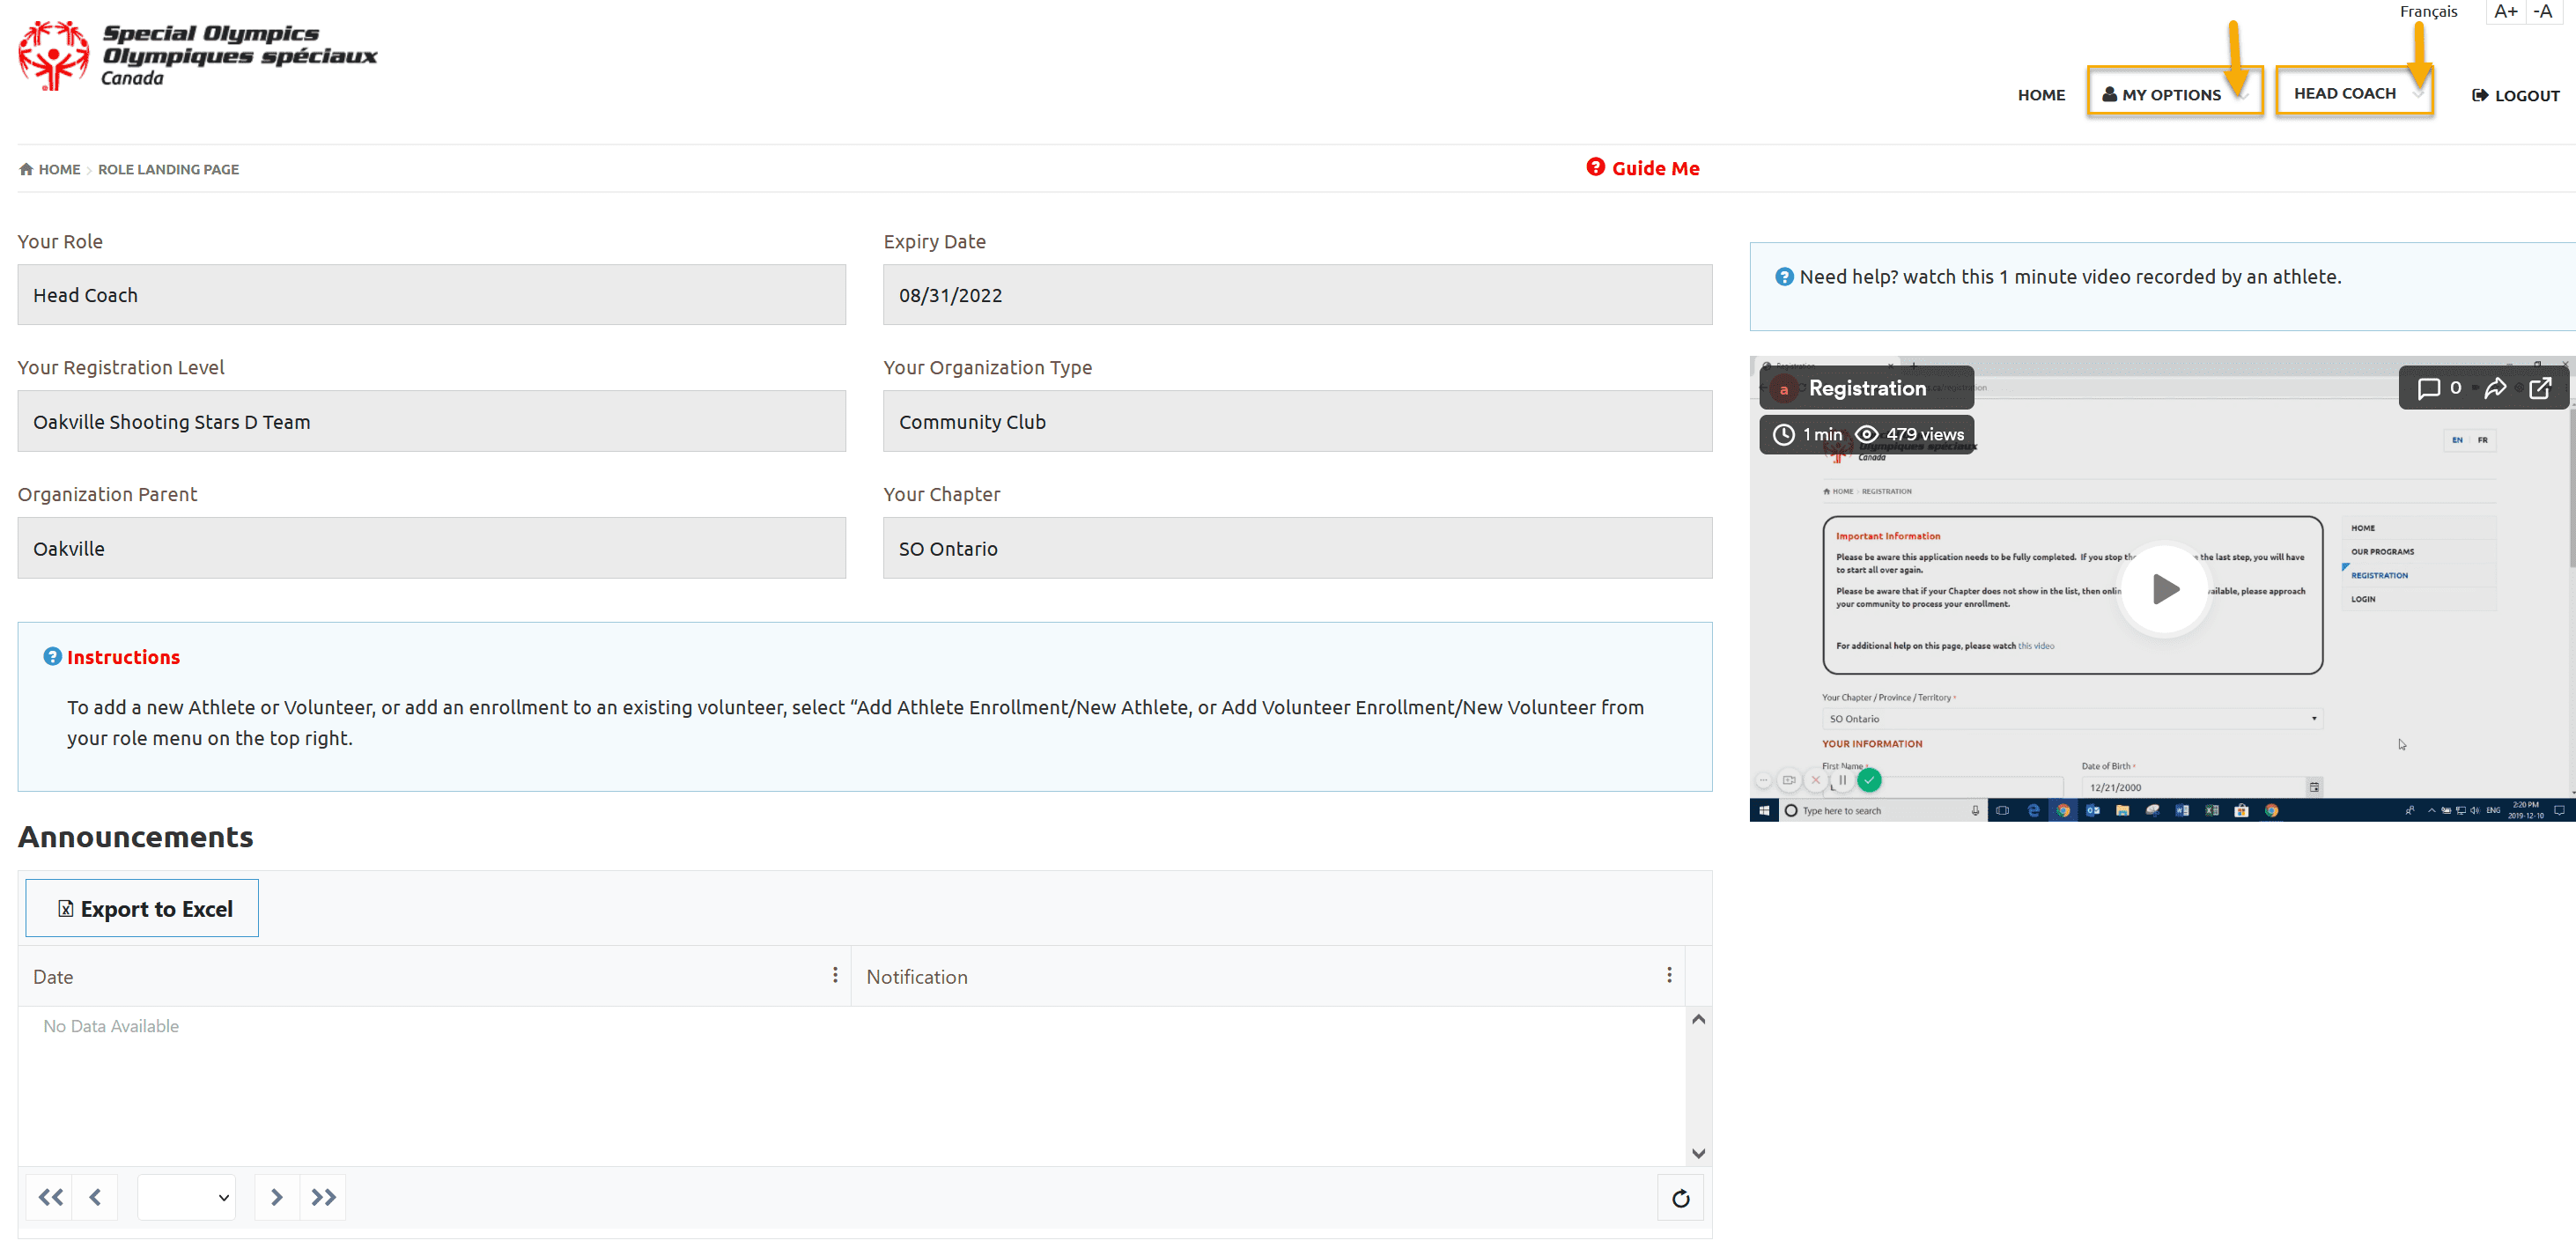
Head Coach Role Options
To View/Select your role options, click on Head Coach dropdown arrow and select any option

1. To View /Update Your Athletes
Select Active Participants from Head Coach menu.
Active Participants Window will provide you list of your athletes.
You can export list of athletes by using Export to Excel button provided at the top of the window.

To view the detailed profile of an athlete click on the Edit button beside the name of the athlete.
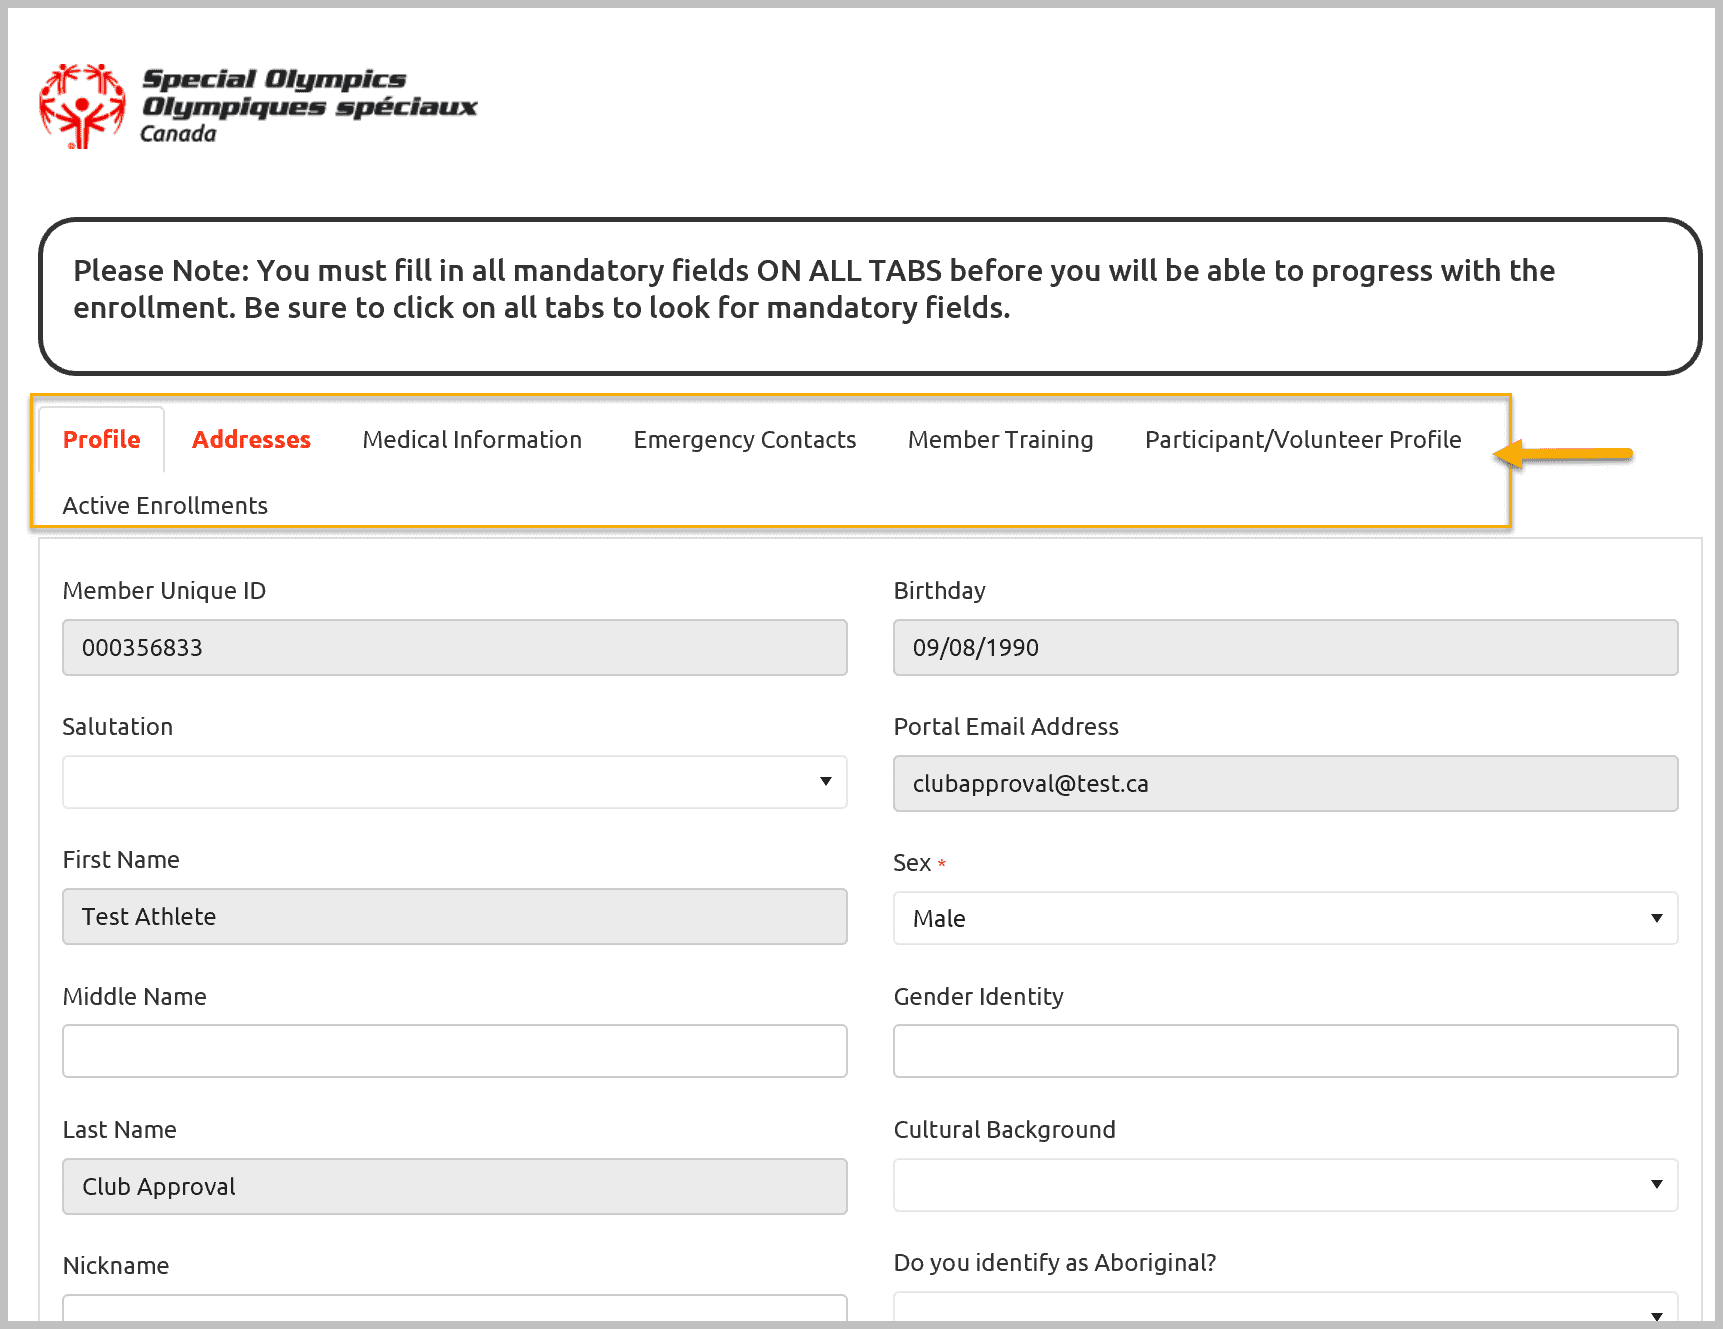
Athlete Profile detail window with multiple tabs at the top will pop up. Select the one you wish to view/update information
Note: Red tabs have some required fields so you can not move forward without filling them appropriately.

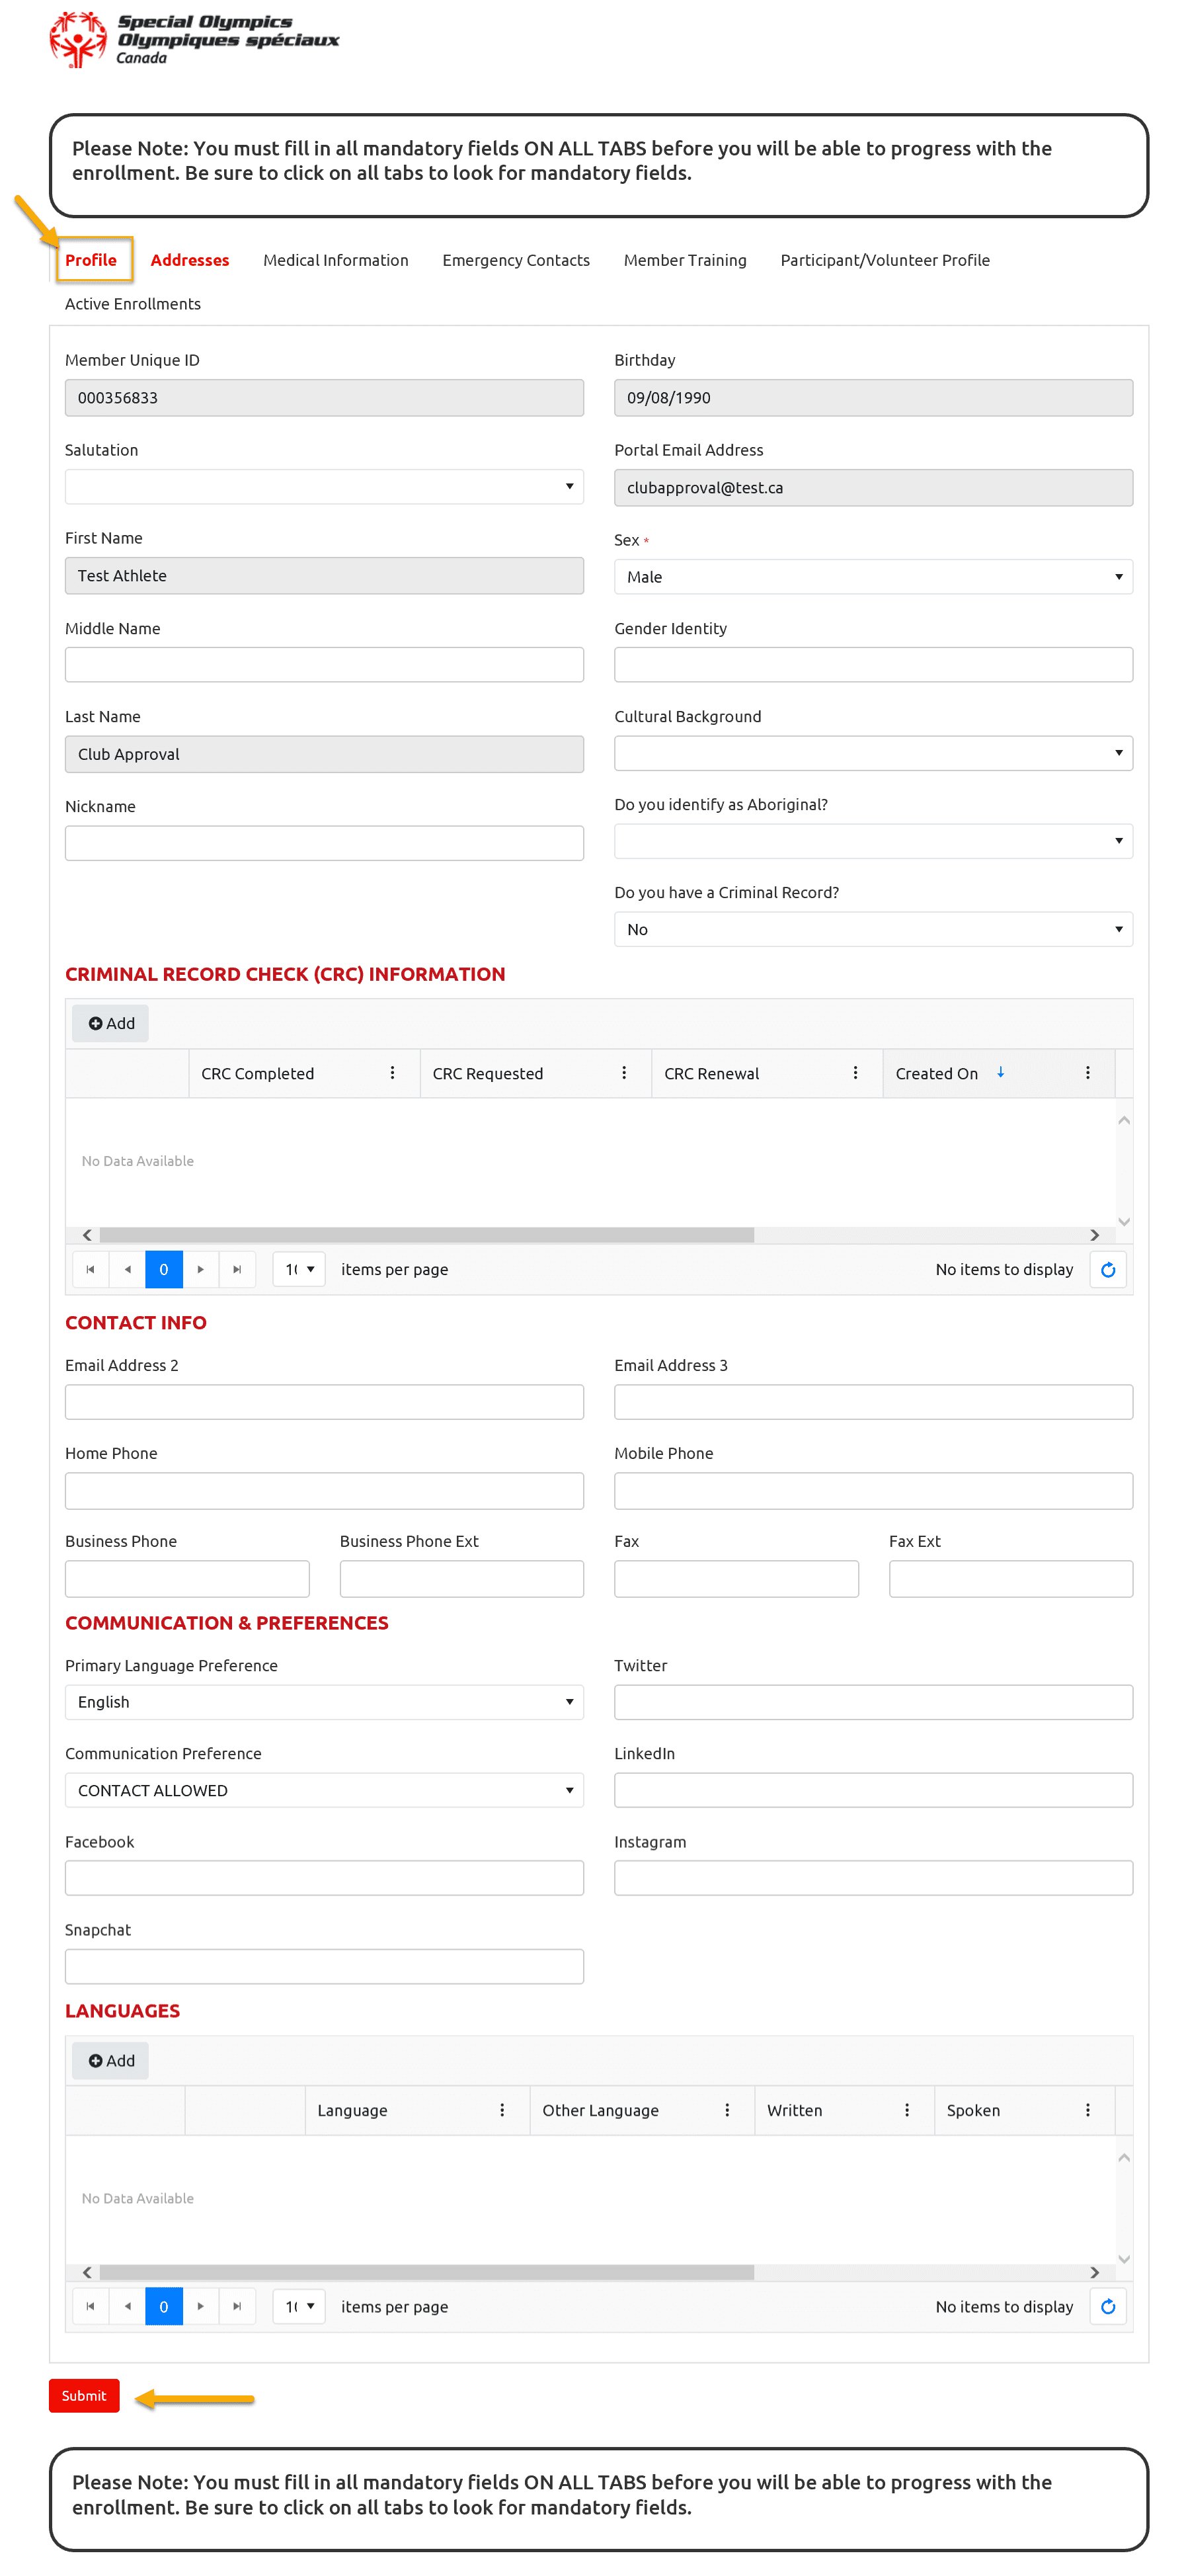
Athlete Profile Tab
In the Profile tab, Member Unique ID, First Name, Last Name and Portal Email Address are read only fields. You can edit all other fields if need to be. After updates click Submit to save the changes.

If you are only viewing the information and not changing it, you can move to another tab without clicking the Submit button.
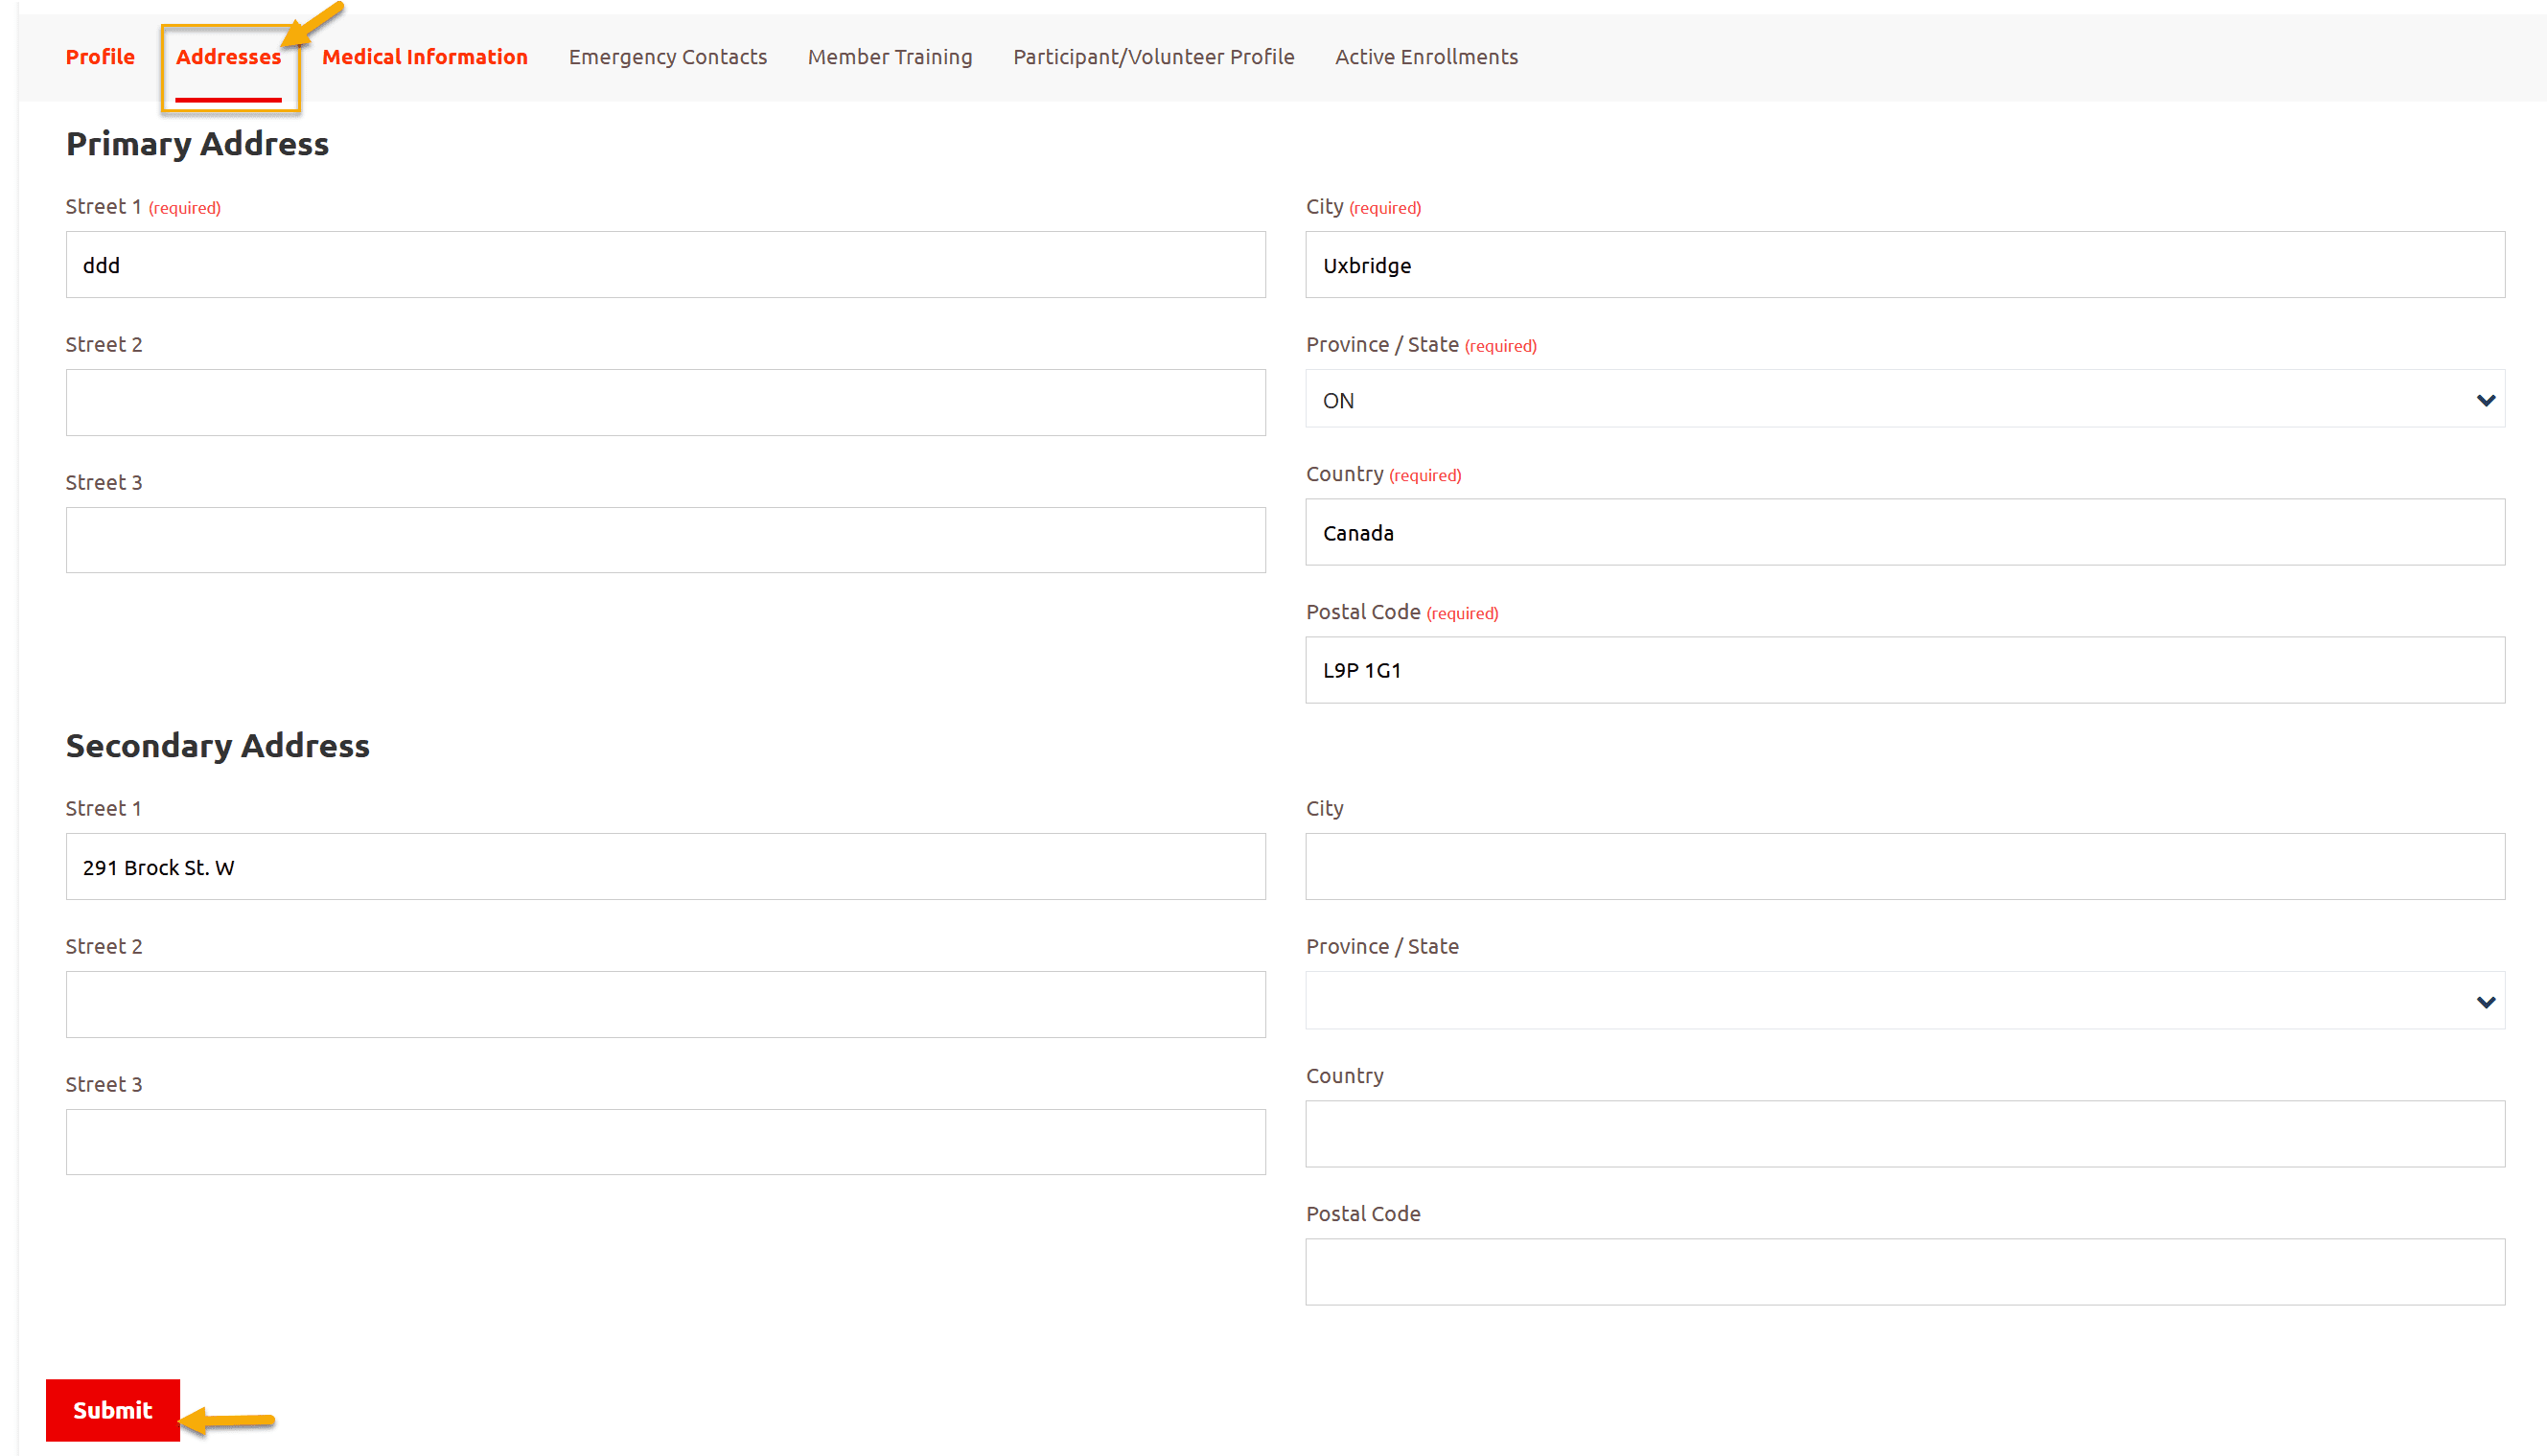
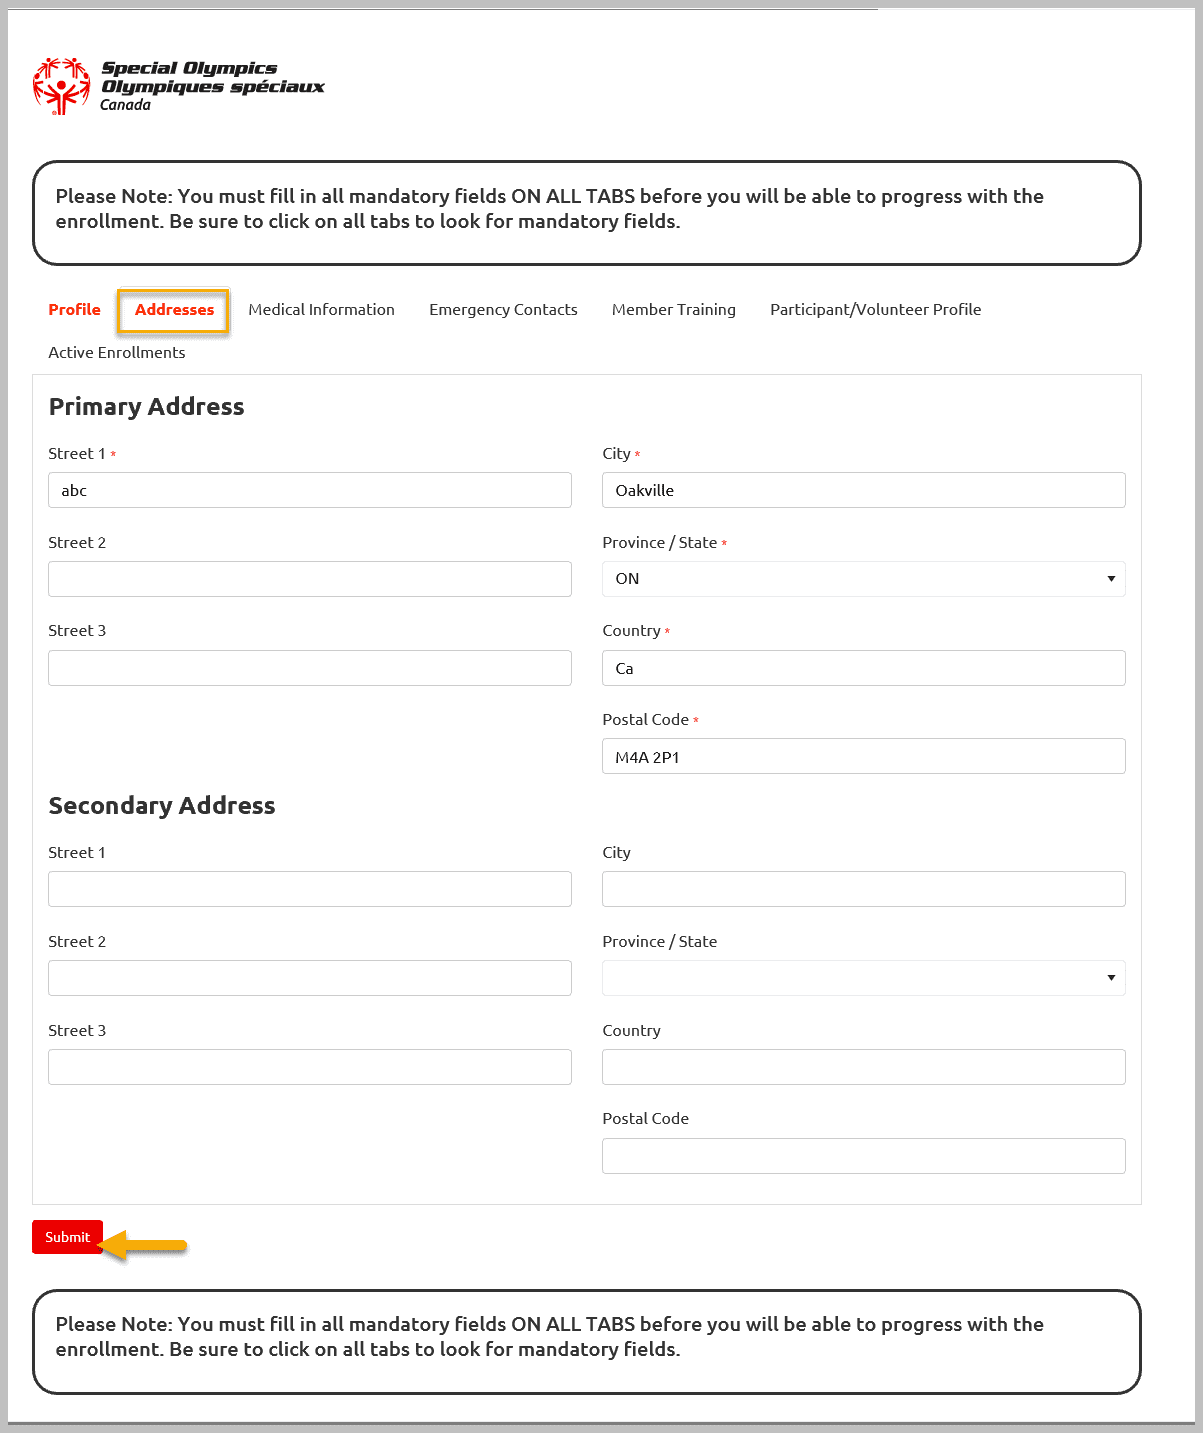
Athlete Address Tab
In address tab, you can enter Primary & Secondary addresses. Review/update this info and then move to next tab Medical Information
Note: Primary Address is mandatory
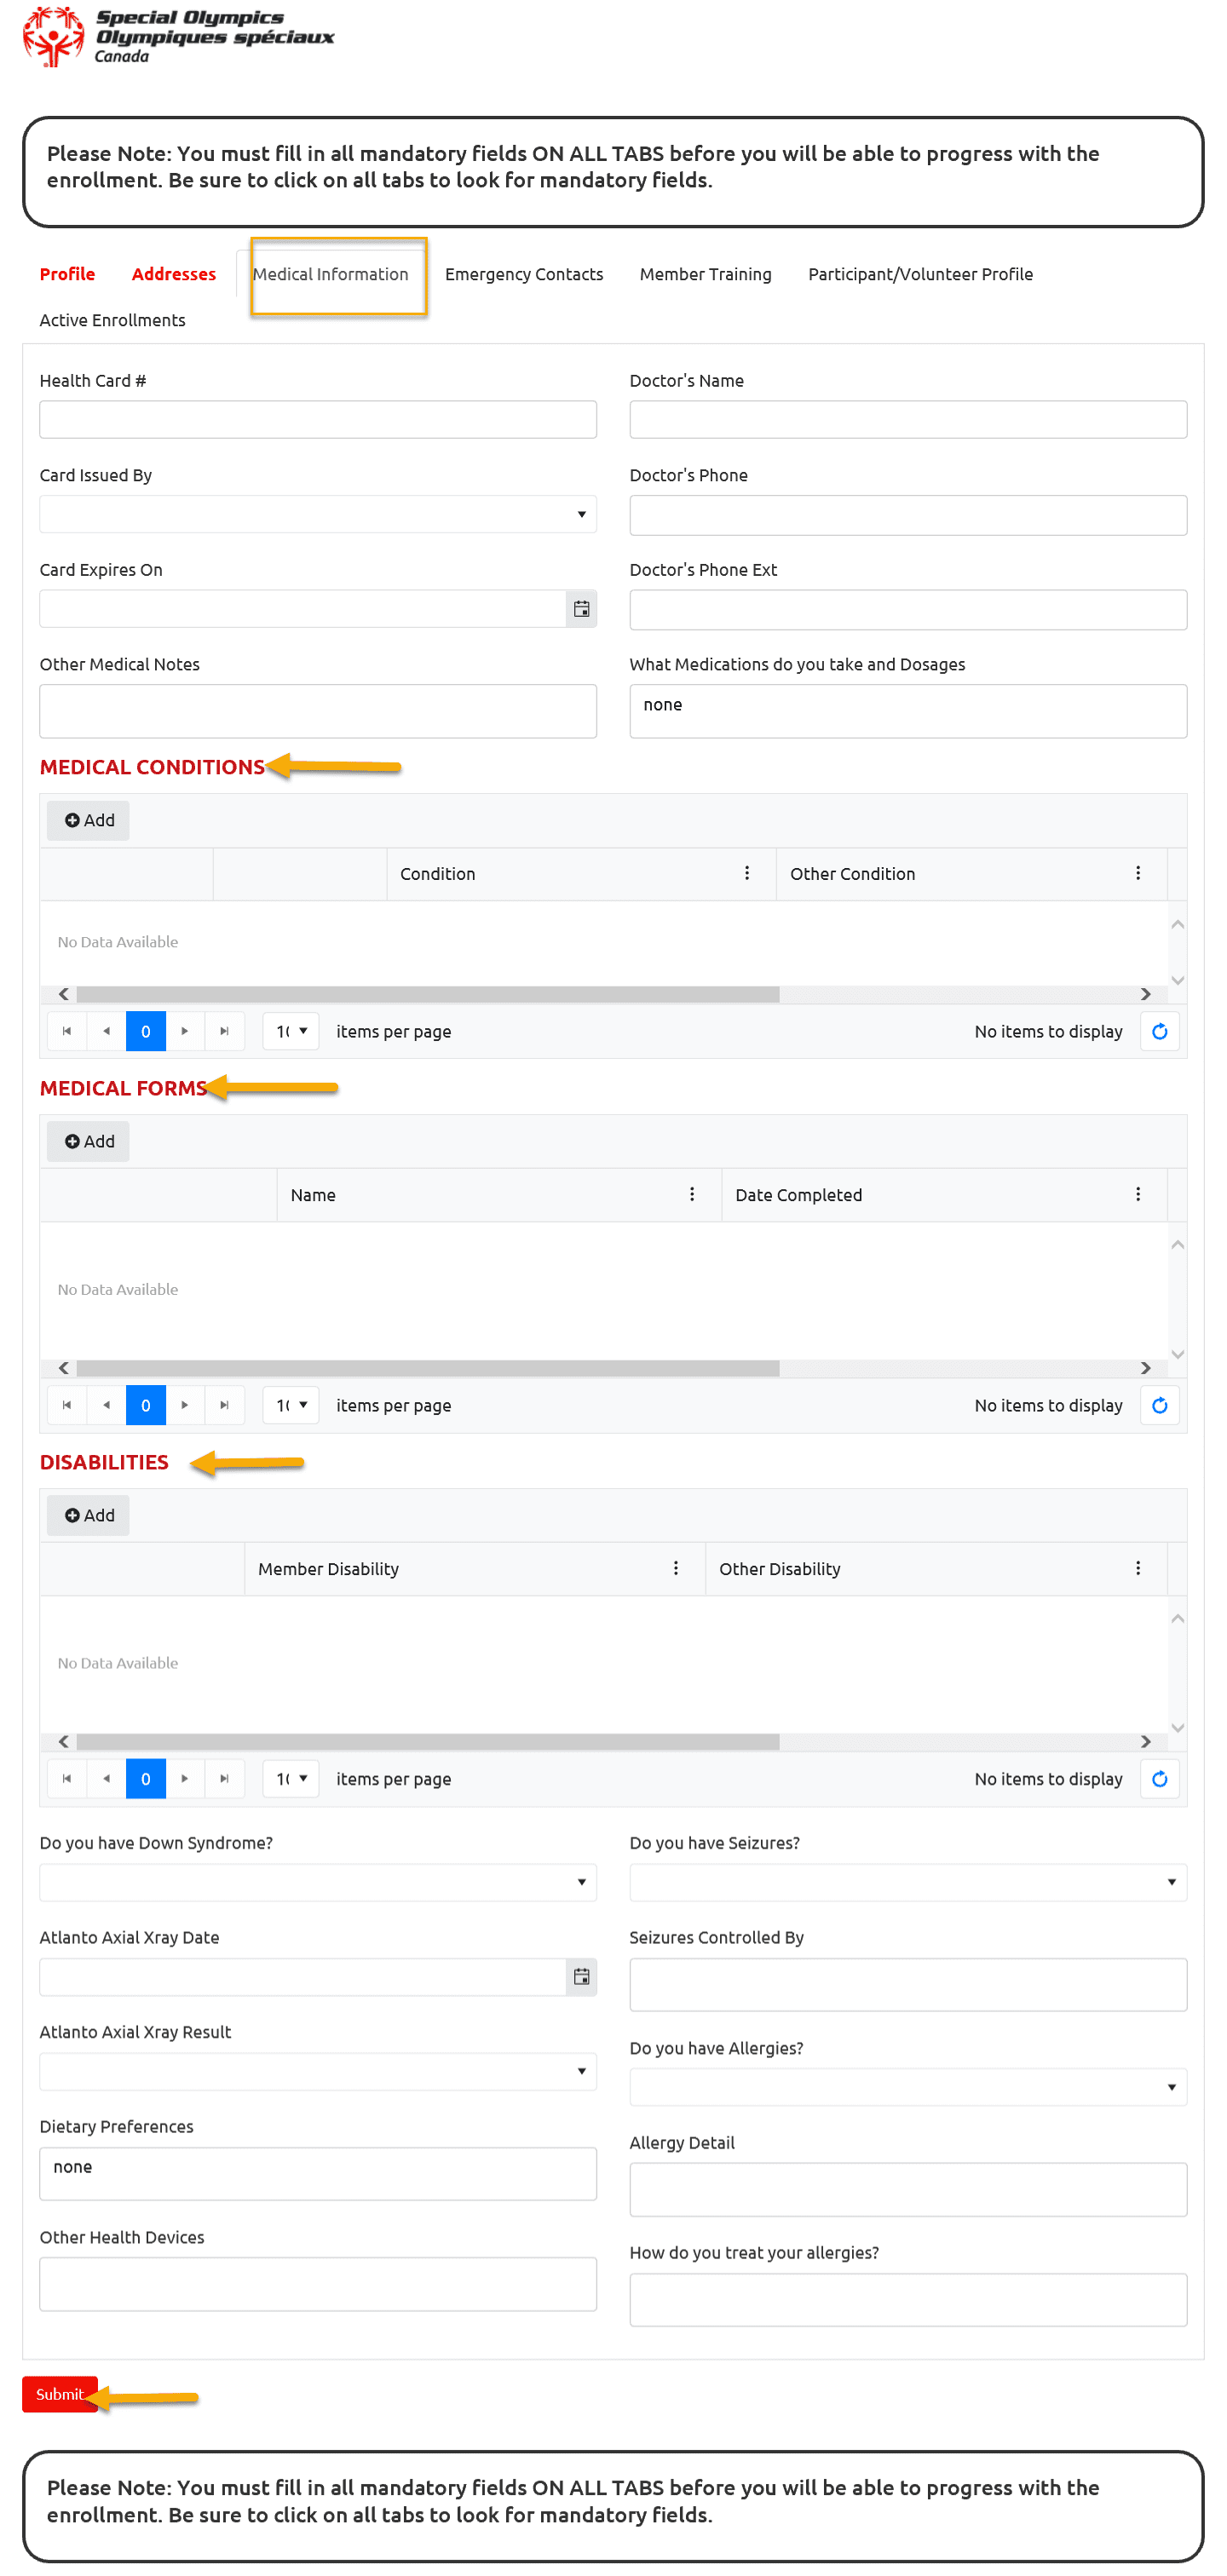
Athlete Medical Information Tab
Medical Information tab will provide you participant’s medical info, which may be helpful during practice or competition like Medical Condition, Allergies, Dietary Restriction, Health Devices, Doctor’s Name & Phone number.
Review / Update medical info. You can upload any medical form like medical history /medicine chart form by clicking on Add in Medical Forms section. To get full instructions follow the link:

You can also add any Medical condition / Disability information as well.
After Review /Update medical information, move to the next tab Emergency Contacts. Don’t forget to Submit if you have updated any information.
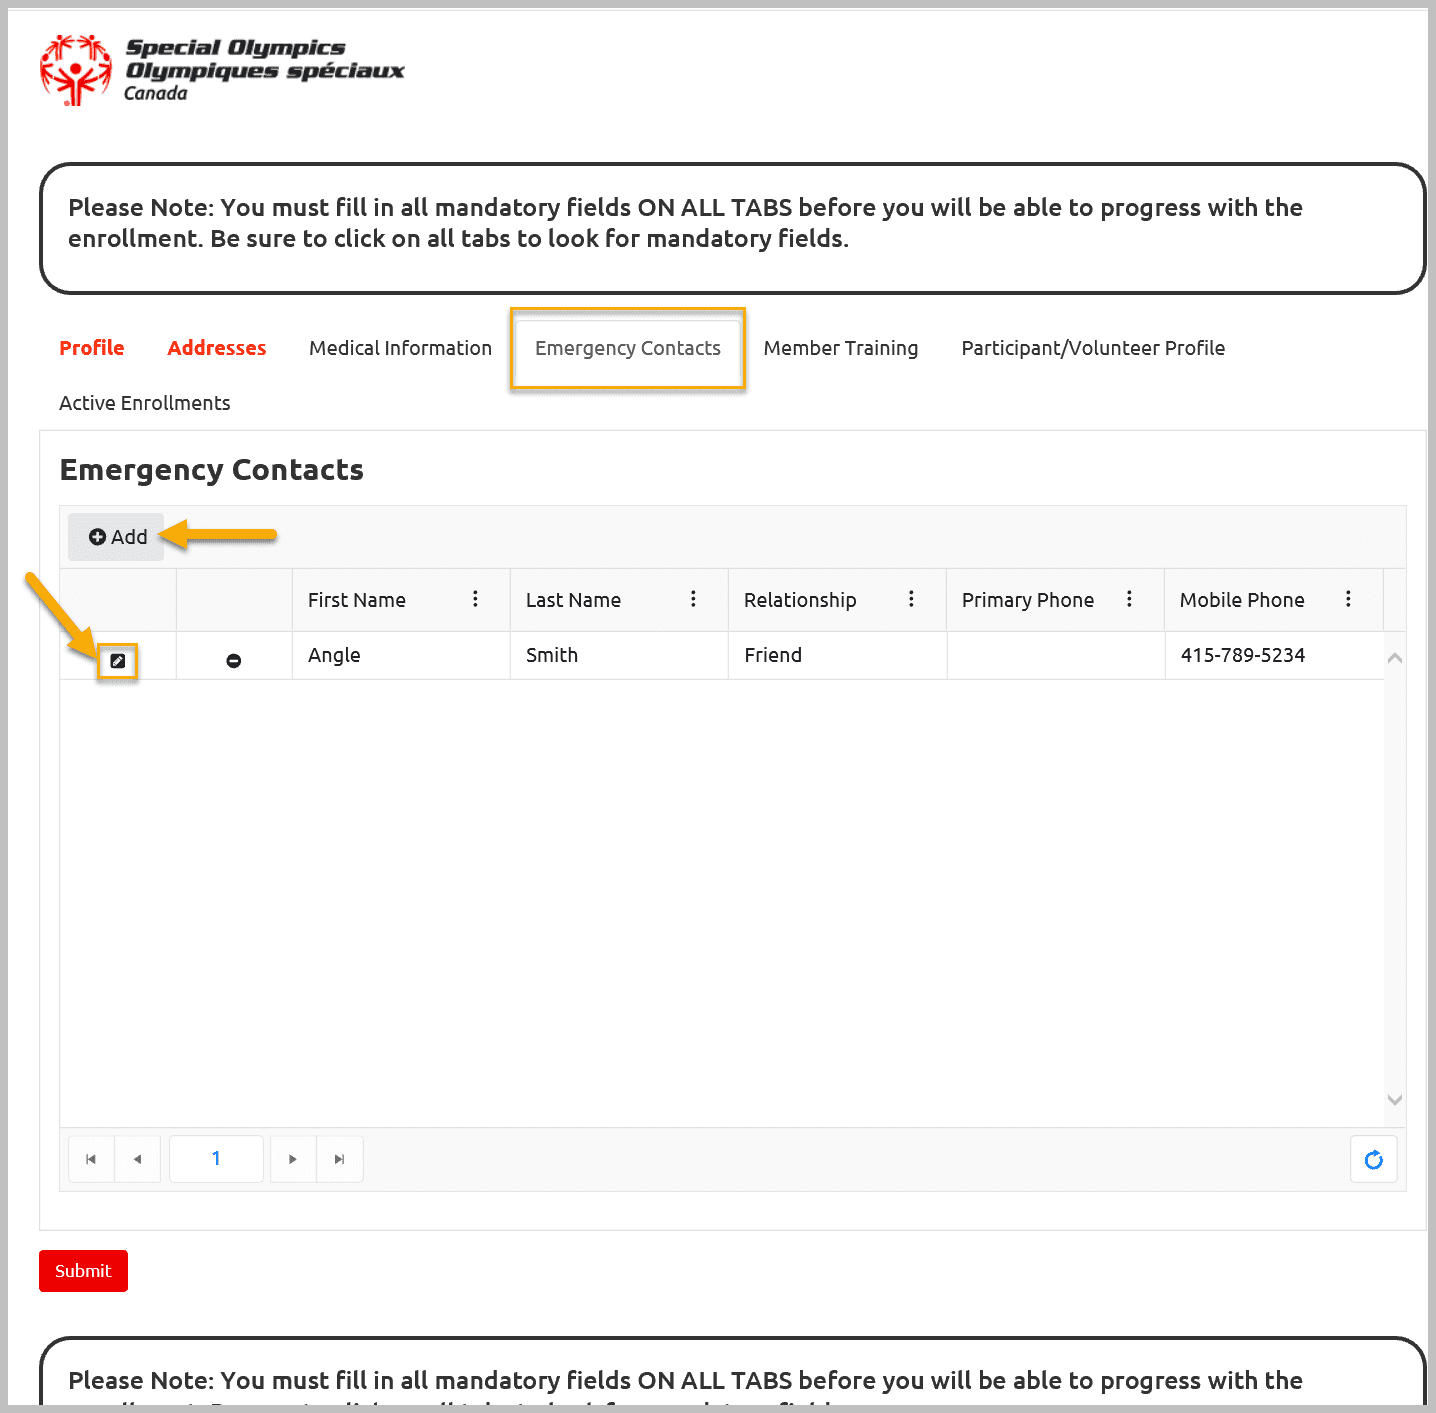
Athlete Emergency Contacts Tab
Review/update Participant’s emergency contact info. To review detailed information for already registered emergency contact, click on Edit button beside the name of EC.

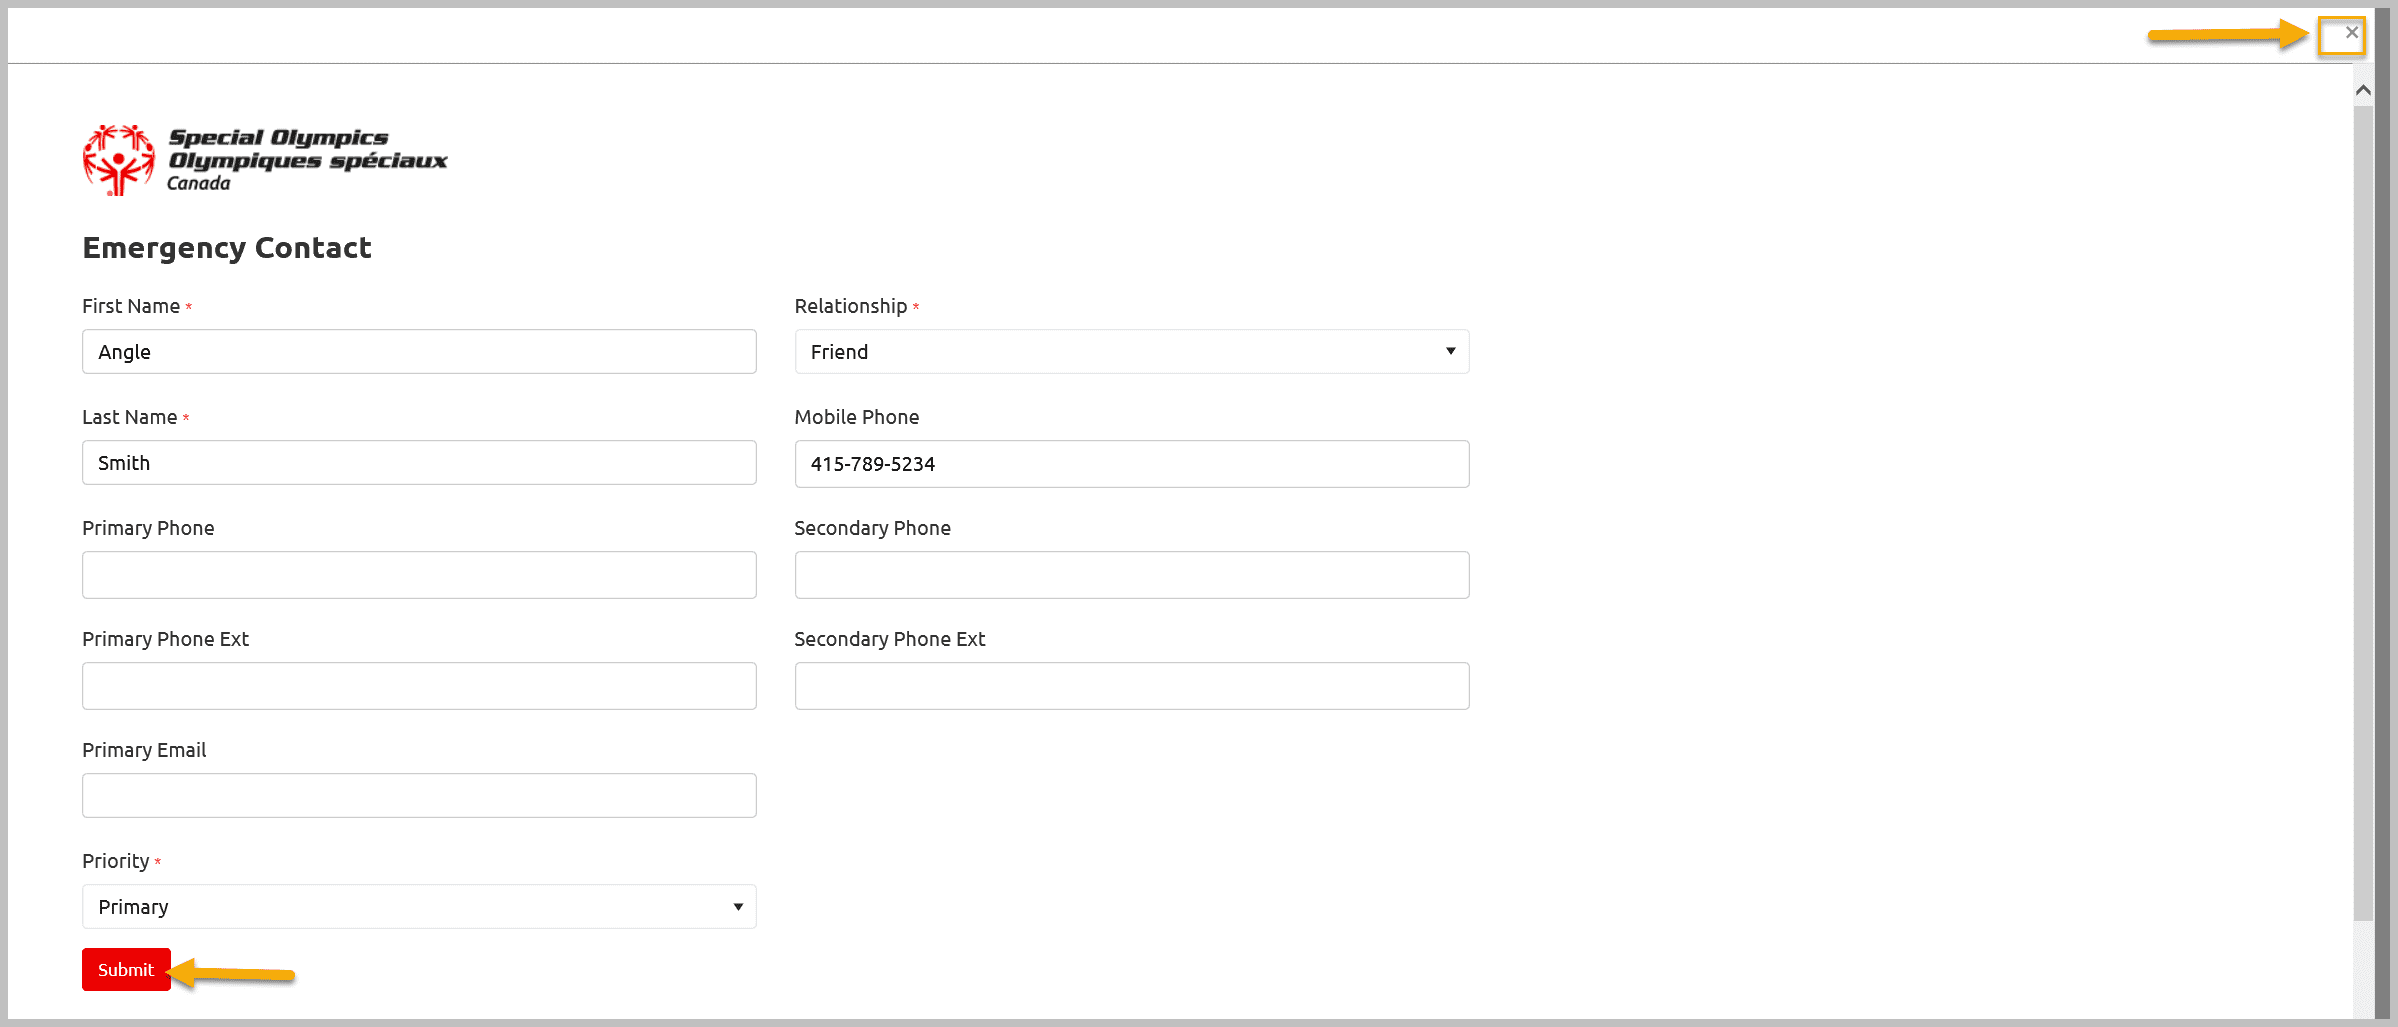
A window with full detail will pop up. After reviewing EC info, click X to exit this window. If you have edited any information click Submit to save the changes.

You can add new Emergency Contact by clicking on Add button provided in Emergency Contacts Window. A new window will pop up. Fill out all Mandatory Fields and other appropriate information and Submit to save the the information. After review/update move to next tab Member Training
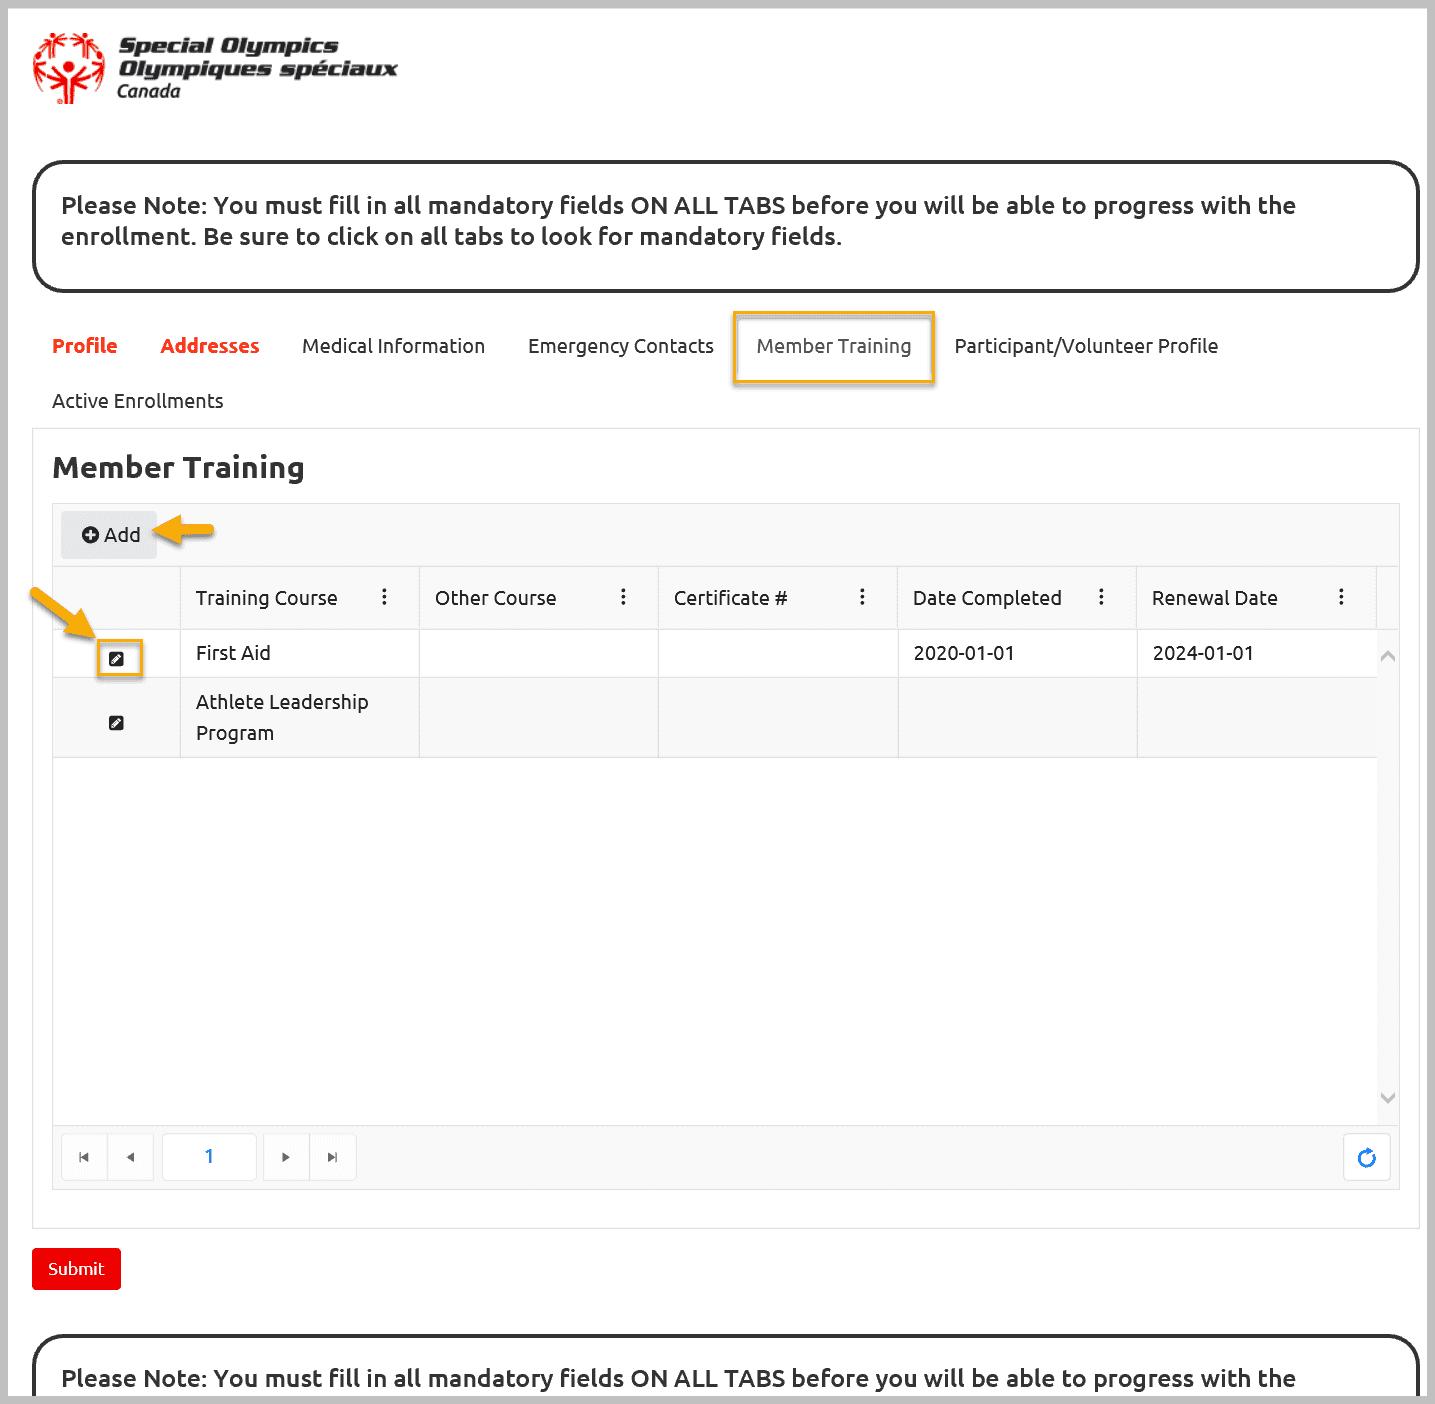
Athlete Member Training Tab
View/update Training Information if Participant has completed and recorded. To view detail of it click Edit button beside the Course name.
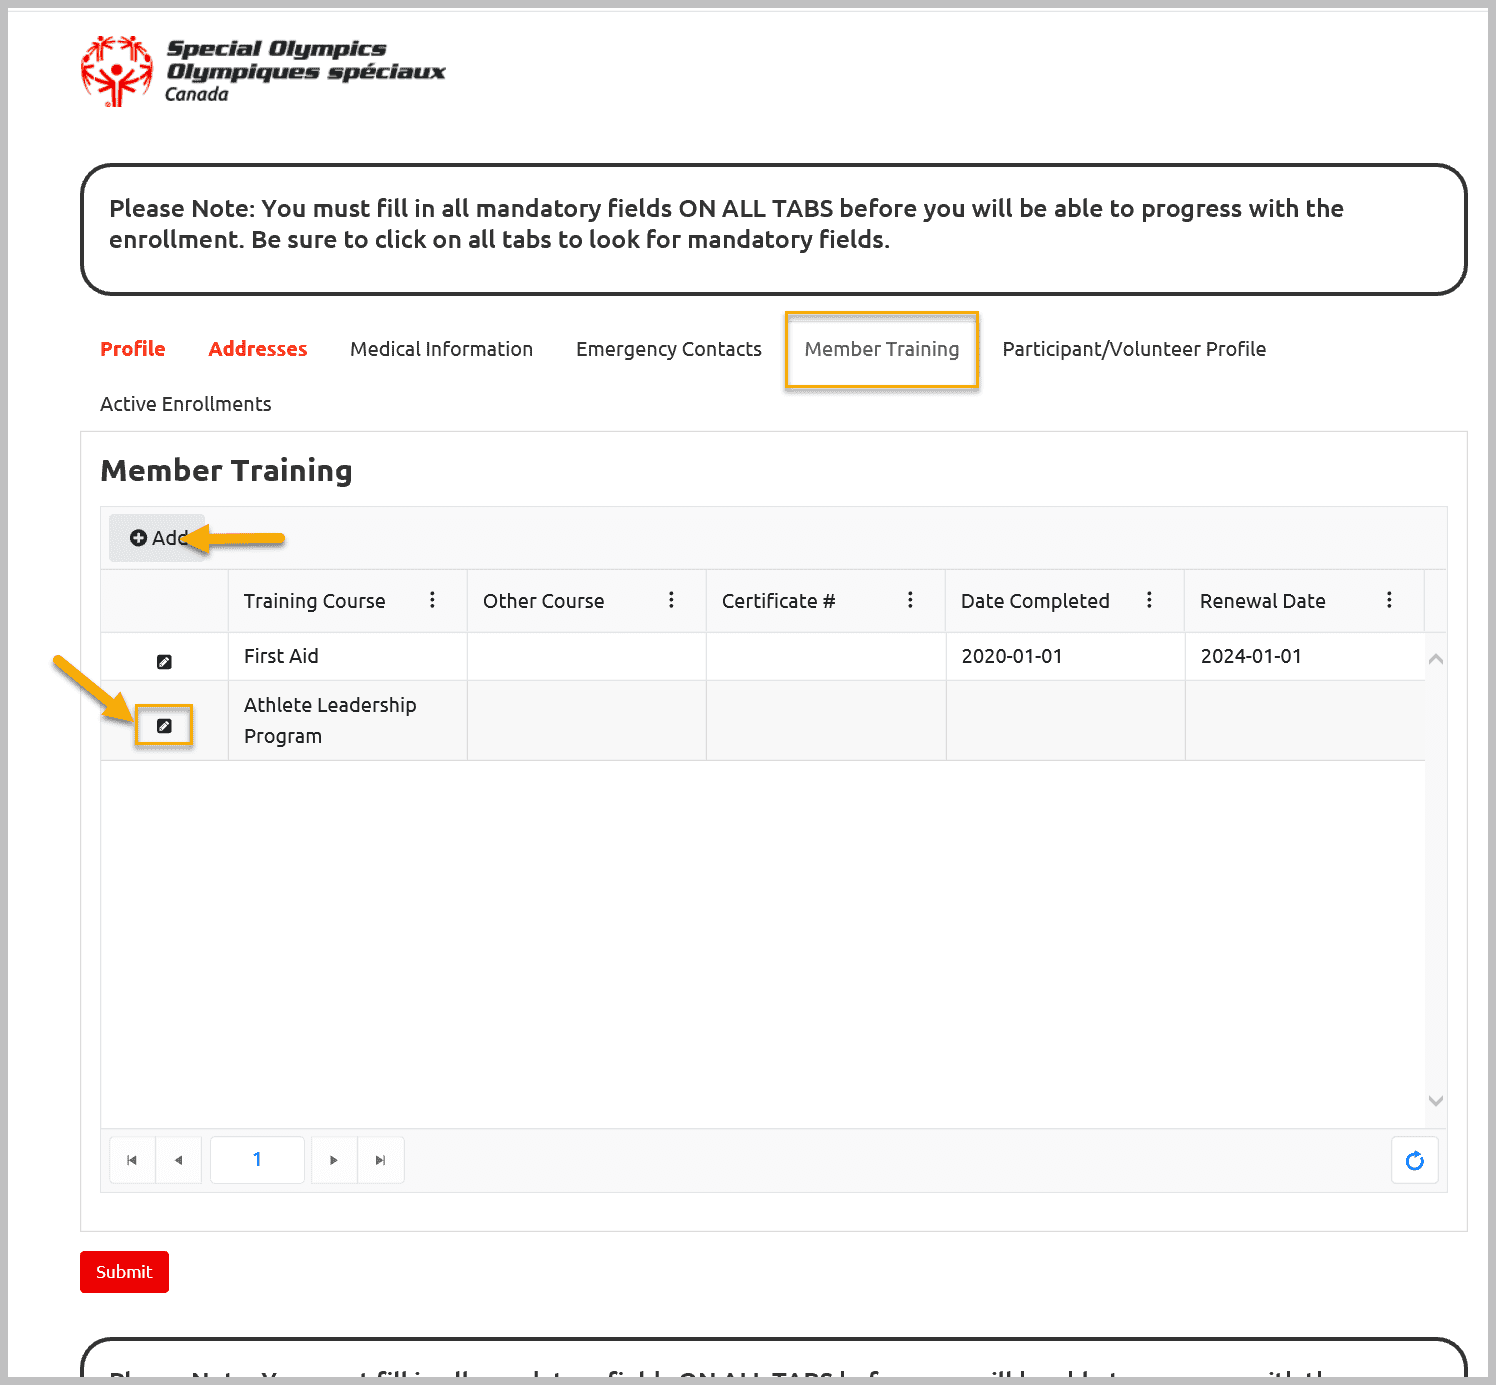
A window with detail information will pop up. After reviewing this info, click X to close this window.
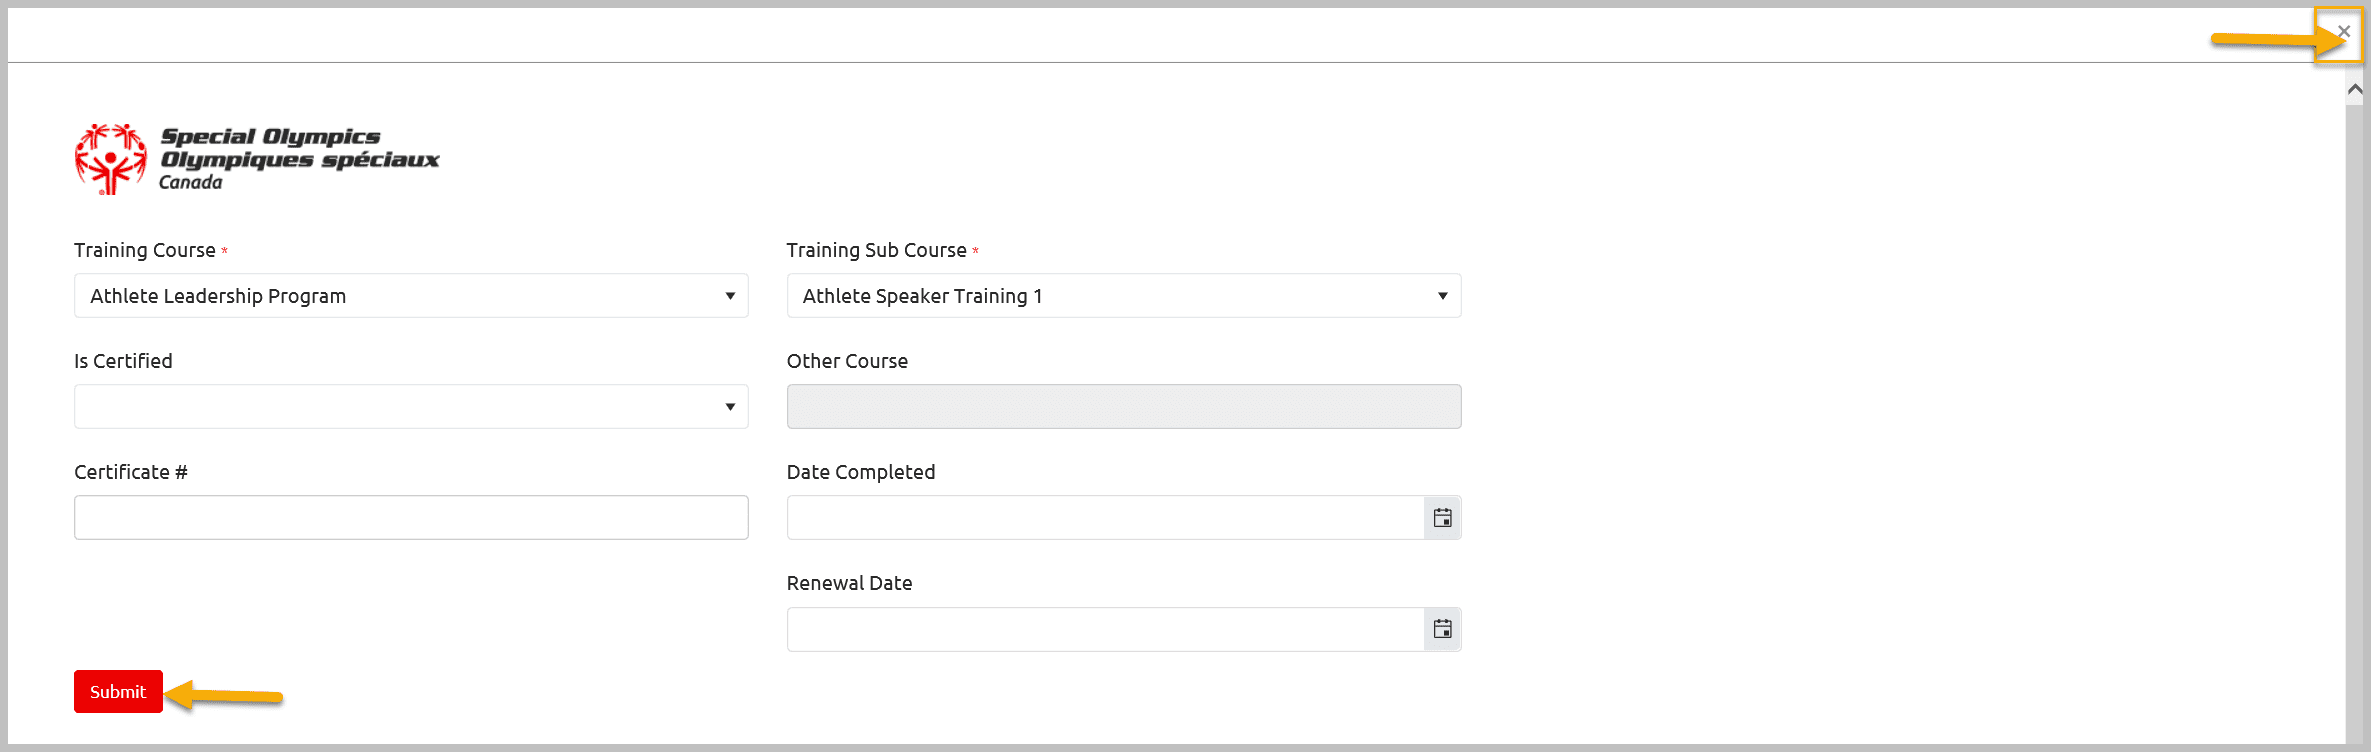
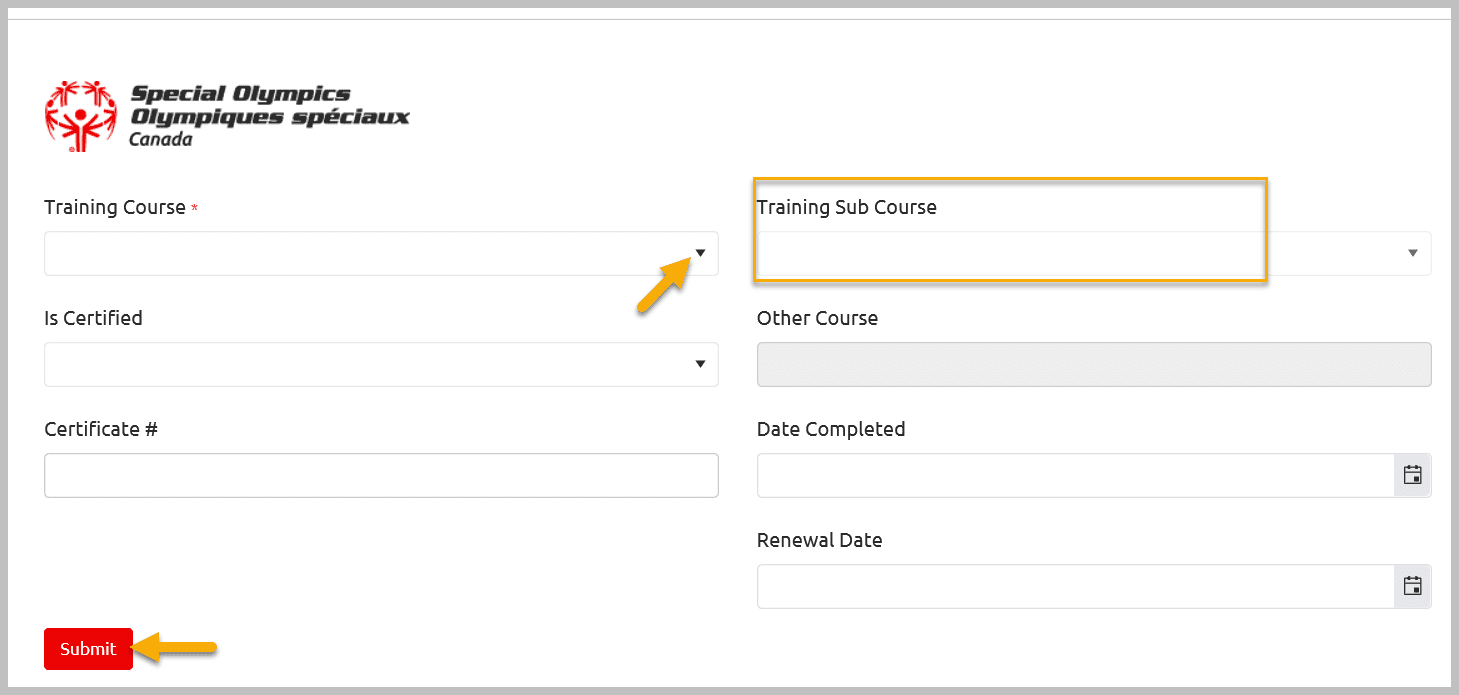
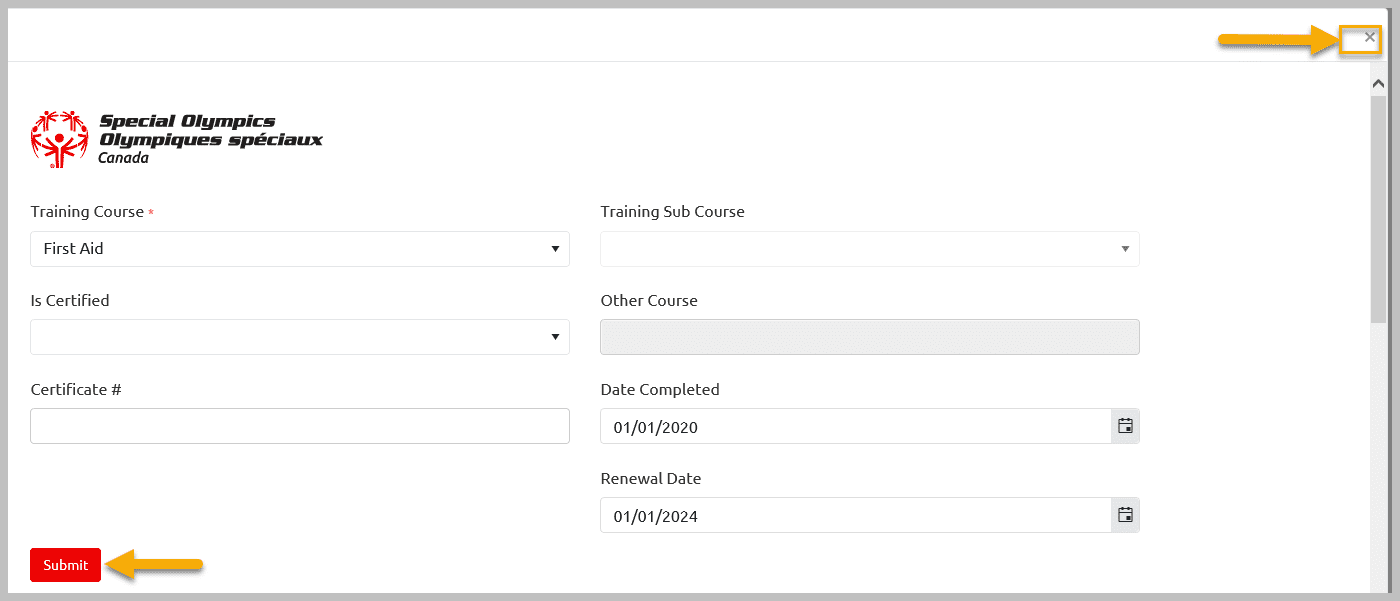
To add new Course information for your athlete, click on Add button provided in Member Training window.
Select Course from Training Course field, some courses have Sub Courses as well. Select Sub Course form Training Sub Course field if any. Fill out other appropriate fields and Submit to save information.
If you do not find the course name in the list, select Other Course from the list, Other Course Field will be enabled to enter course name.
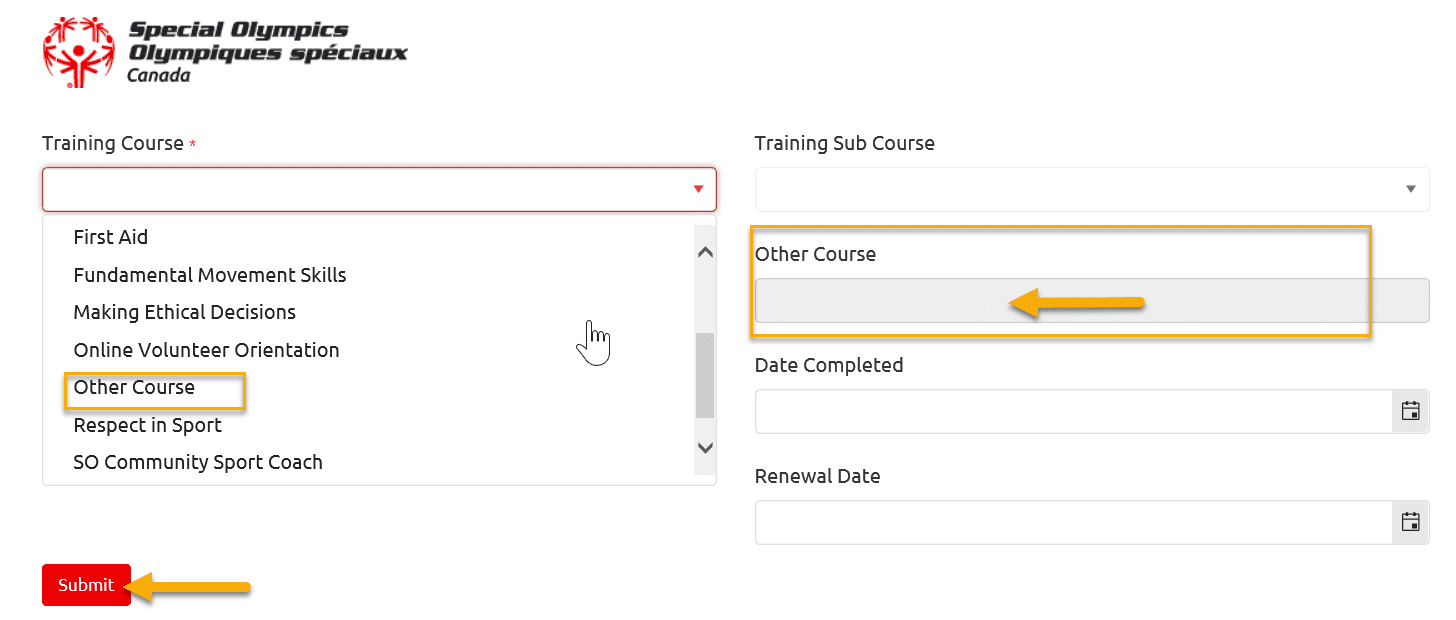
After entering appropriate information in other fields, click Submit to save the changes.
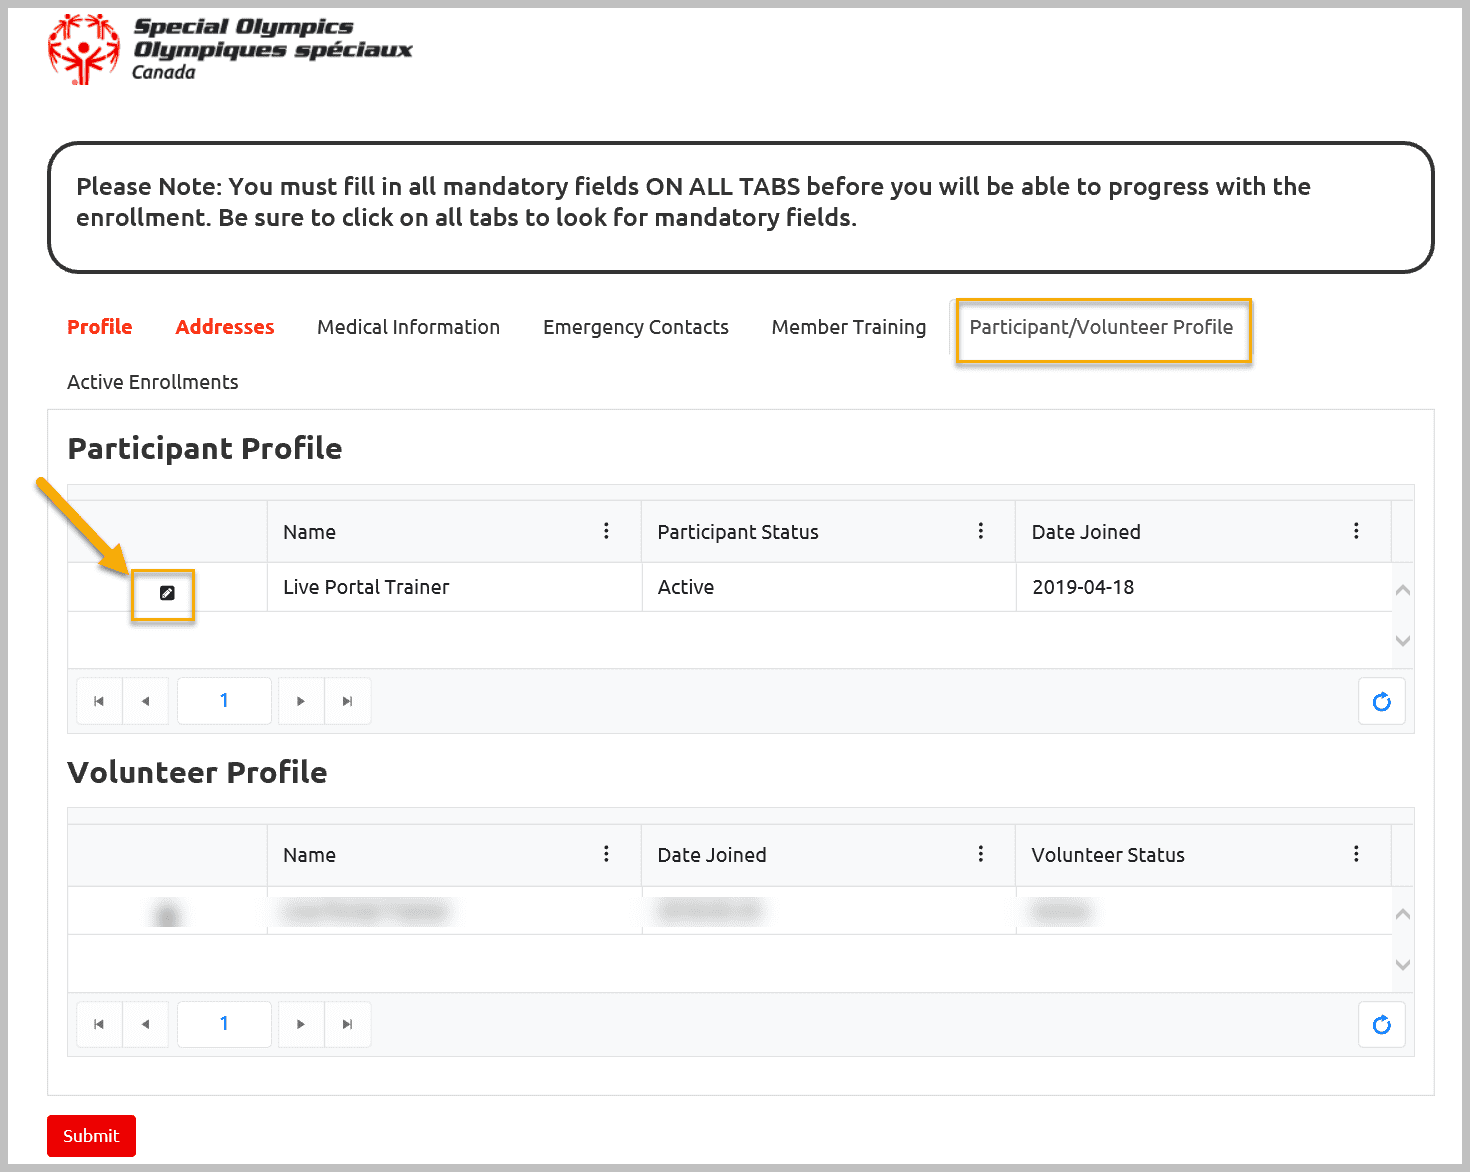
Participant Profile Tab
In Participant/Volunteer Profile screen, you will see your athlete name status and the date athlete joined SOO
To view /update more information, click on the Edit button beside Participant name
The pop up window will provide you information on Date Joined with Special Olympics, Living situation, Notes and special note on Behavior information if any.
You are also able to view Waiver Answers and consent to be photographed option.
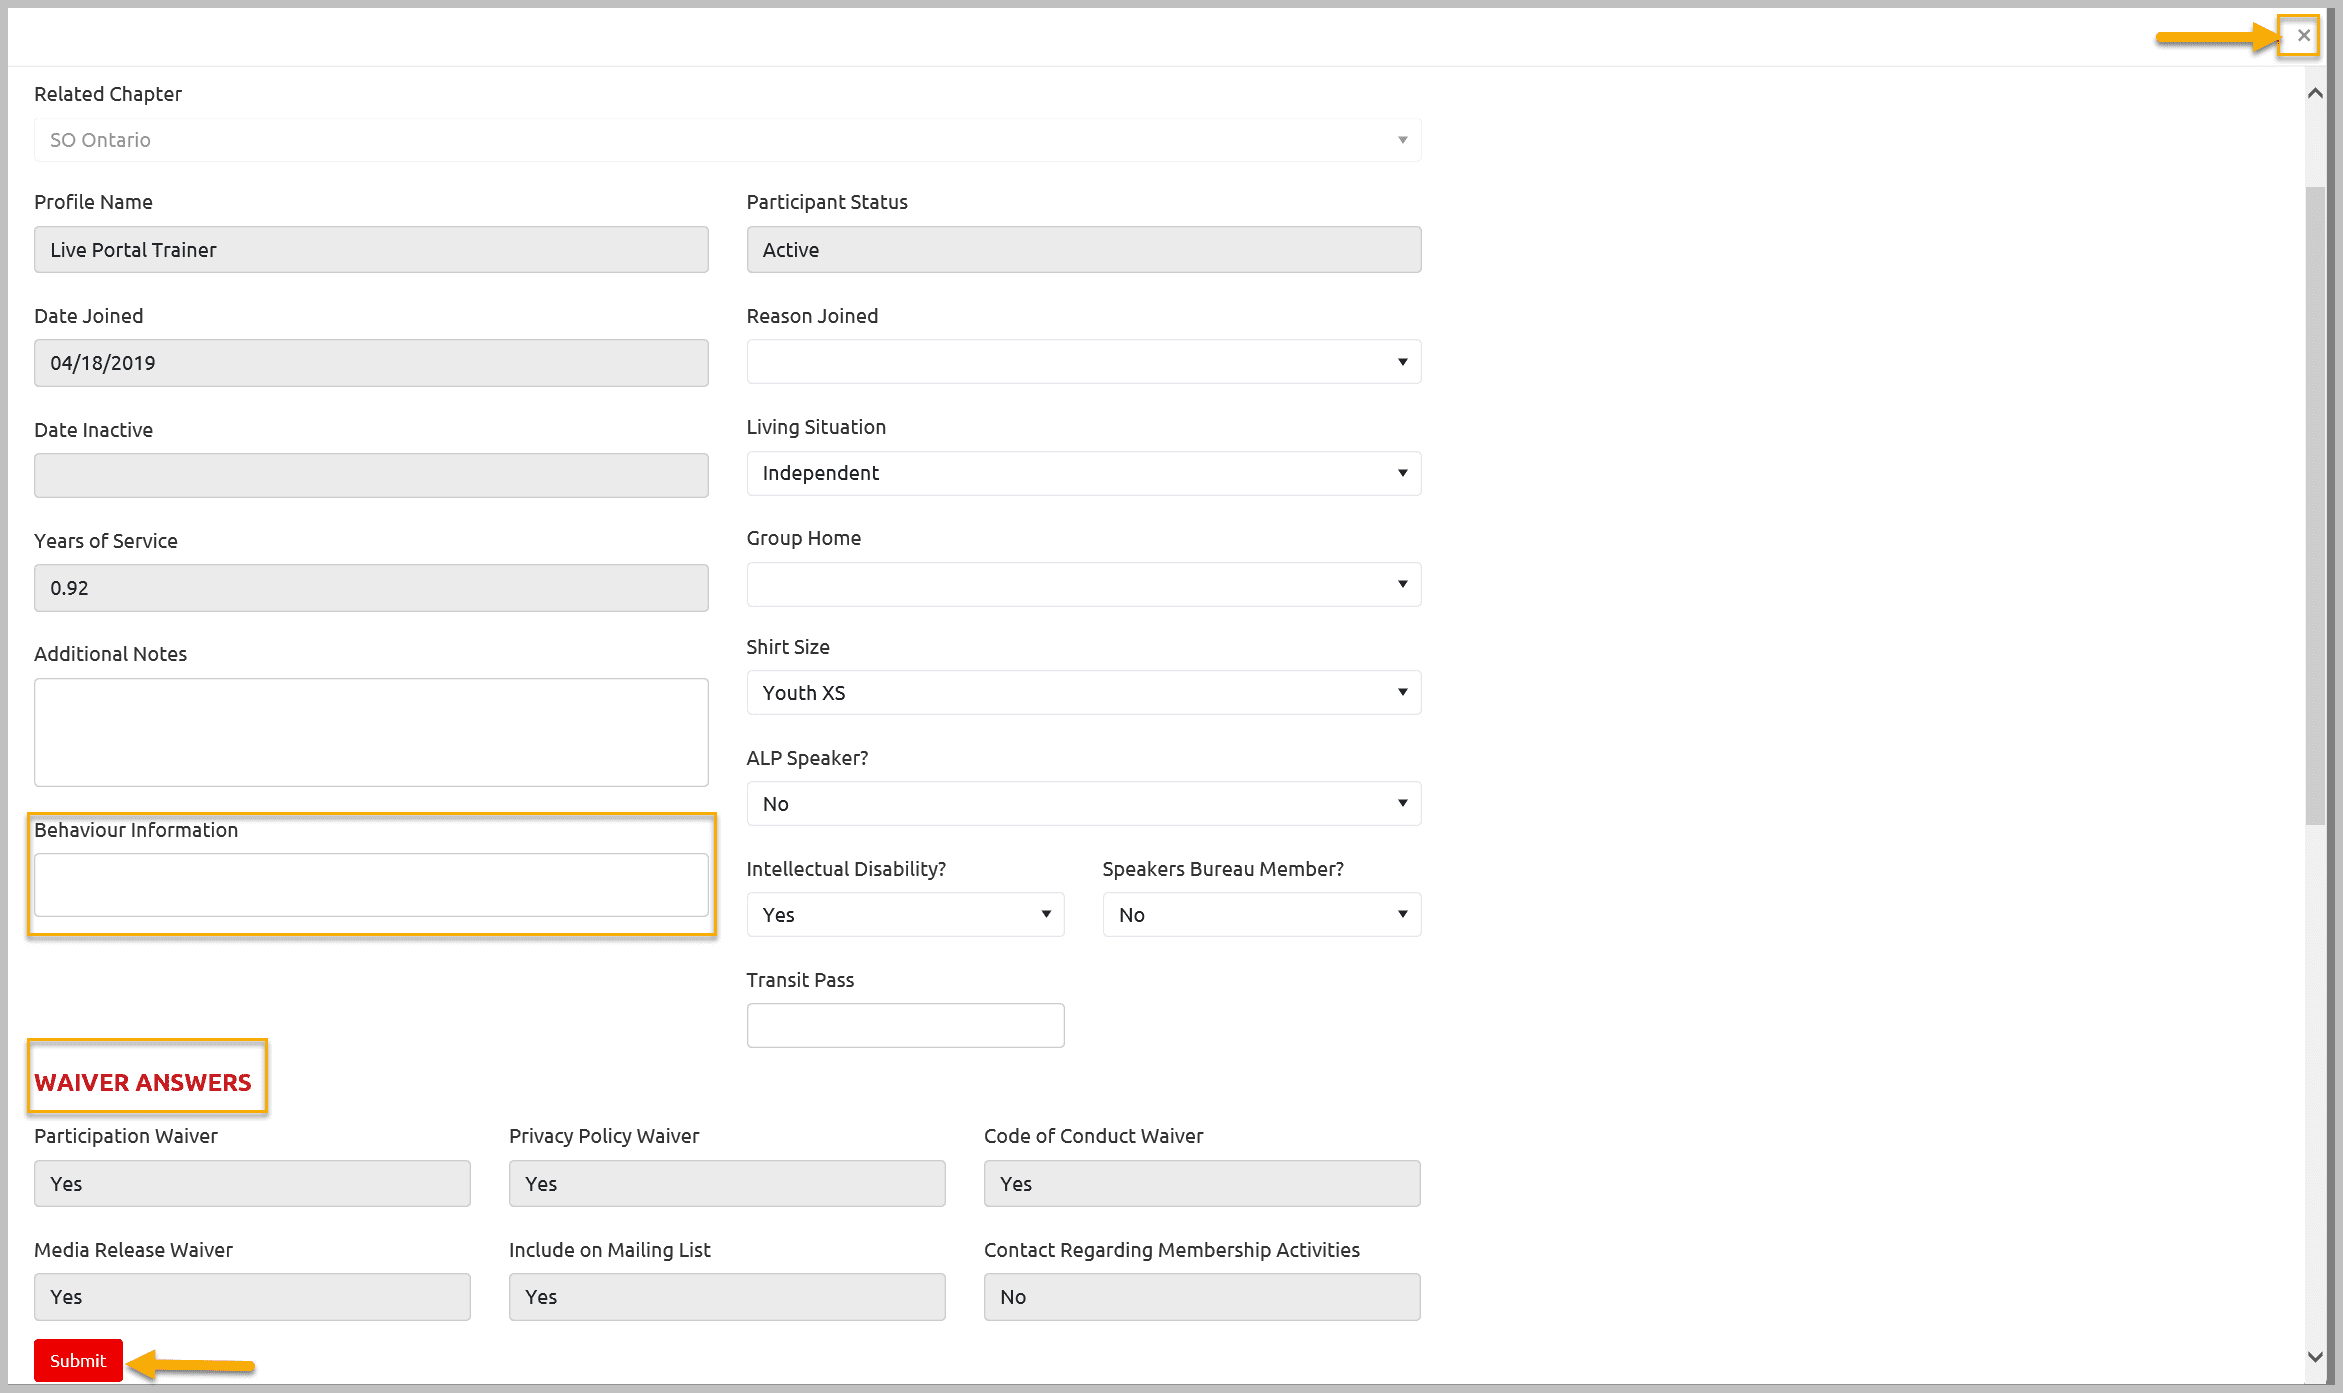
After reviewing this info, close this window by clicking on the X. Click Submit if you have updated any information.
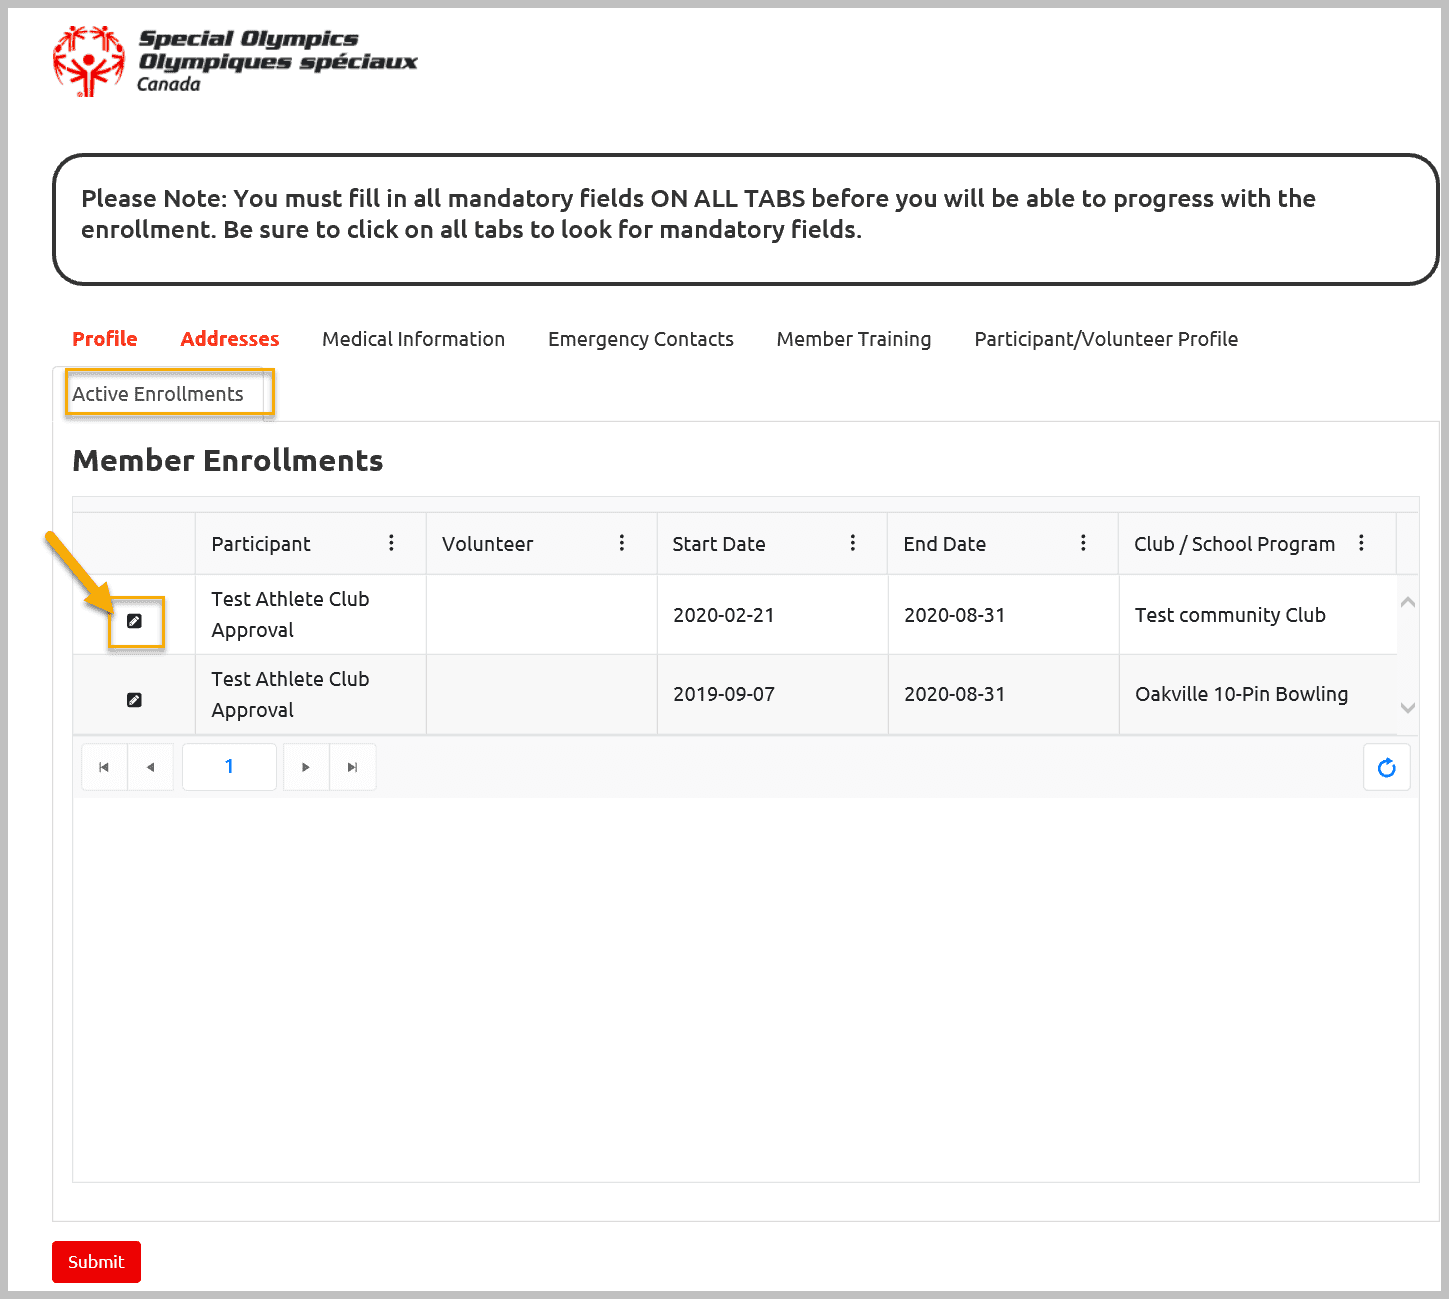
Active Enrollments Tab
Active Enrollment window will provide list of active enrollments with all of the clubs athlete is currently registered with. To view the detail of any enrollment click on the Edit button beside the name of Athlete.
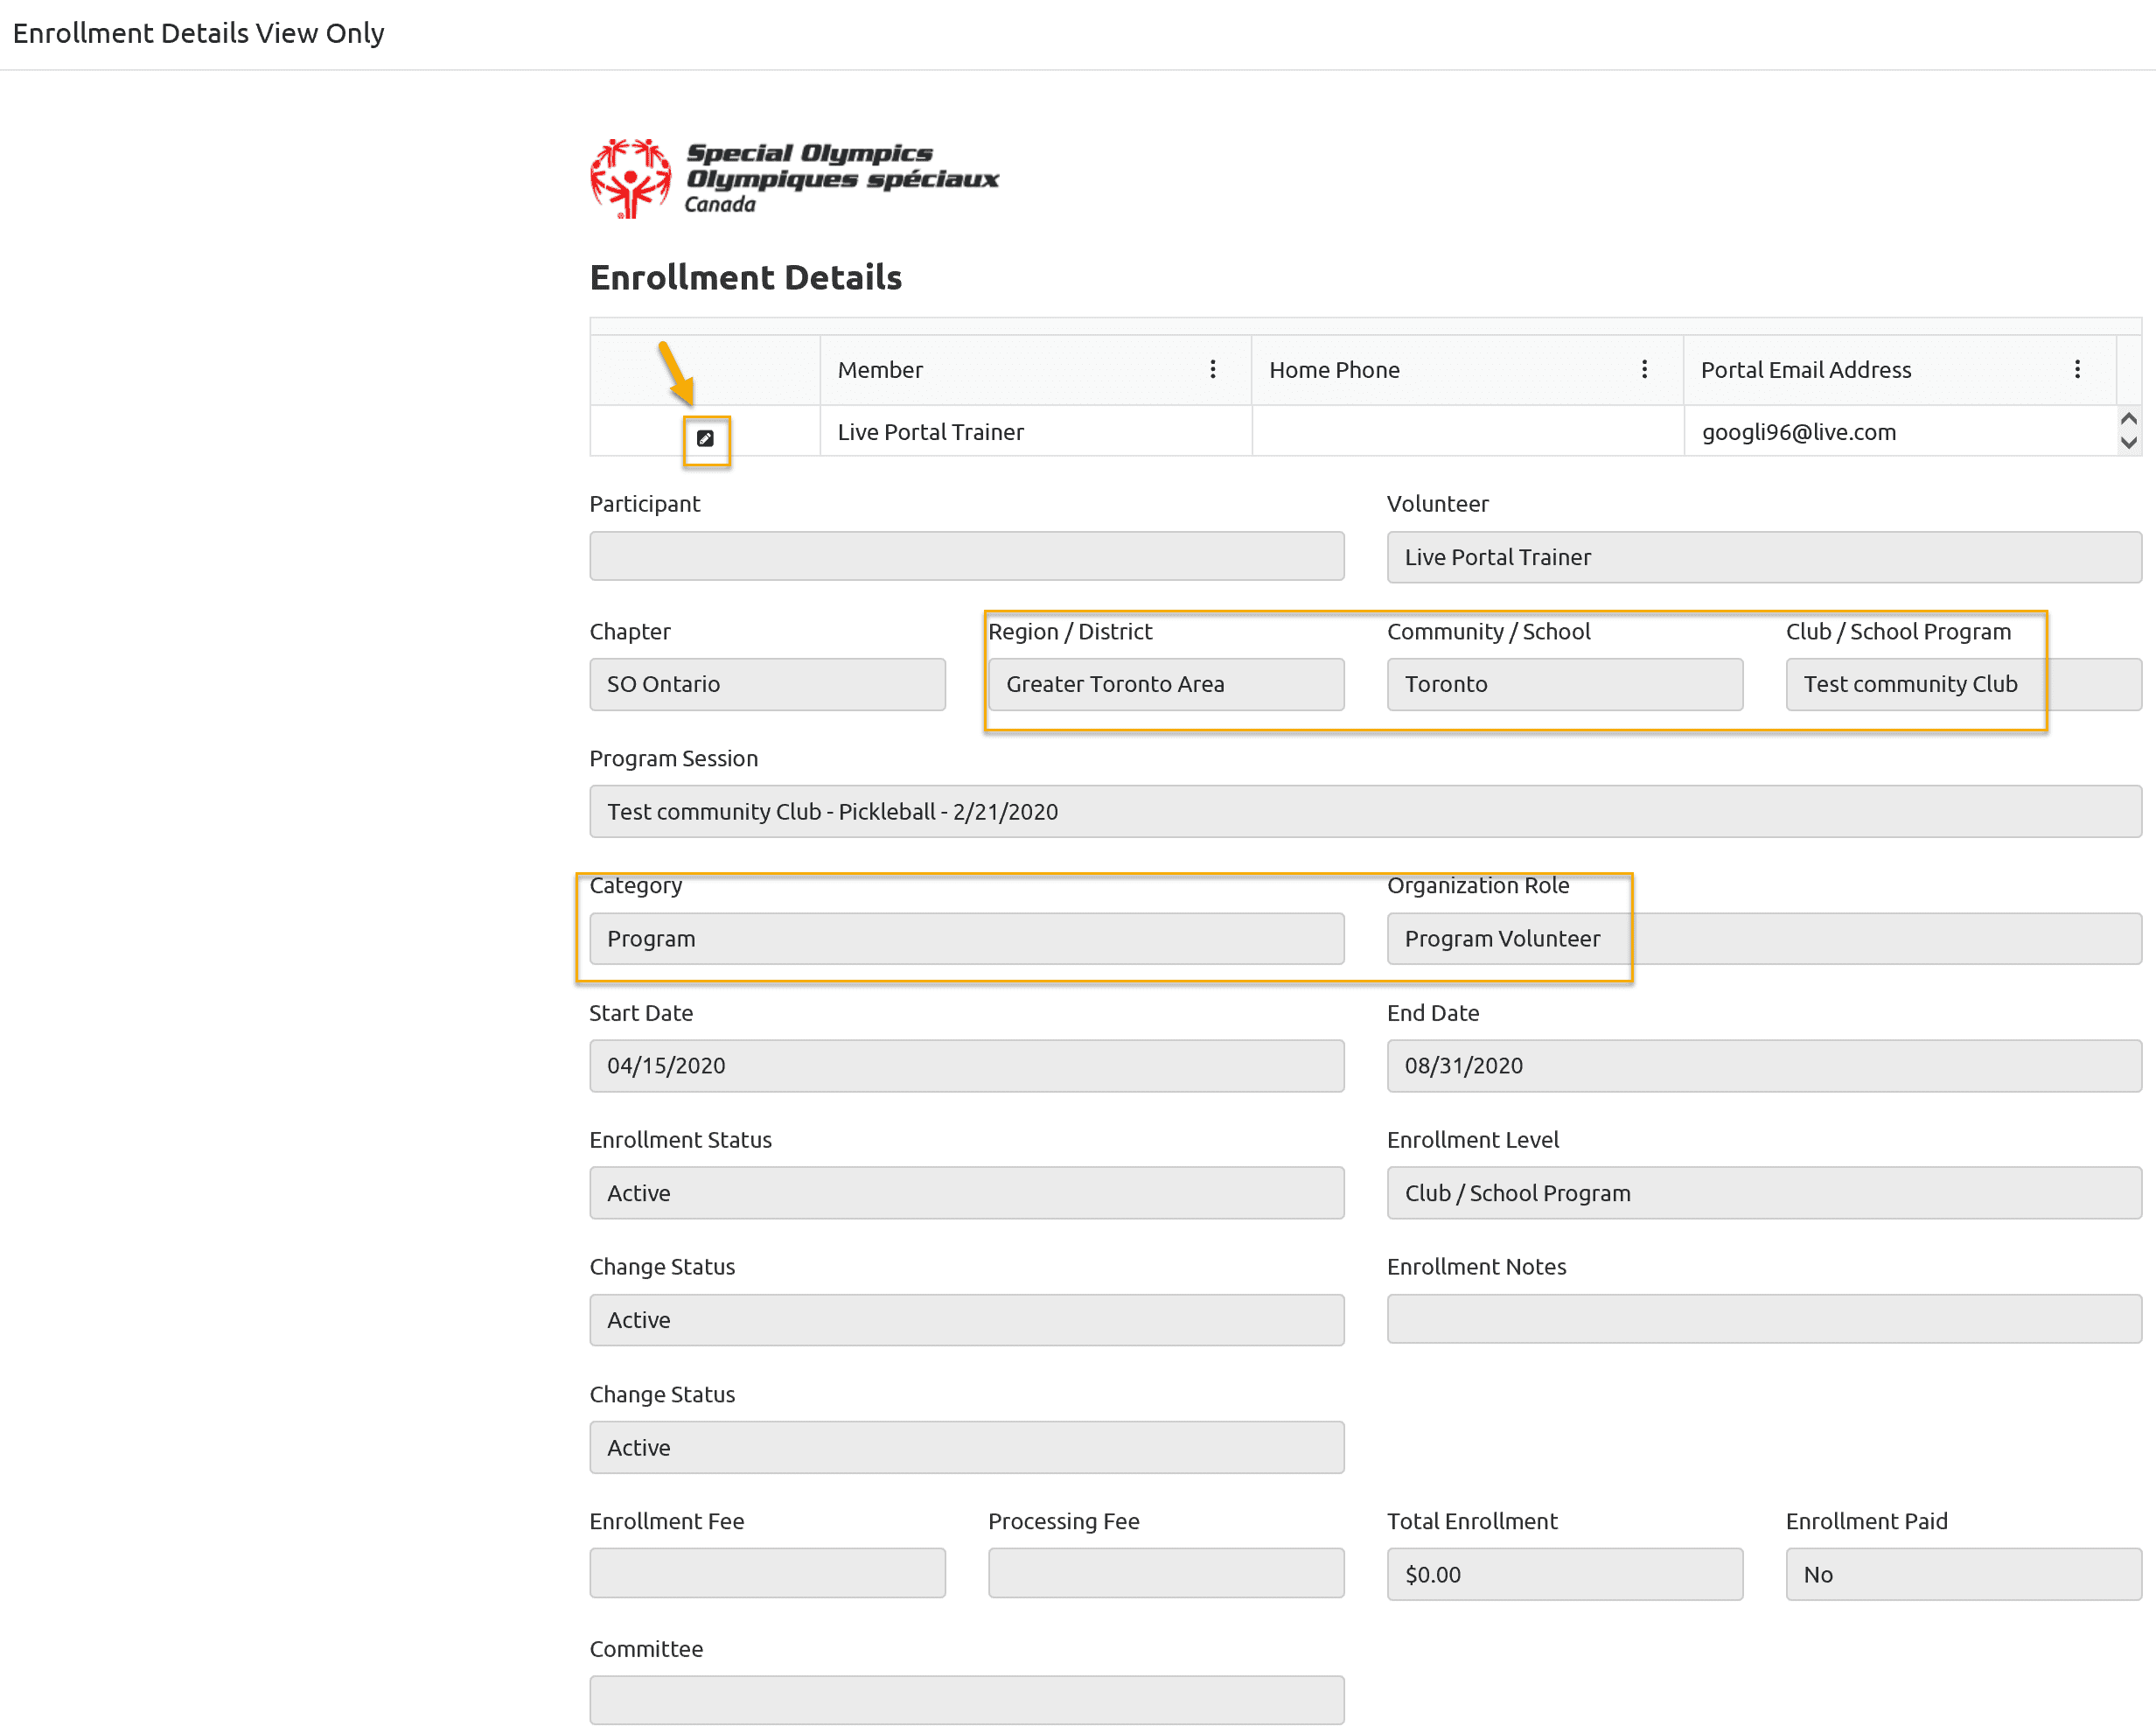
You can only view details of enrollment like Club name, Sport, enrollment Start and End date. After viewing information exit by clicking X at the right corner of the window.
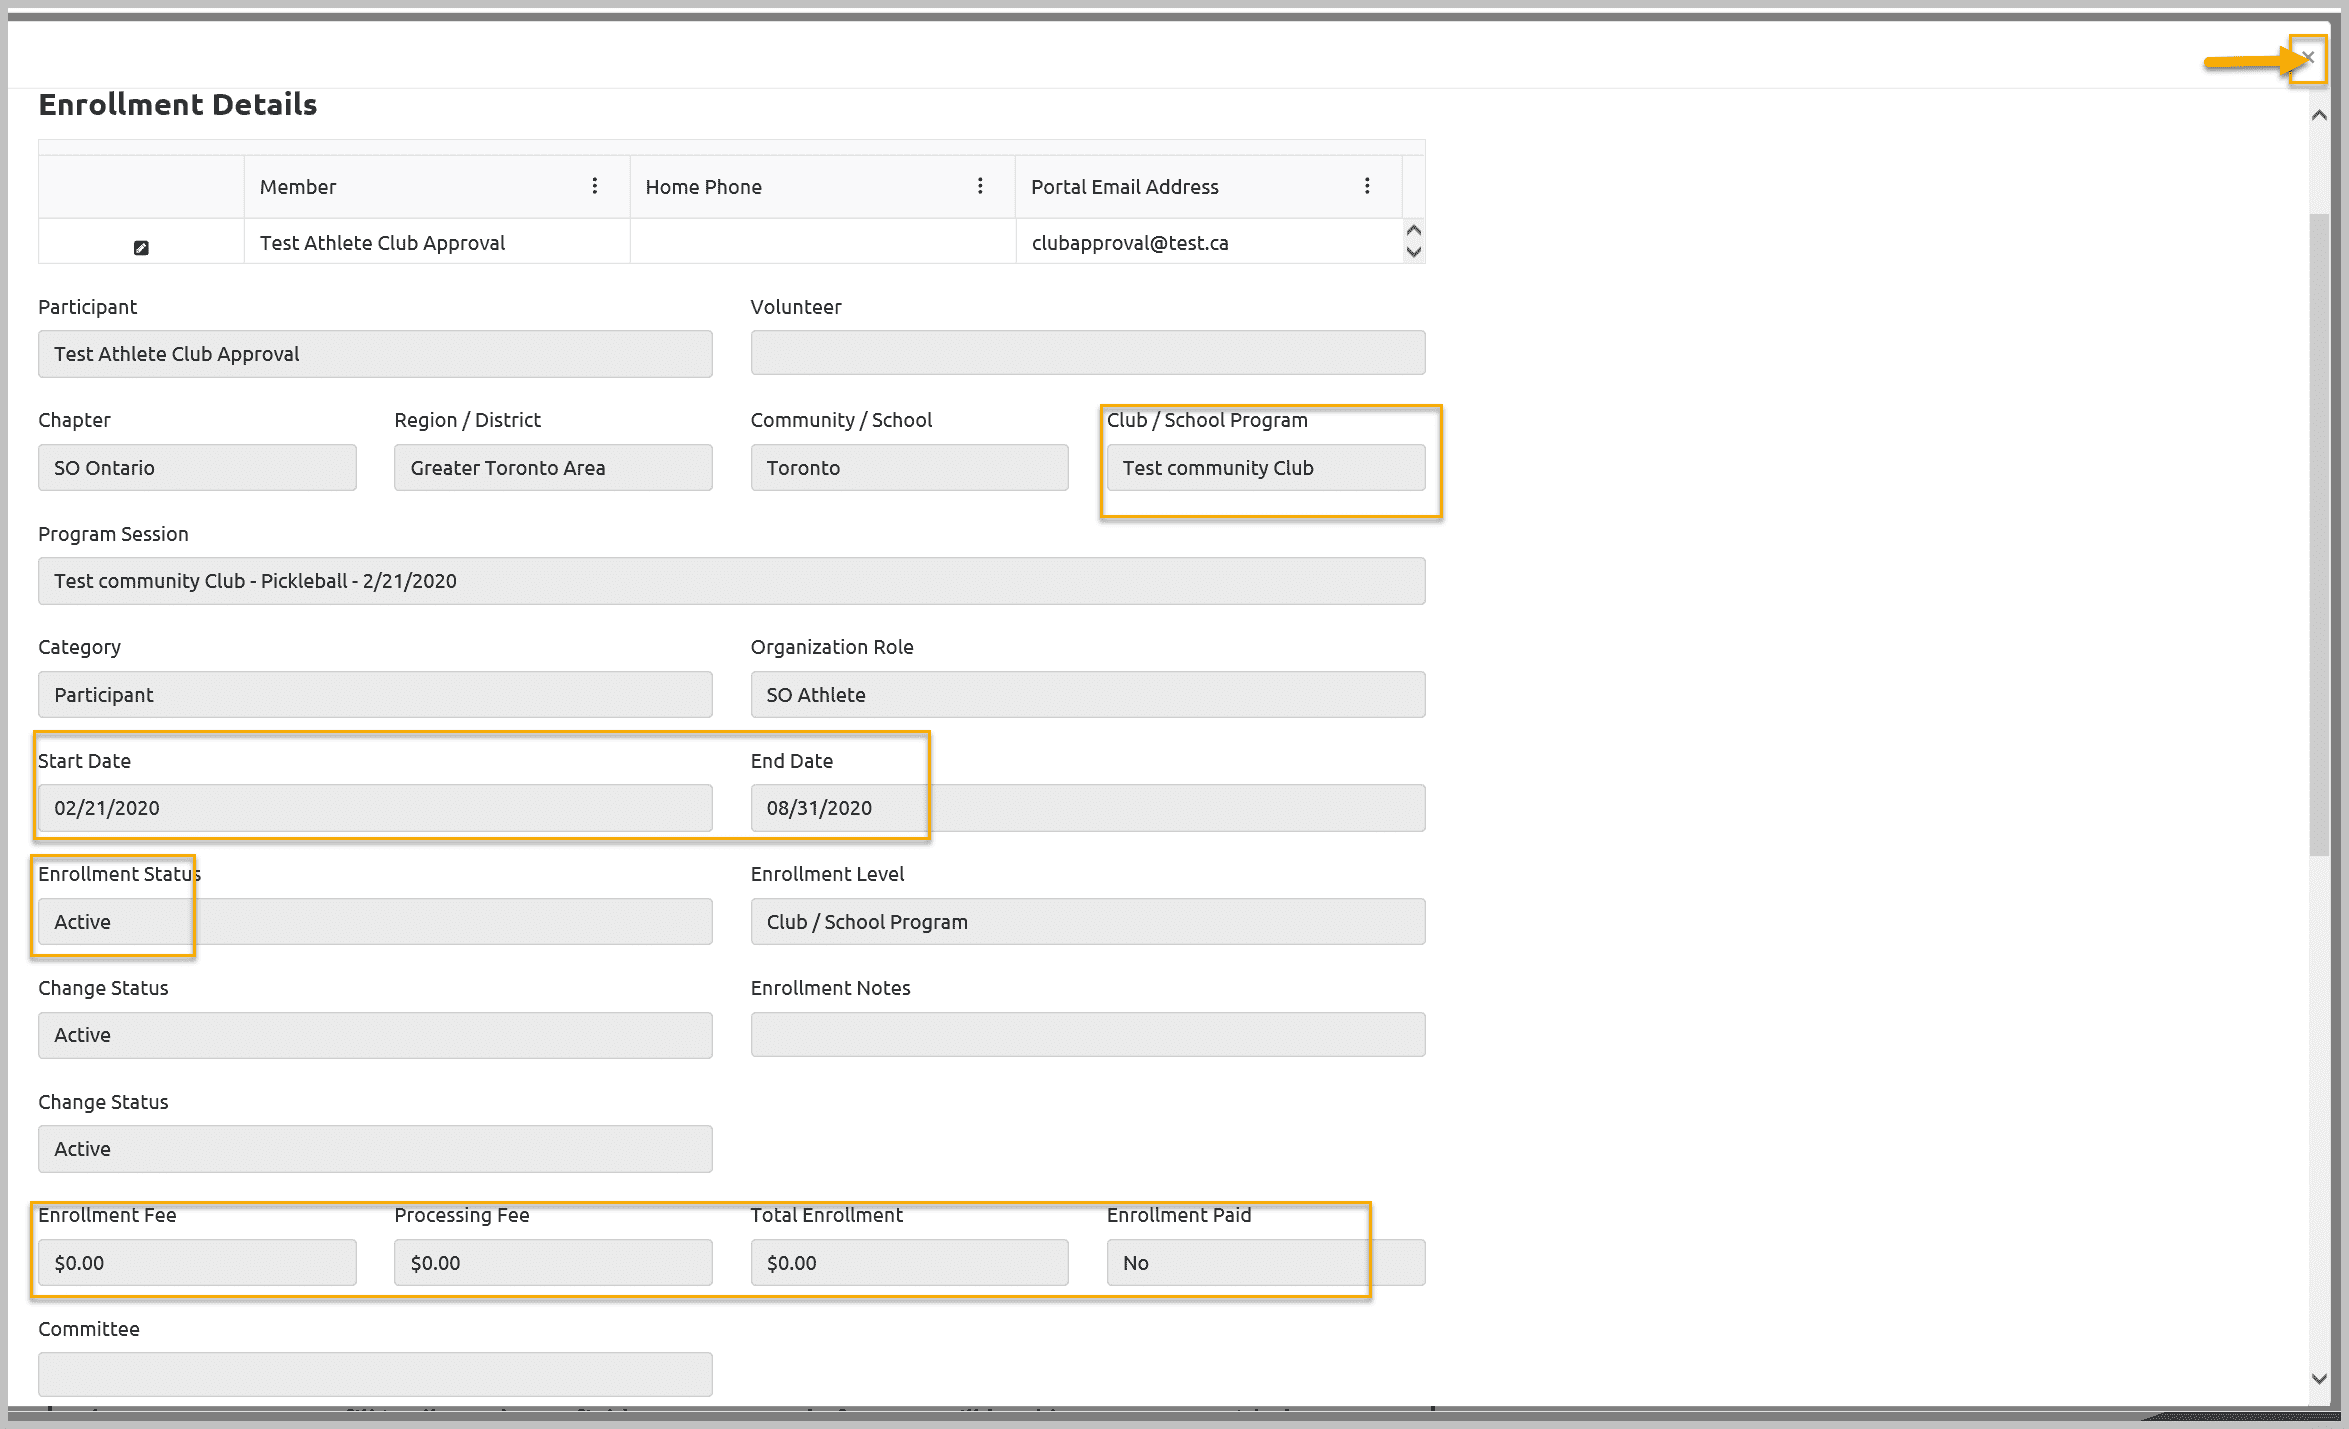
To exit from selected Participant profile info and to select another participant, click on X at top right corner of the window. You will be on the Active Participants list window.
2. View /Update Your Volunteers
Select Active Volunteers button from the menu to view list of volunteers registered with your club.
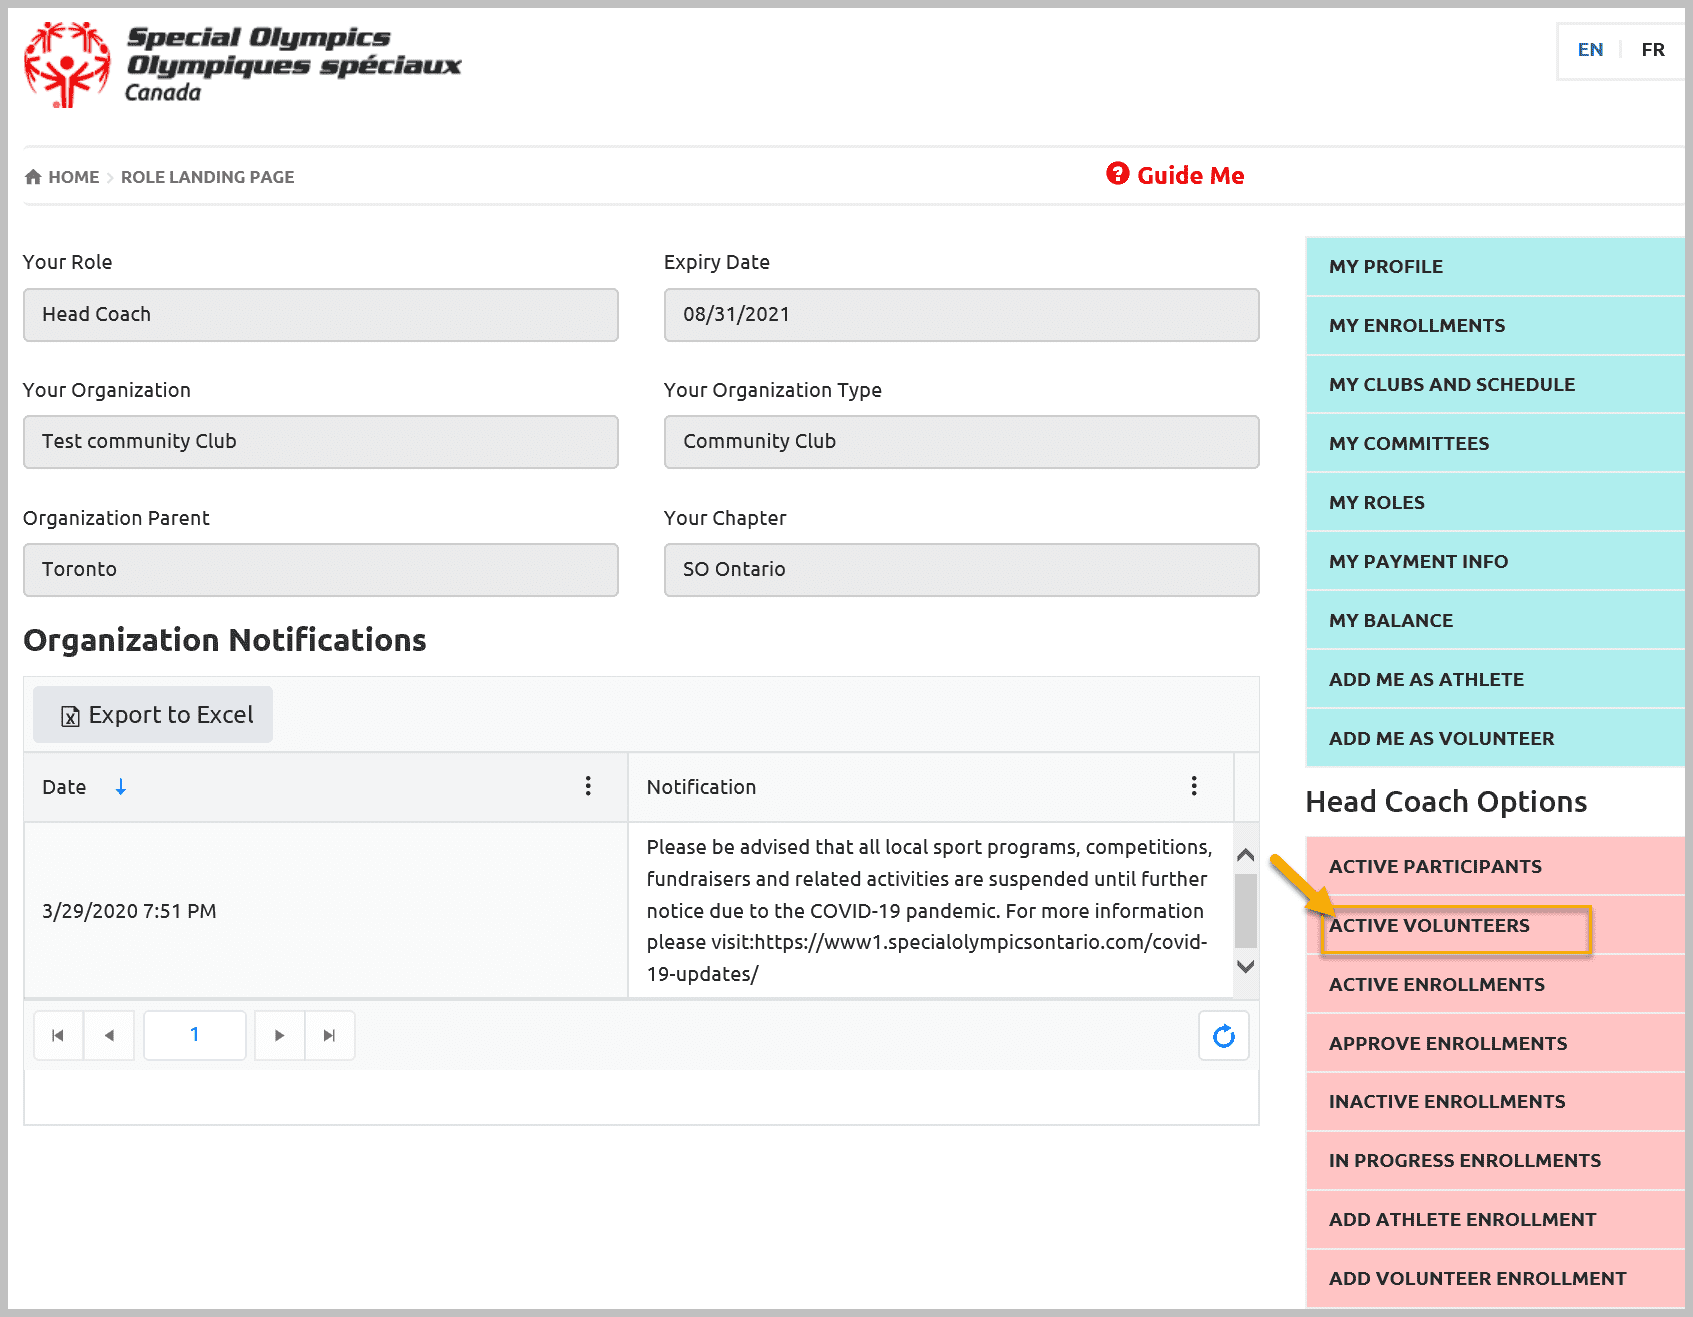
Active Volunteers Window will provide you list of your Volunteers. To view the detailed profile of a volunteer click on the Edit button beside the name of the volunteer.
You can export list of volunteers by using Export to Excel button provided at the top of the window.

Volunteer Profile detail window with multiple tabs at the top will pop up. Select the one you wish to view/Update information
Volunteer Profile Tab
In the Profile tab, Member Unique ID, First Name, Last Name and Portal Email Address are read only fields. You can edit all other fields if need to be. After updates click Submit to save the changes.
If you are only viewing the information and have not updated any information, you can move to another tab without clicking the Submit button.
Volunteer Address Tab
In address tab, you can enter Primary & Secondary addresses. Review/update this info and then move to next tab Medical Info
Note: Primary Address is mandatory
Volunteer Medical Information Tab
Medical Information tab will provide you volunteers’s medical info, which may be helpful during practice or competition like Medical Condition, Allergies, Dietary Restriction, Health Devices, Doctor’s Name & Phone number.
You can upload any medical form (medical history /medicine chart etc.) by clicking on Add in Medical Forms section. You can also add any Medical condition / Disability information as well.
After Review /Update medical information, move to the next tab Emergency Contacts. Don’t forget to Submit if you have updated any information.
Volunteer Emergency Contacts Tab
Review/update Volunteer’s emergency contact info. To review detailed information for already registered emergency contact, click on Edit button beside the name of EC.
A window with full detail will pop up. After reviewing EC info, click X to exit this window. If you have edited any information click Submit to save the changes.
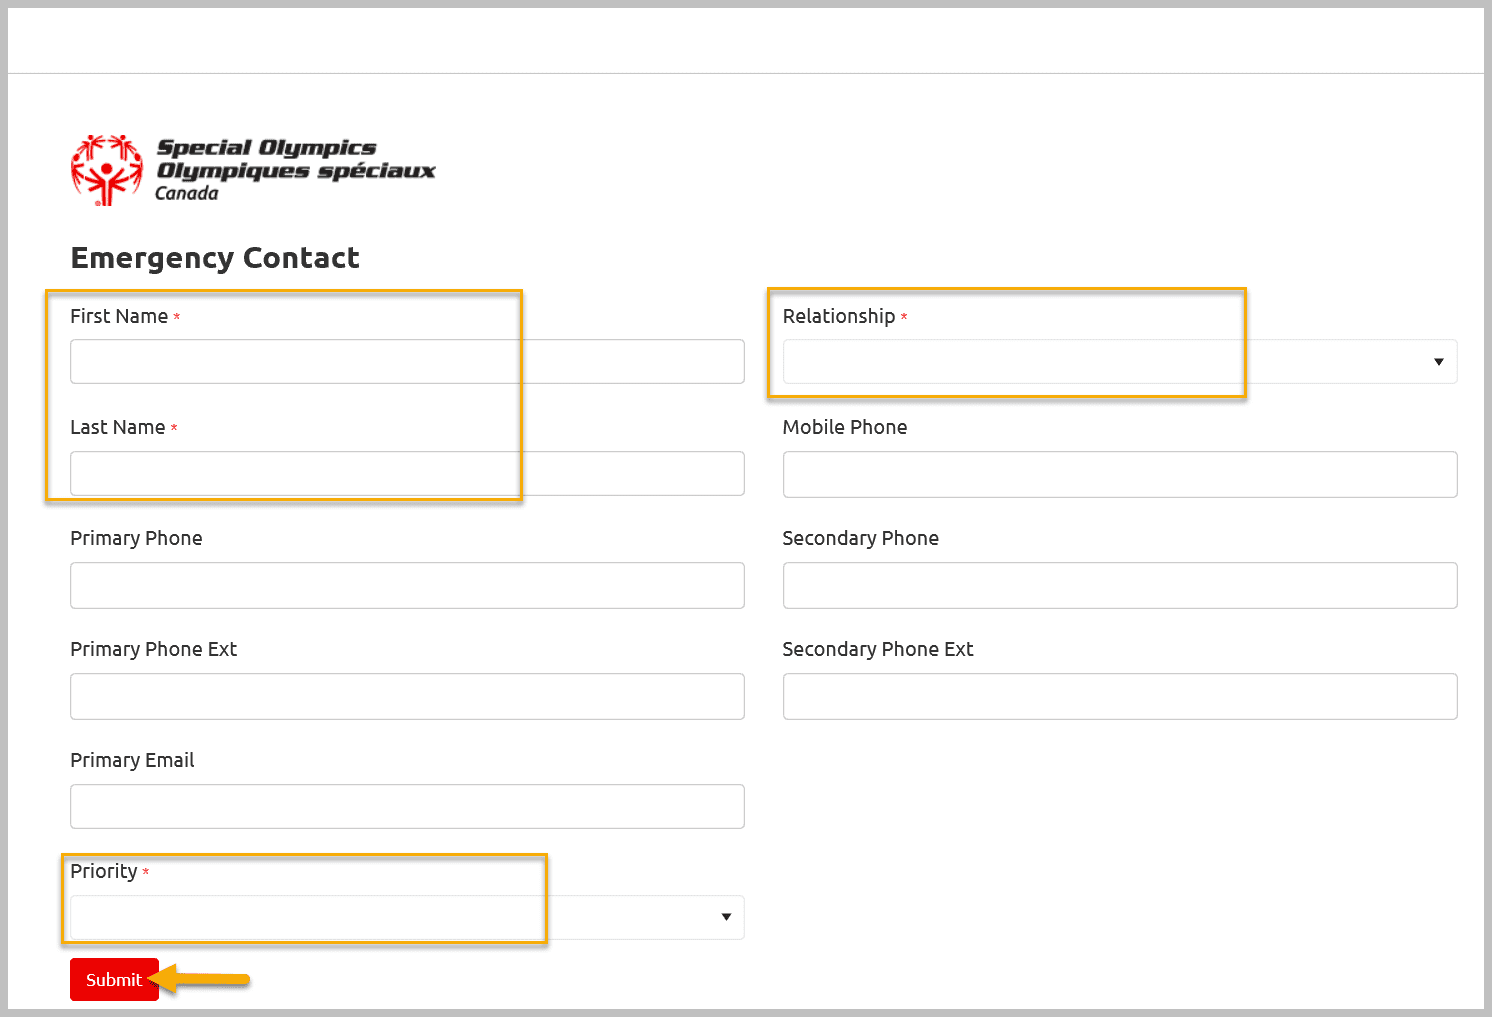
You can add new Emergency Contact by clicking on Add button provided in Emergency Contacts Window. A new window will pop up. Fill out all Mandatory Fields and other appropriate information and Submit to save the the information. After review/update move to next tab Member Training
Note: First & Last Name, Relationship and Priority fields are mandatory.
Volunteer Member Training Tab
View/update Training Information if volunteer has completed and recorded. To view detail of it click Edit button beside the Course name.
A window with detail information will pop up. After reviewing this info, click X to close this window.
To add new Course information for your athlete, click on Add button provided in Member Training window.
Select Course from Training Course field, some courses have Sub Courses as well. Select Sub Course form Training Sub Course field if any. Fill out other appropriate fields and Submit to save information.
If you do not find the course name in the list, select Other Course from the list, Other Course Field will be enabled to enter course name.
After entering appropriate information in other fields, click Submit to save the changes.
Volunteer Profile Tab
In Participant/Volunteer Profile window you will see: your volunteer name, status and the date Volunteer joined SOO
To view /update more information, click on the Edit button beside volunteer name.

Volunteer Profile detail window will provide you volunteer name, date joined with SOO, Years of Service NCCP number and other details including Reference names if provided.
You can view Waiver Answers of volunteer and consent to be photographed option.
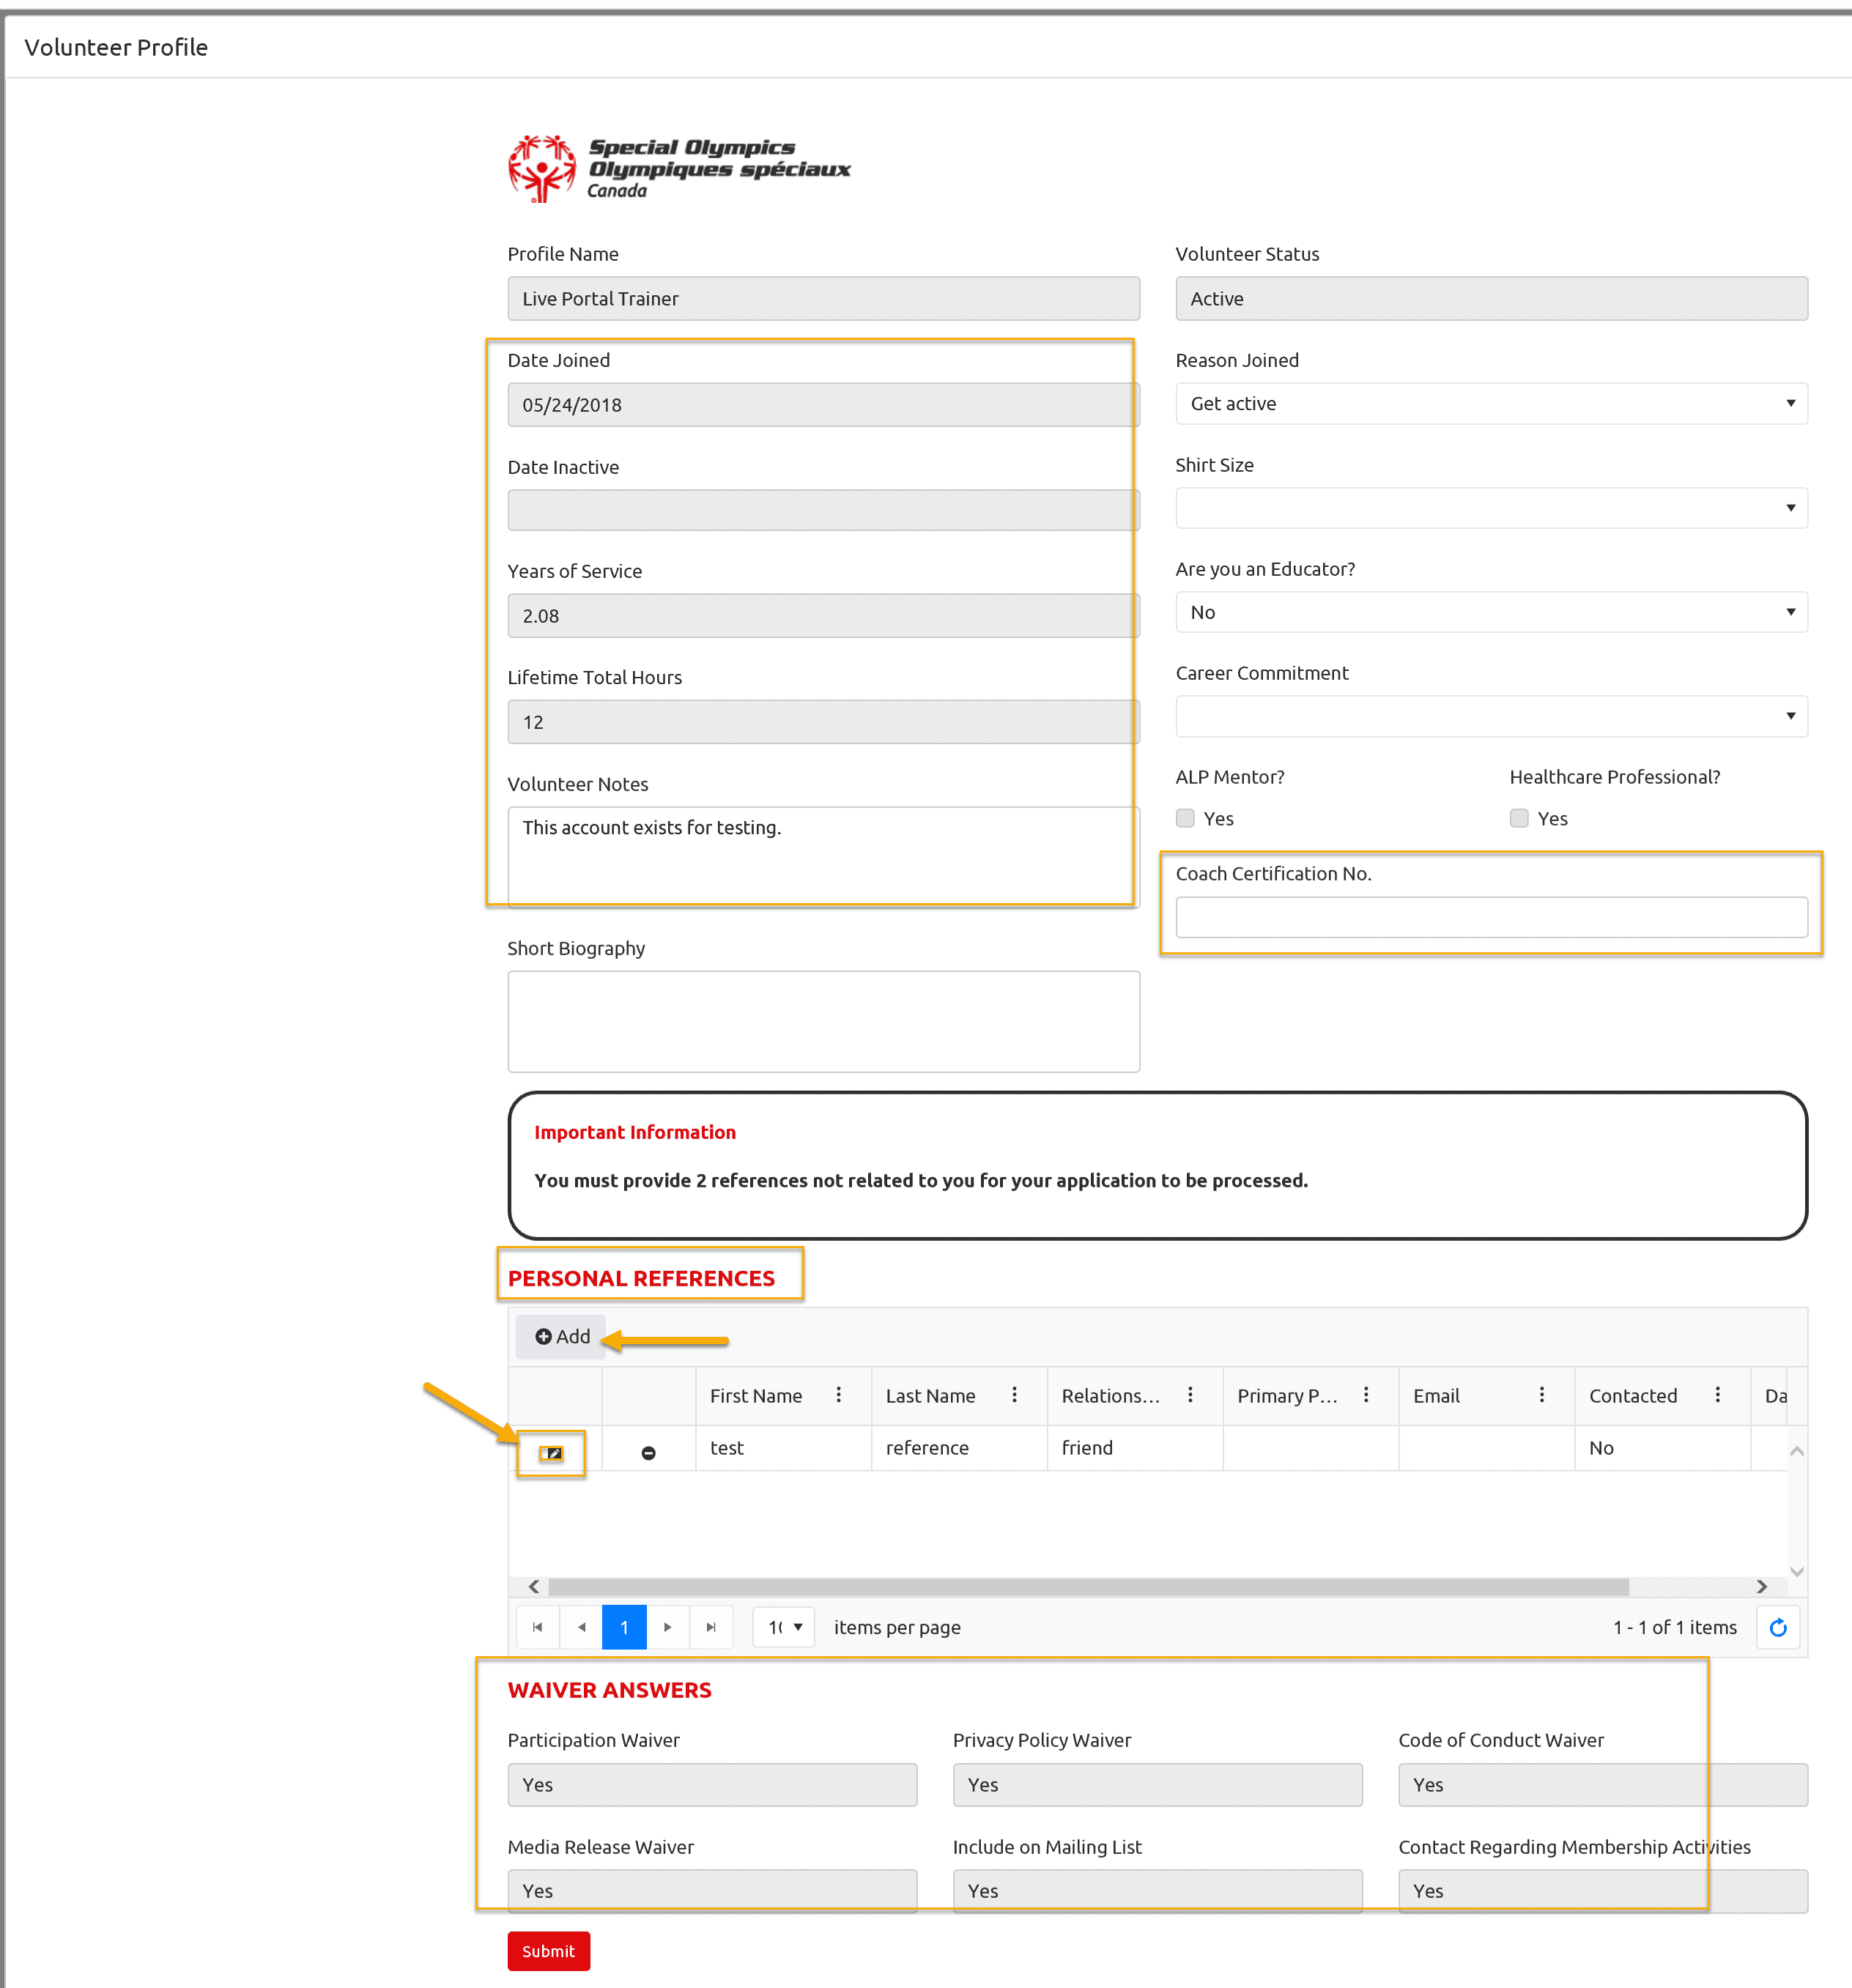
Reference Check – Community Endorsement
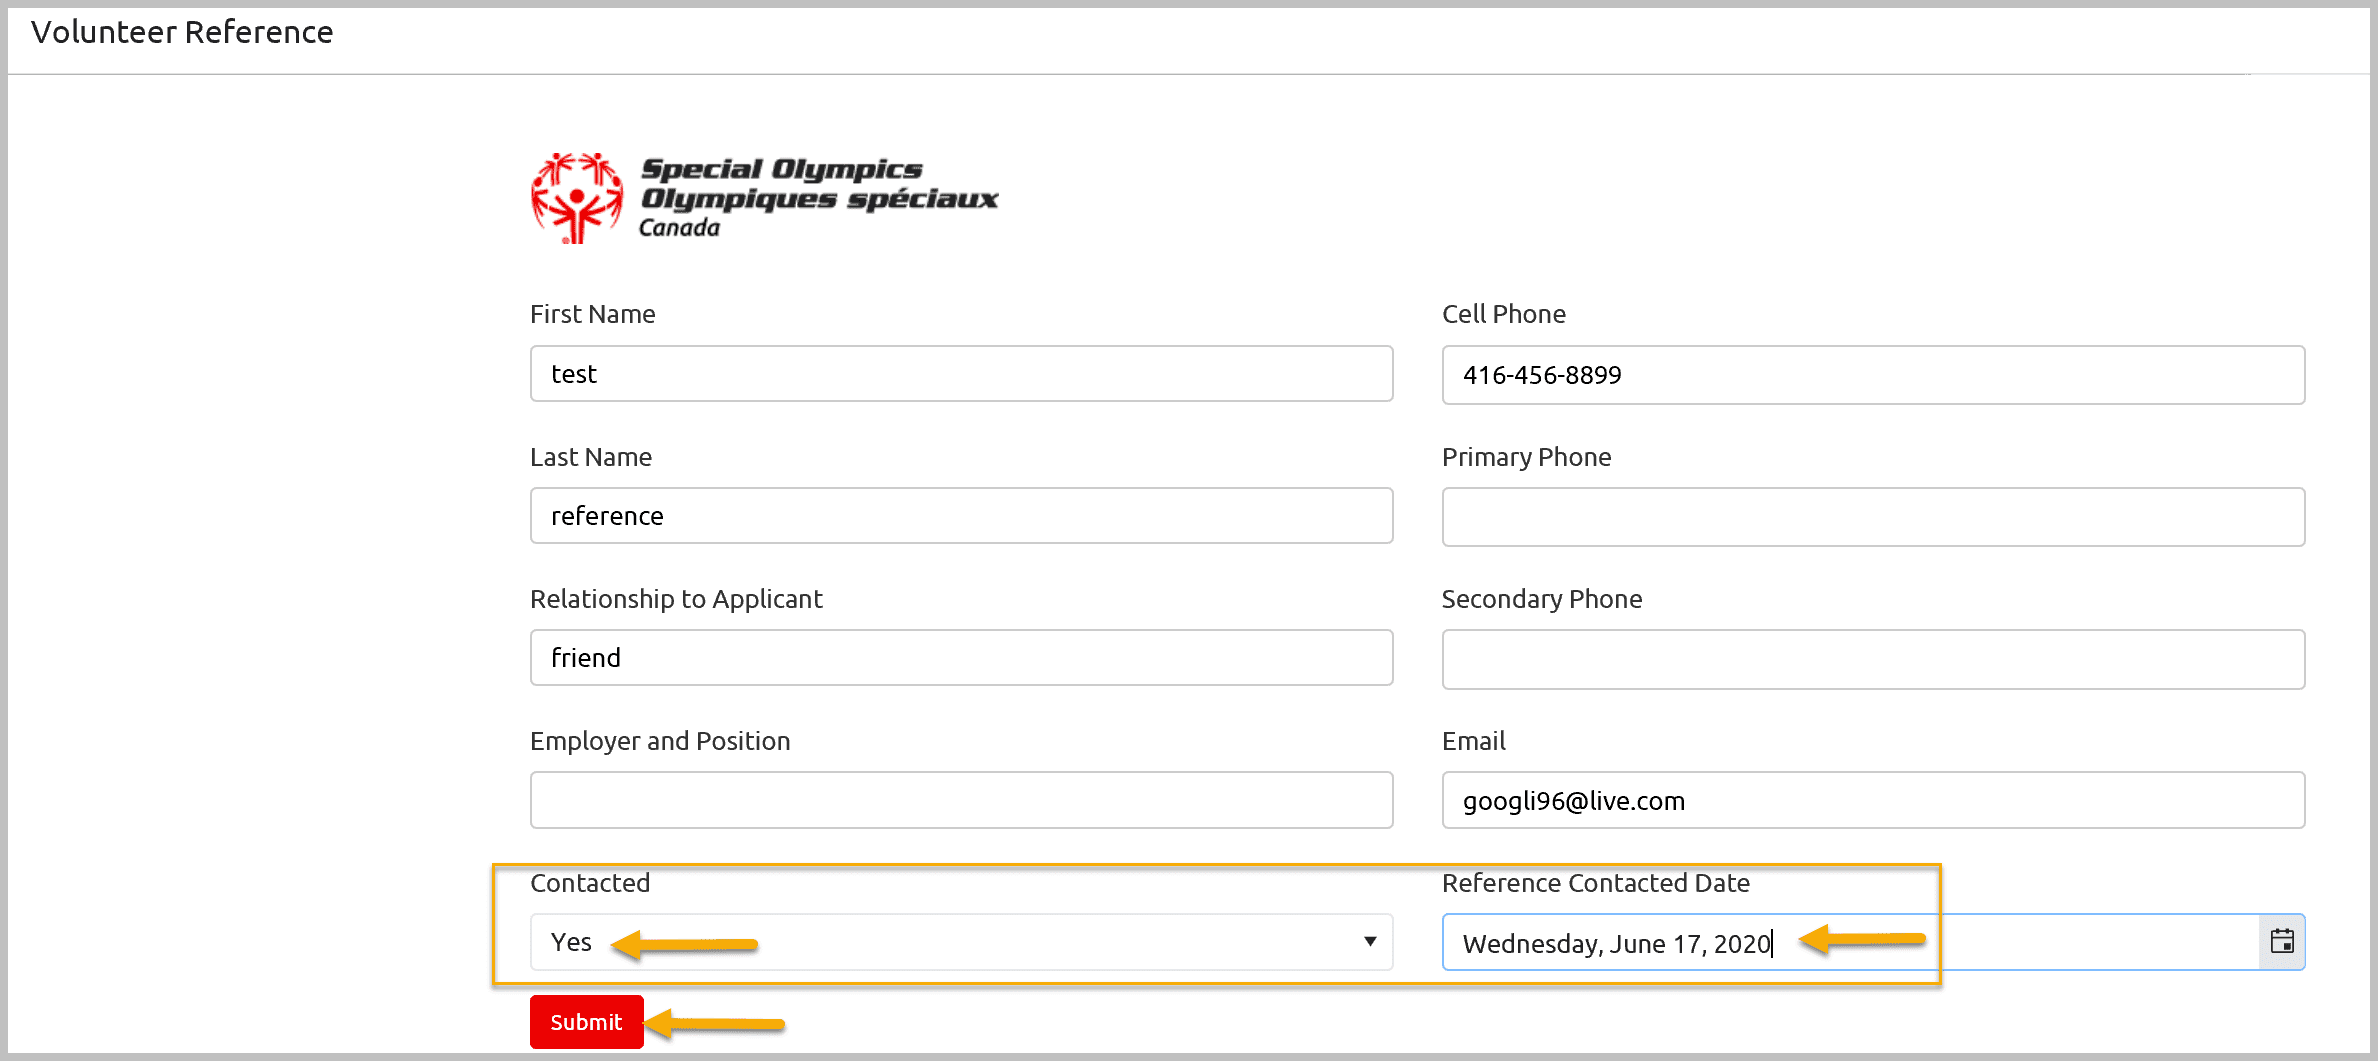
To view / contact references, click on Edit button beside reference name. Volunteer Reference screen will provide you name and contact information of the reference for your volunteer. Contact the reference by Phone or by using https://www1.specialolympicsontario.com/get-involved/become-a-volunteer/volunteer-reference-check-form/ form. Once you get satisfactory response from references, add this information in the following window by selecting Yes from Contacted field & add the date when reference was successfully contacted in Reference Contacted Date field. Clicking Submit to save the information.
Add New Reference
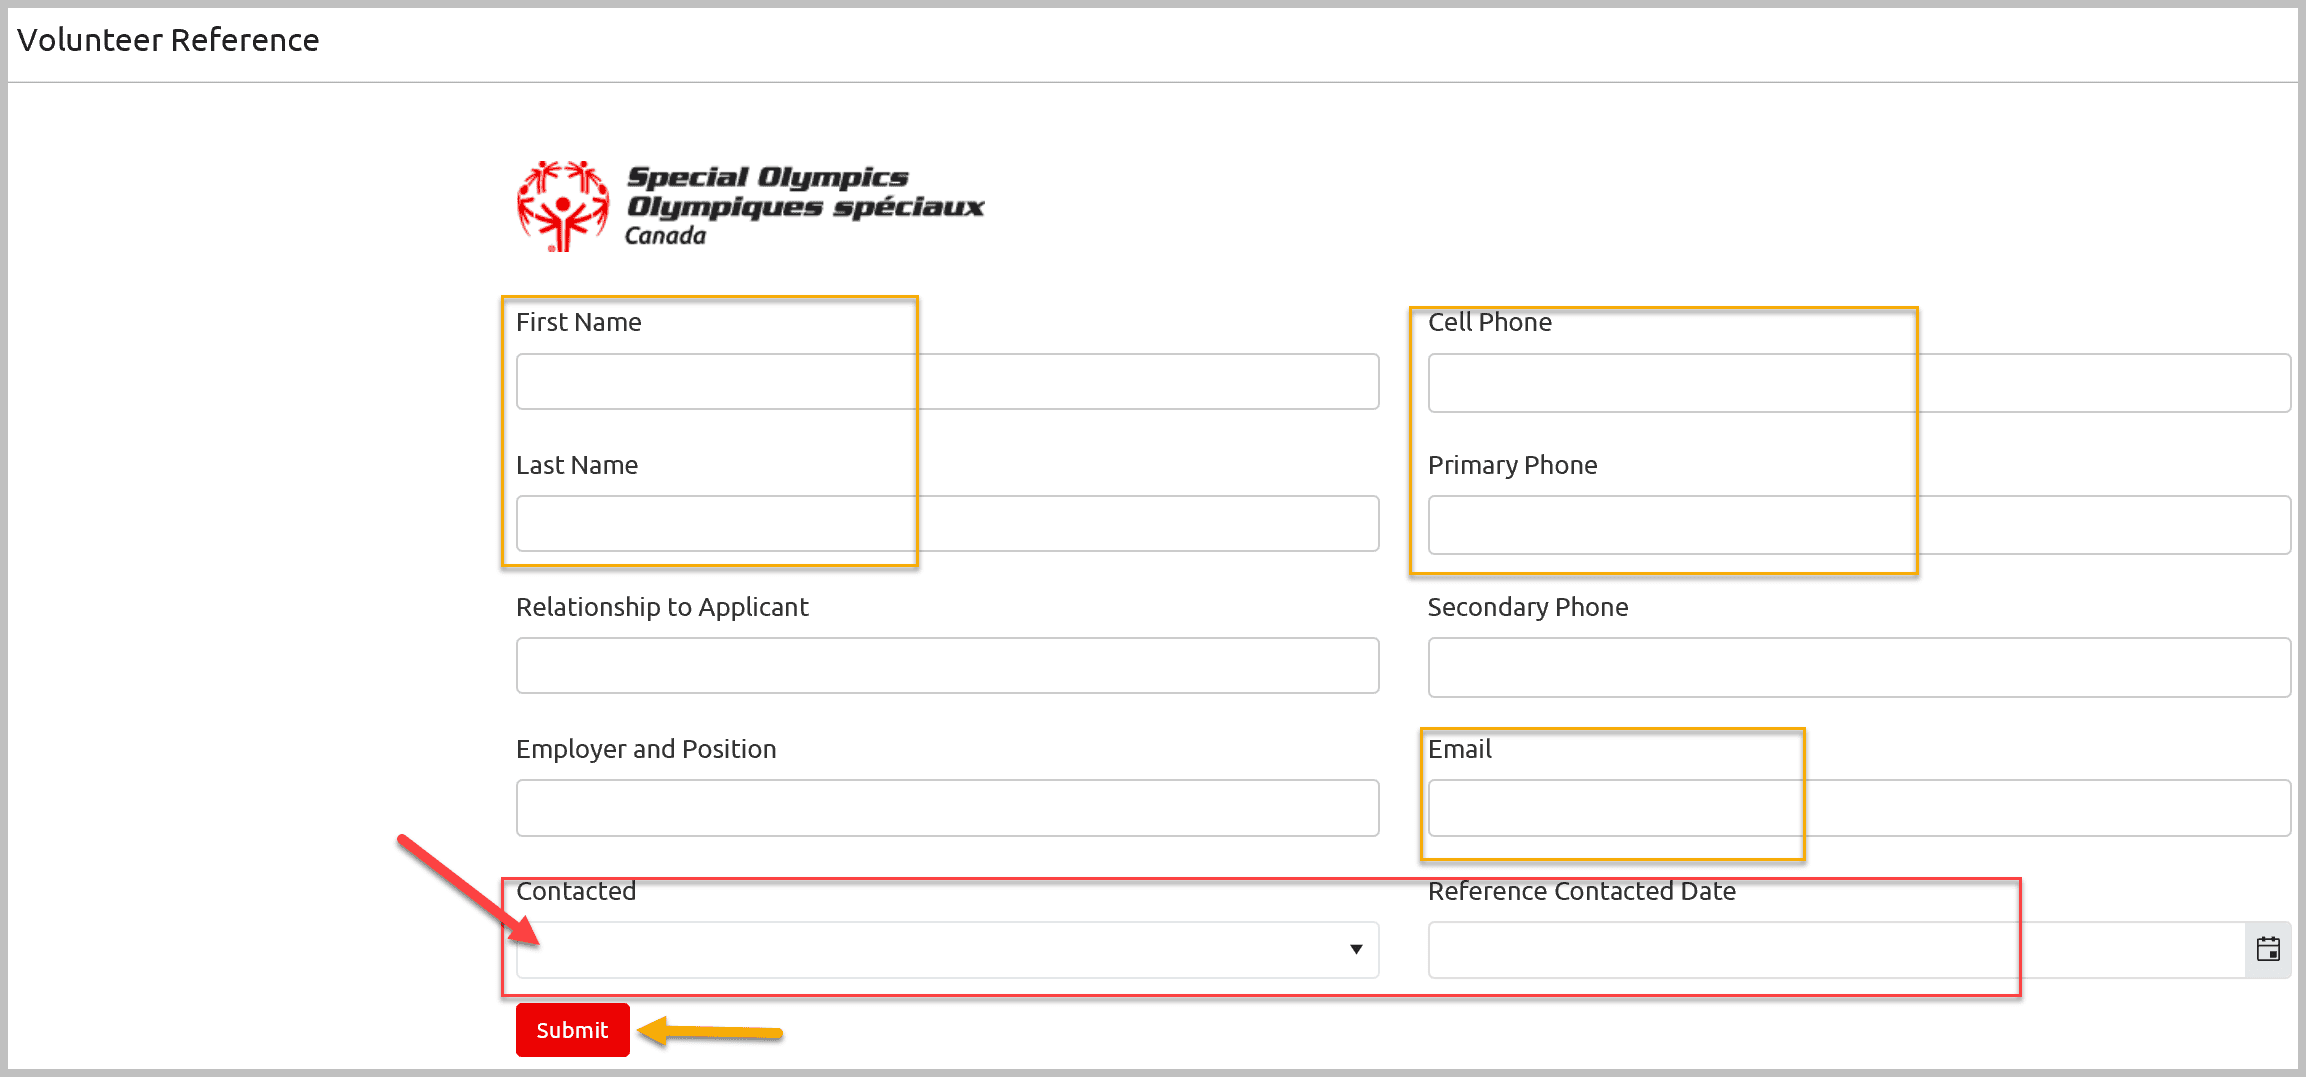
To add new Reference, click on the Add button in Personal References section. Add First & Last Name, Phone, Email and any other information that you have for Reference. If you already have contacted this reference for your volunteer, select Yes from Contacted field & add the date when reference was successfully contacted in Reference Contacted Date field as well before clicking Submit to save the information. Otherwise after adding reference information, select No from Contacted field and leave blank Date Contacted field and then click on Submit button to save it.
You can only update some fields, others are read only. Remember to click Submit after any changes that you have made. Click on Submit in the Volunteer main window to save all changes you have made to your Volunteer profile. In case you just reviewed volunteer information, close this window by clicking on the X.
Active Enrollments Tab
Active Enrollment window will provide list of active enrollments with all of the clubs volunteer is currently registered with. To view the detail of any enrollment click on the Edit button beside the name of volunteer.
You can only view details of enrollment like Club name, Sport, enrollment Start and End date. After reviewing information exit by clicking X at the right corner of the window.
If you want to view full profile to your volunteer click on Edit button beside the name of volunteer.
To exit from selected Volunteer profile info and to select another Volunteer, click on X at top right corner of the window. You will be on the Active Volunteers list window.
Active Enrollments Tab
This tab will provide list of all active Athletes and Volunteers of your club
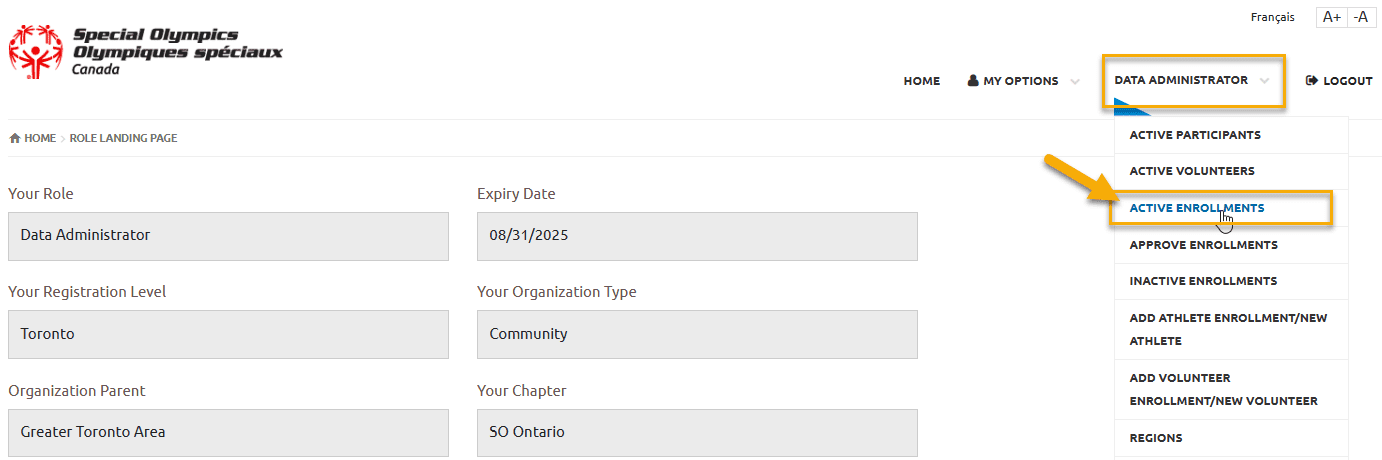
n Active Enrollments Window, Search for Participant or Volunteer from three dots or by scrolling down.
Click Edit button beside the name of Participant/Volunteer to open the Enrollment Detail window

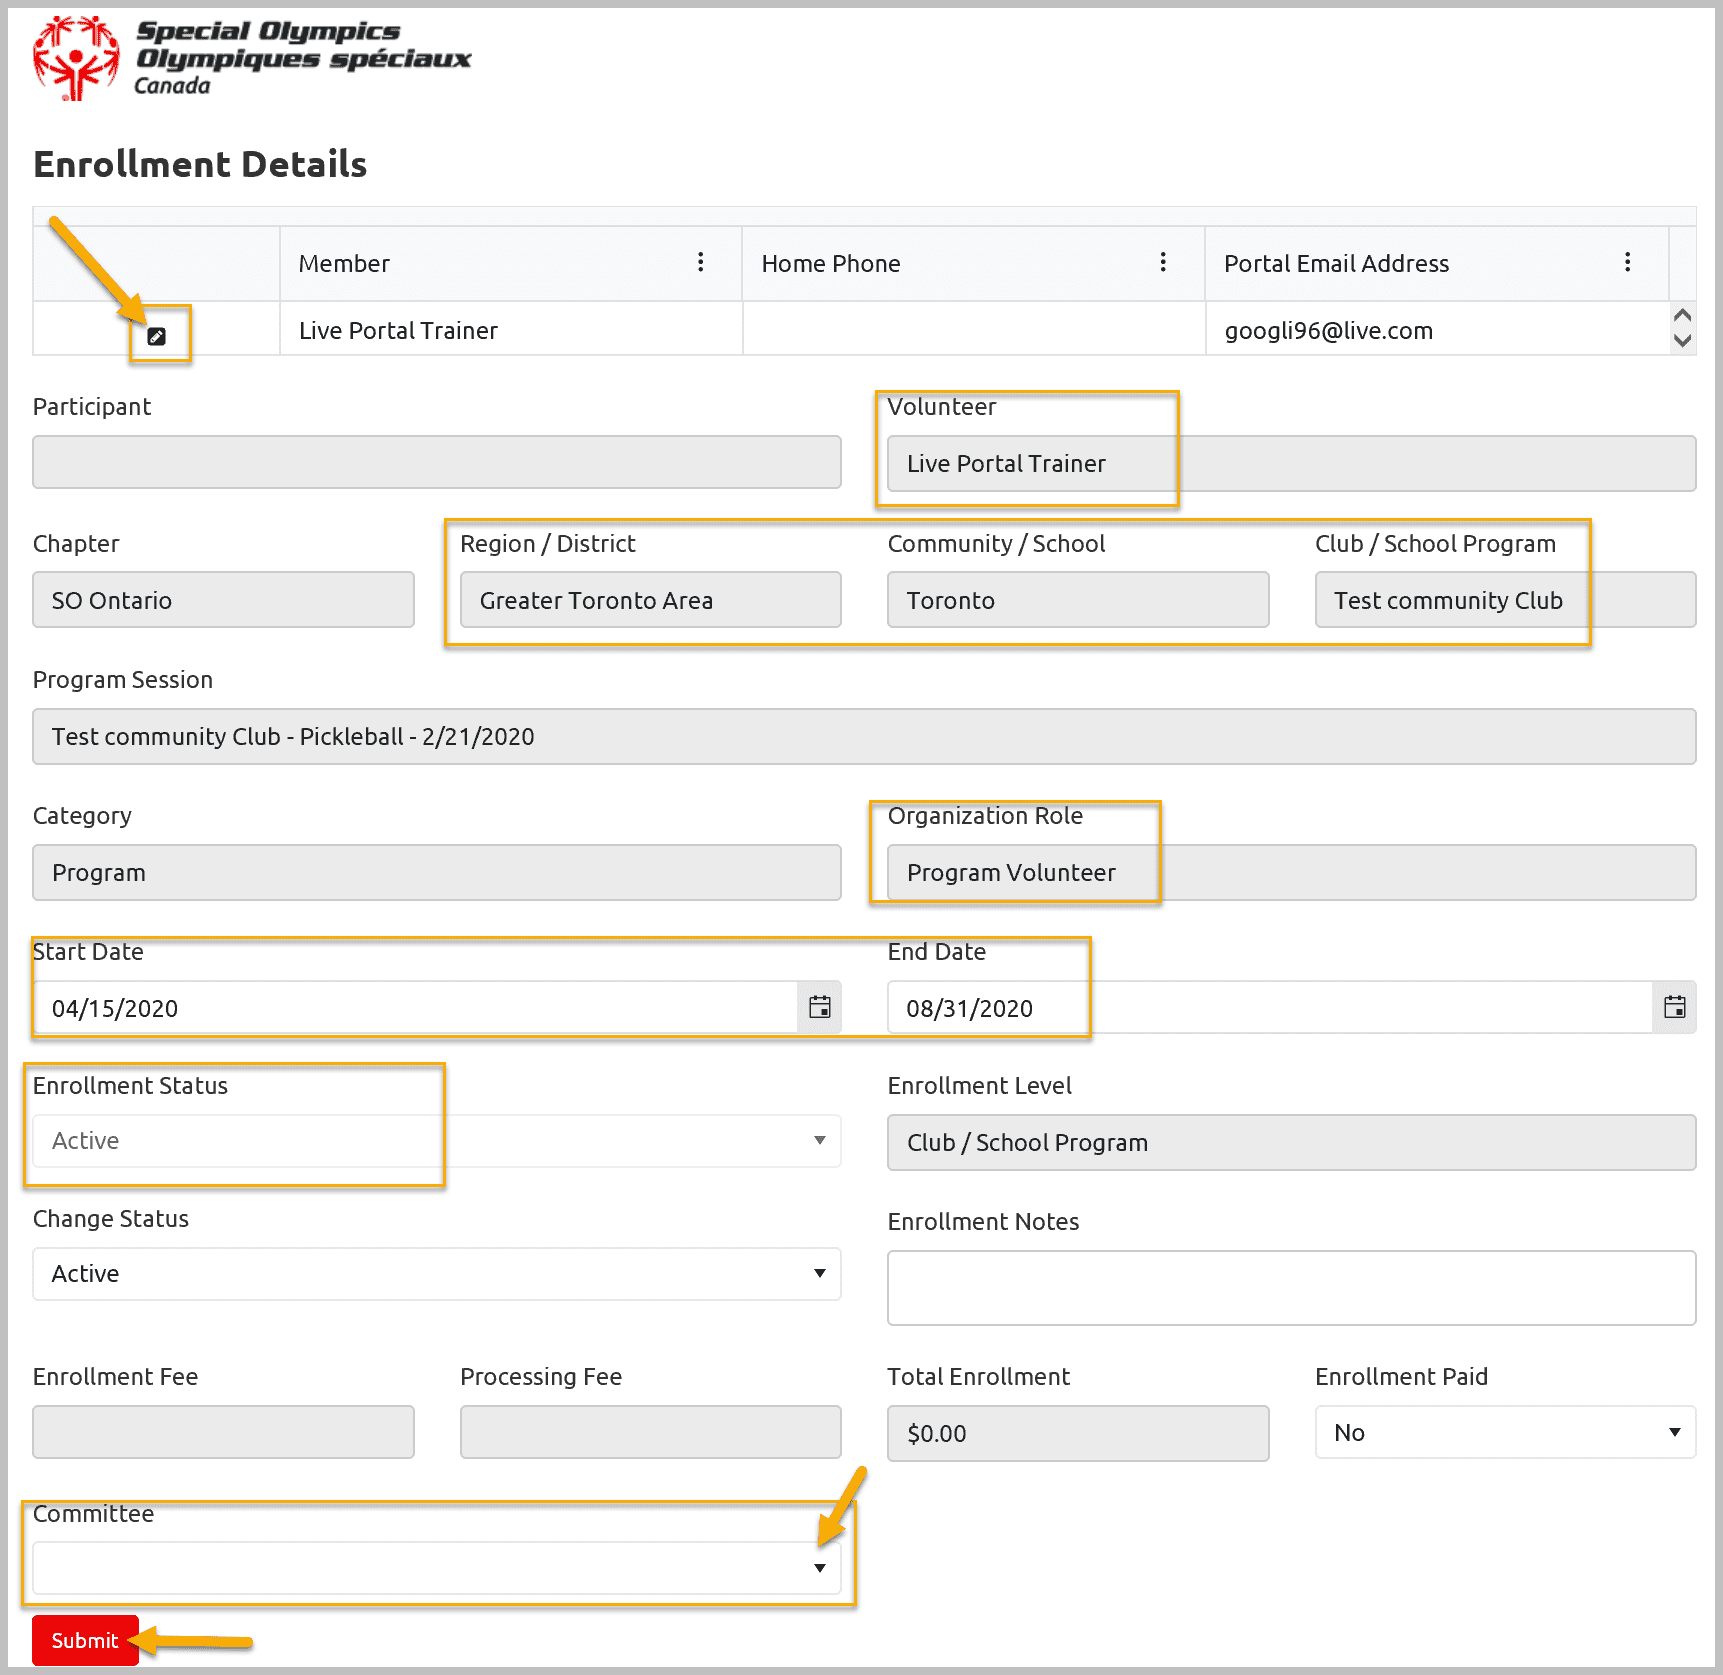
From following screen,
- You can view details of enrollment
- You can Cancel Enrollment of the member click for Full Instructions
- You can add volunteer in a Committee
Approve Enrollments
Please follow the instructions Approve Enrollments
Inactive Enrollments
Select Inactive Enrollments button from right hand menu. This window will provide you the list of all inactive members which were enrolled with this club in the past. You can see name of member Role in club, start and end date and status.
You can export list of inactive members by using Export to Excel feature.
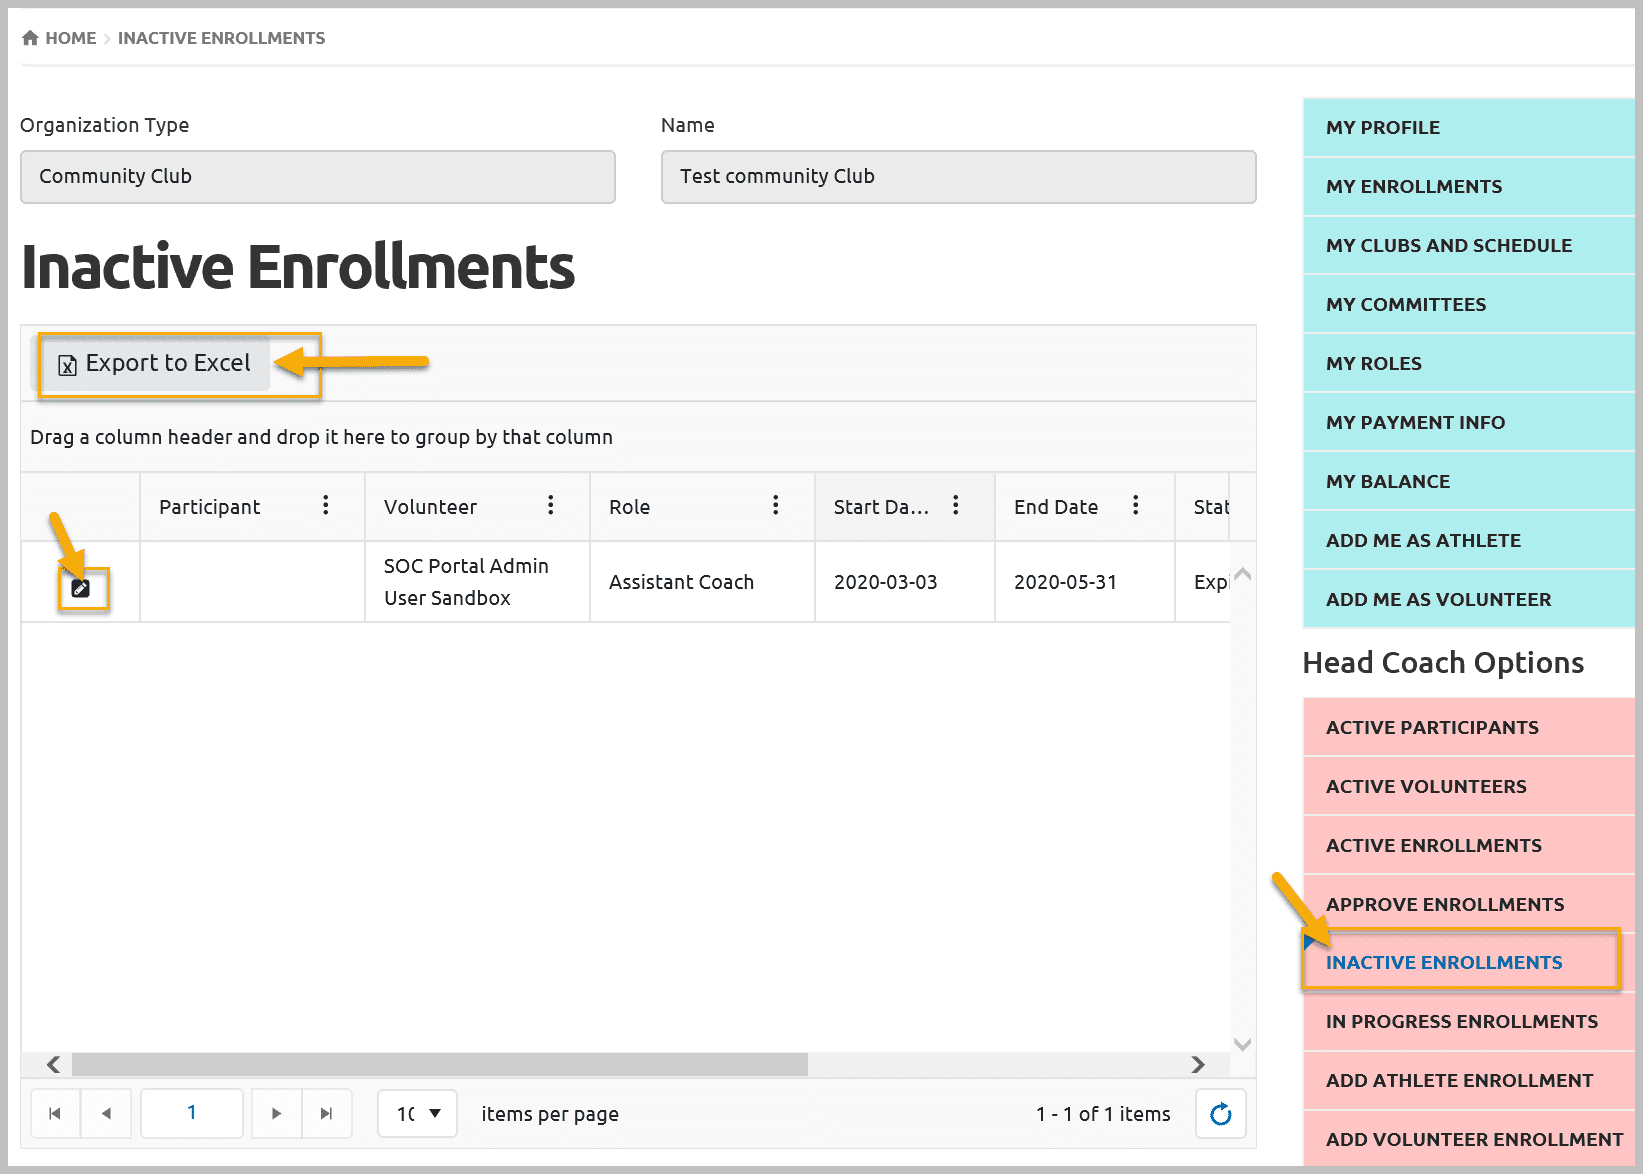 Note: You will not have the option to edit the information.
After reviewing information click on X to close the window. You will be in the Inactive Enrollment window to select another member if you wish to view information.

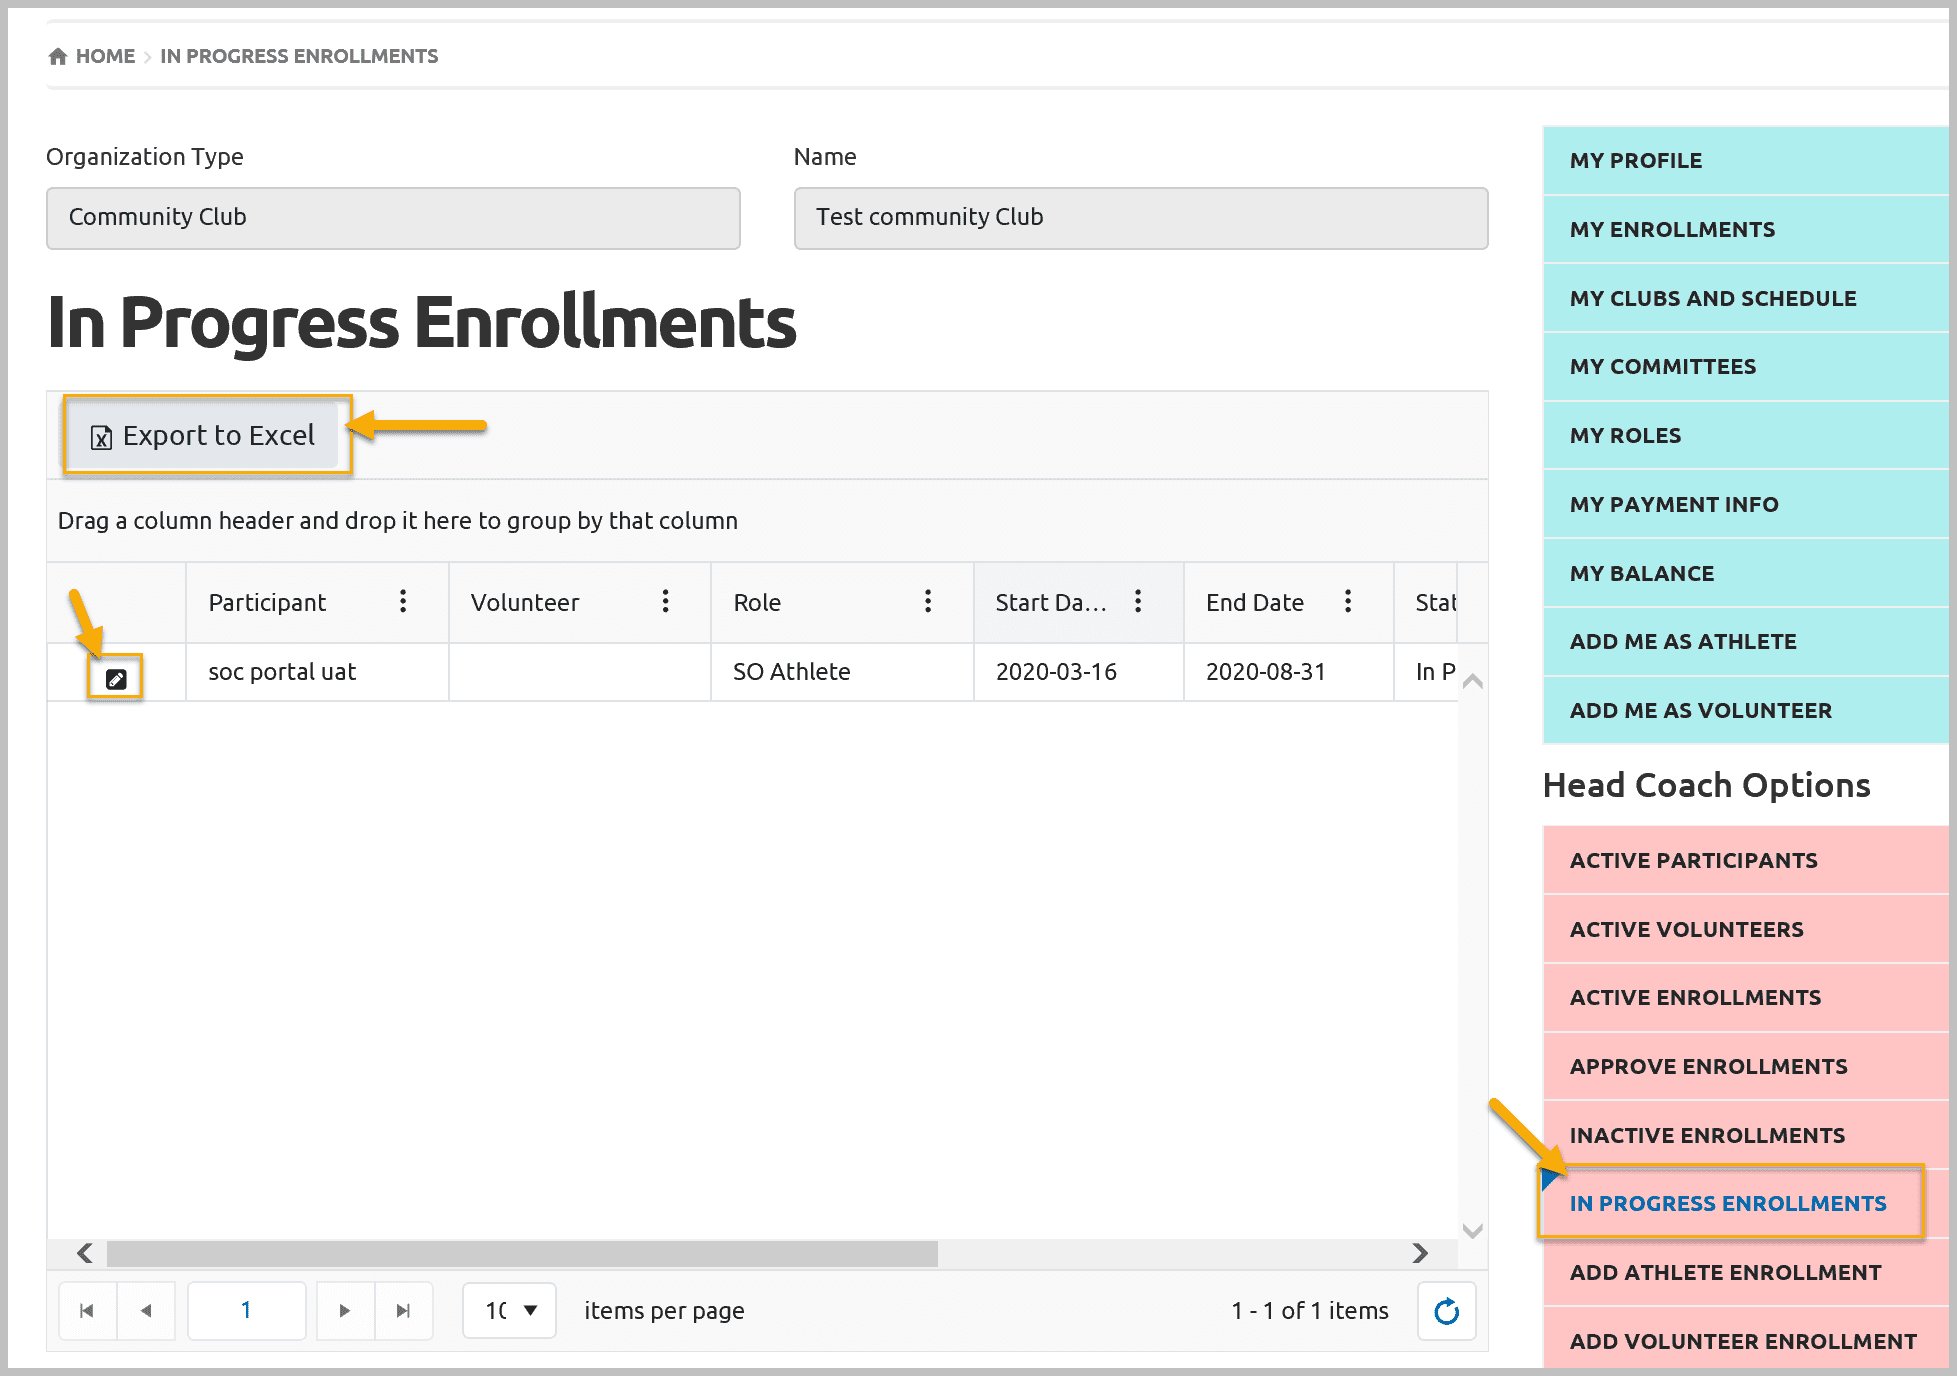
In Progress Enrollments
In Progress enrollments can be created by New Applicants, Registered Members and all Data Admins when an enrollment is abandoned with out completion. Reason could be wrong program selection or not sure what to do next. OR
Data Admins – used Bulk Entry Tool to add Athlete/Volunteer enrollments but missed last step to change the status of enrollment from In Progress to Active. These members will never get activated and will not appear in any report.
This window will provide you list of all In Progress Enrollments and you can export them in Excel sheet by clicking on Export to Excel button.
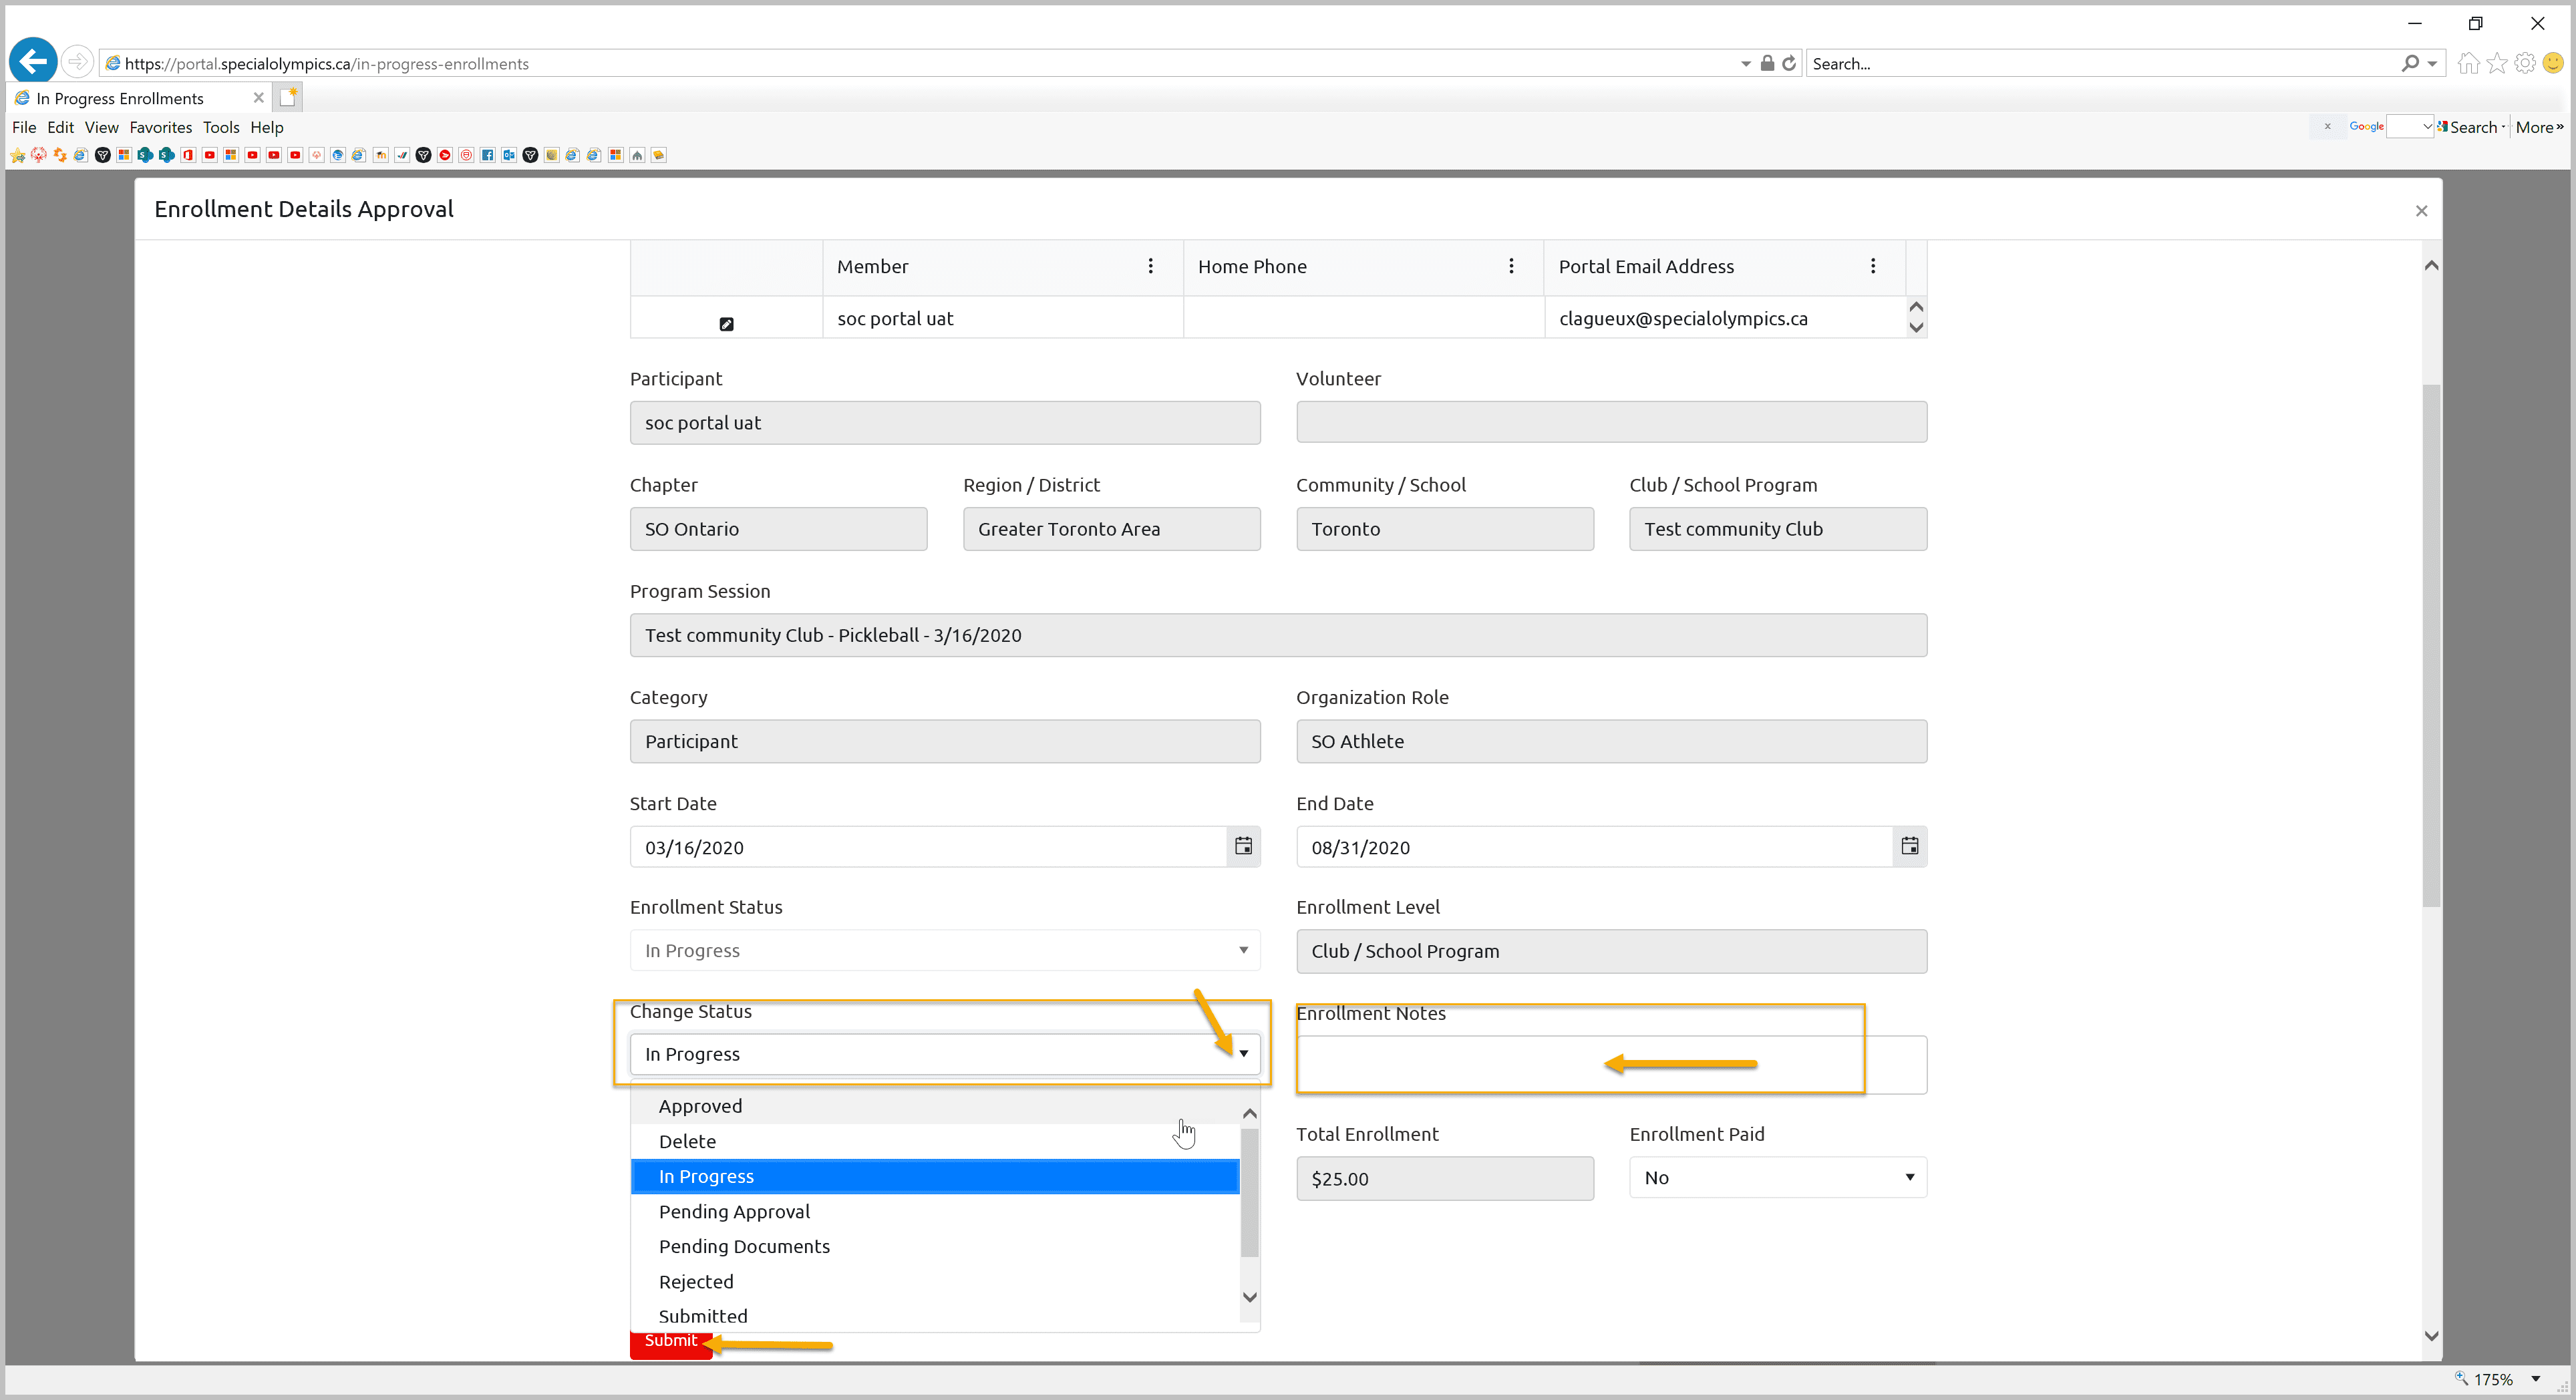
Update Enrollment Status
Based on your decision you can update status of the enrollment as:
Approved – sure to approve enrollment, system will activate enrollment based on the Enrollment Start date.
Delete– to delete enrollment, update the End Date as of today, system will delete this enrollment permanently
Pending Approval – If community has not received full confirmation from parents/references have not been checked for volunteers (do not change End Date)
Pending Documents – Medical Form, Atlanto Axial Form, Police checks / some important docs are missing (do not change End Date)
Rejected – Do not want to keep enrollment for some reason, update the End Date
Submitted – want to approve enrollment (do not change End Date)
Waiting List – Program is full
And Submit to save the changes.
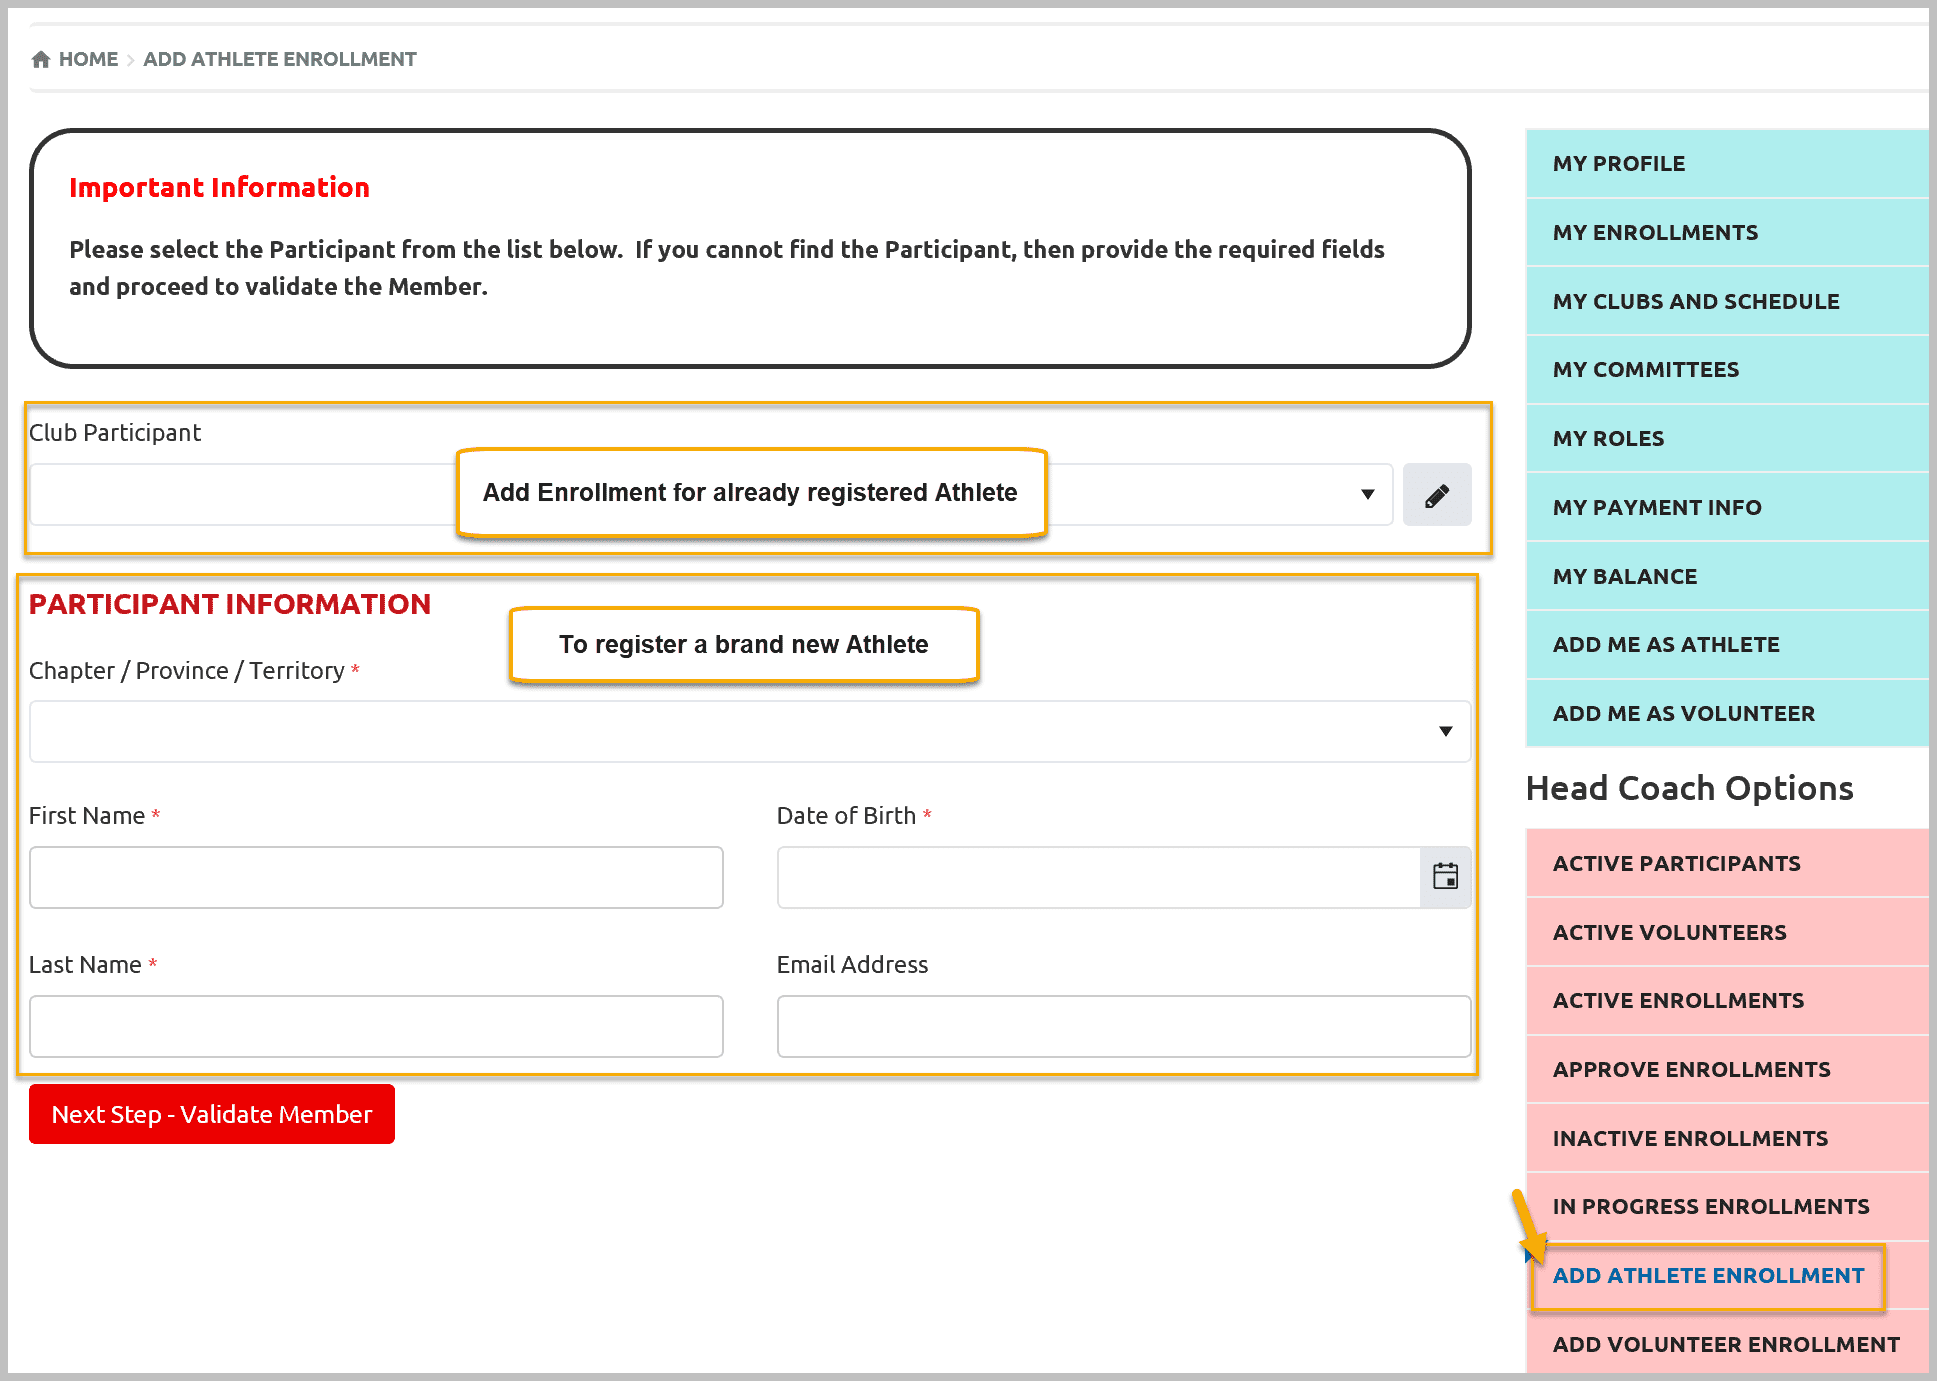
Add Athlete Enrollment
Select Add Athlete Enrollment form right side Pink menu. This window has tow functionalities:
- Enroll already registered member in your club
- Register a brand new athlete who does not have computer/internet access and provided you hard copy of registration form. See instruction https://www1.specialolympicsontario.com/support/documentation/athlete-not-found-in-database-instructions-to-create-new-profile-by-data-admin/
Select Athlete to Enroll
Select the name of an athlete from the Club Participants fields. You can search by name if list is long. If two athletes have same name and need to verify to select correct one, click on Edit button on right side of Club Participants field
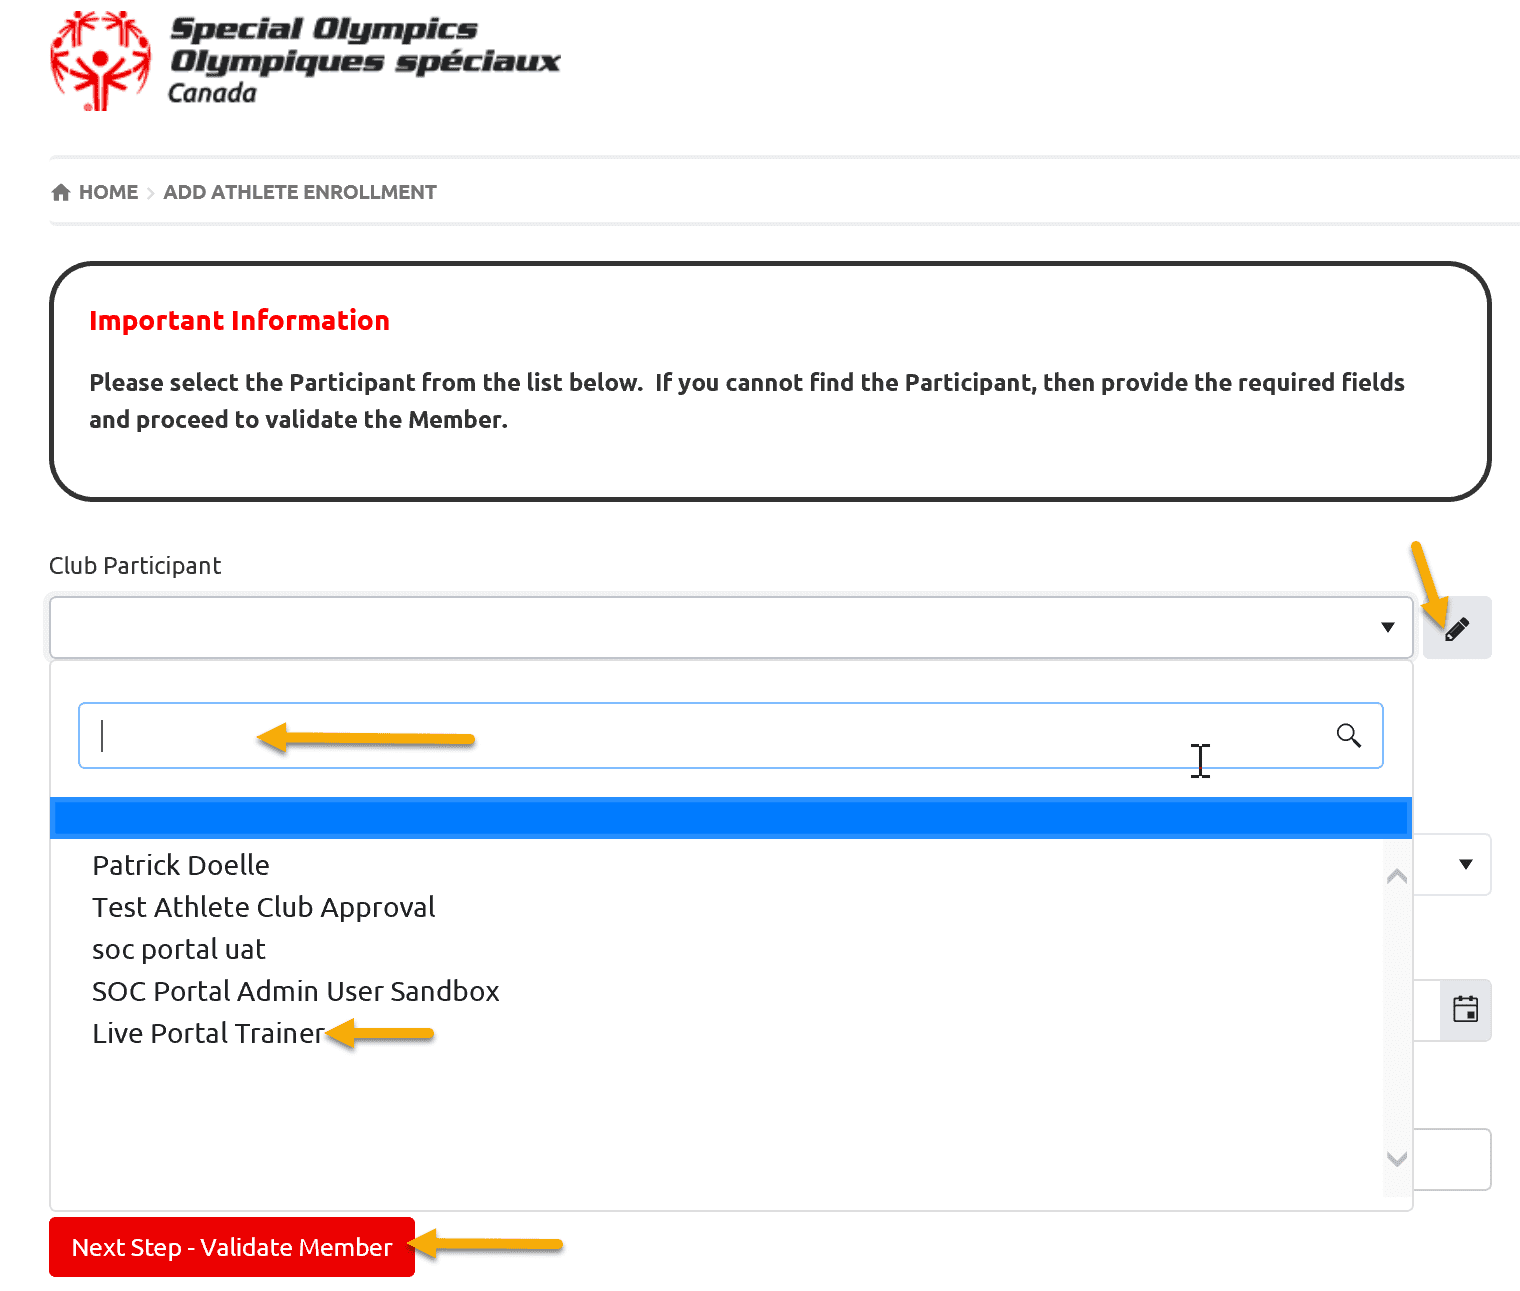
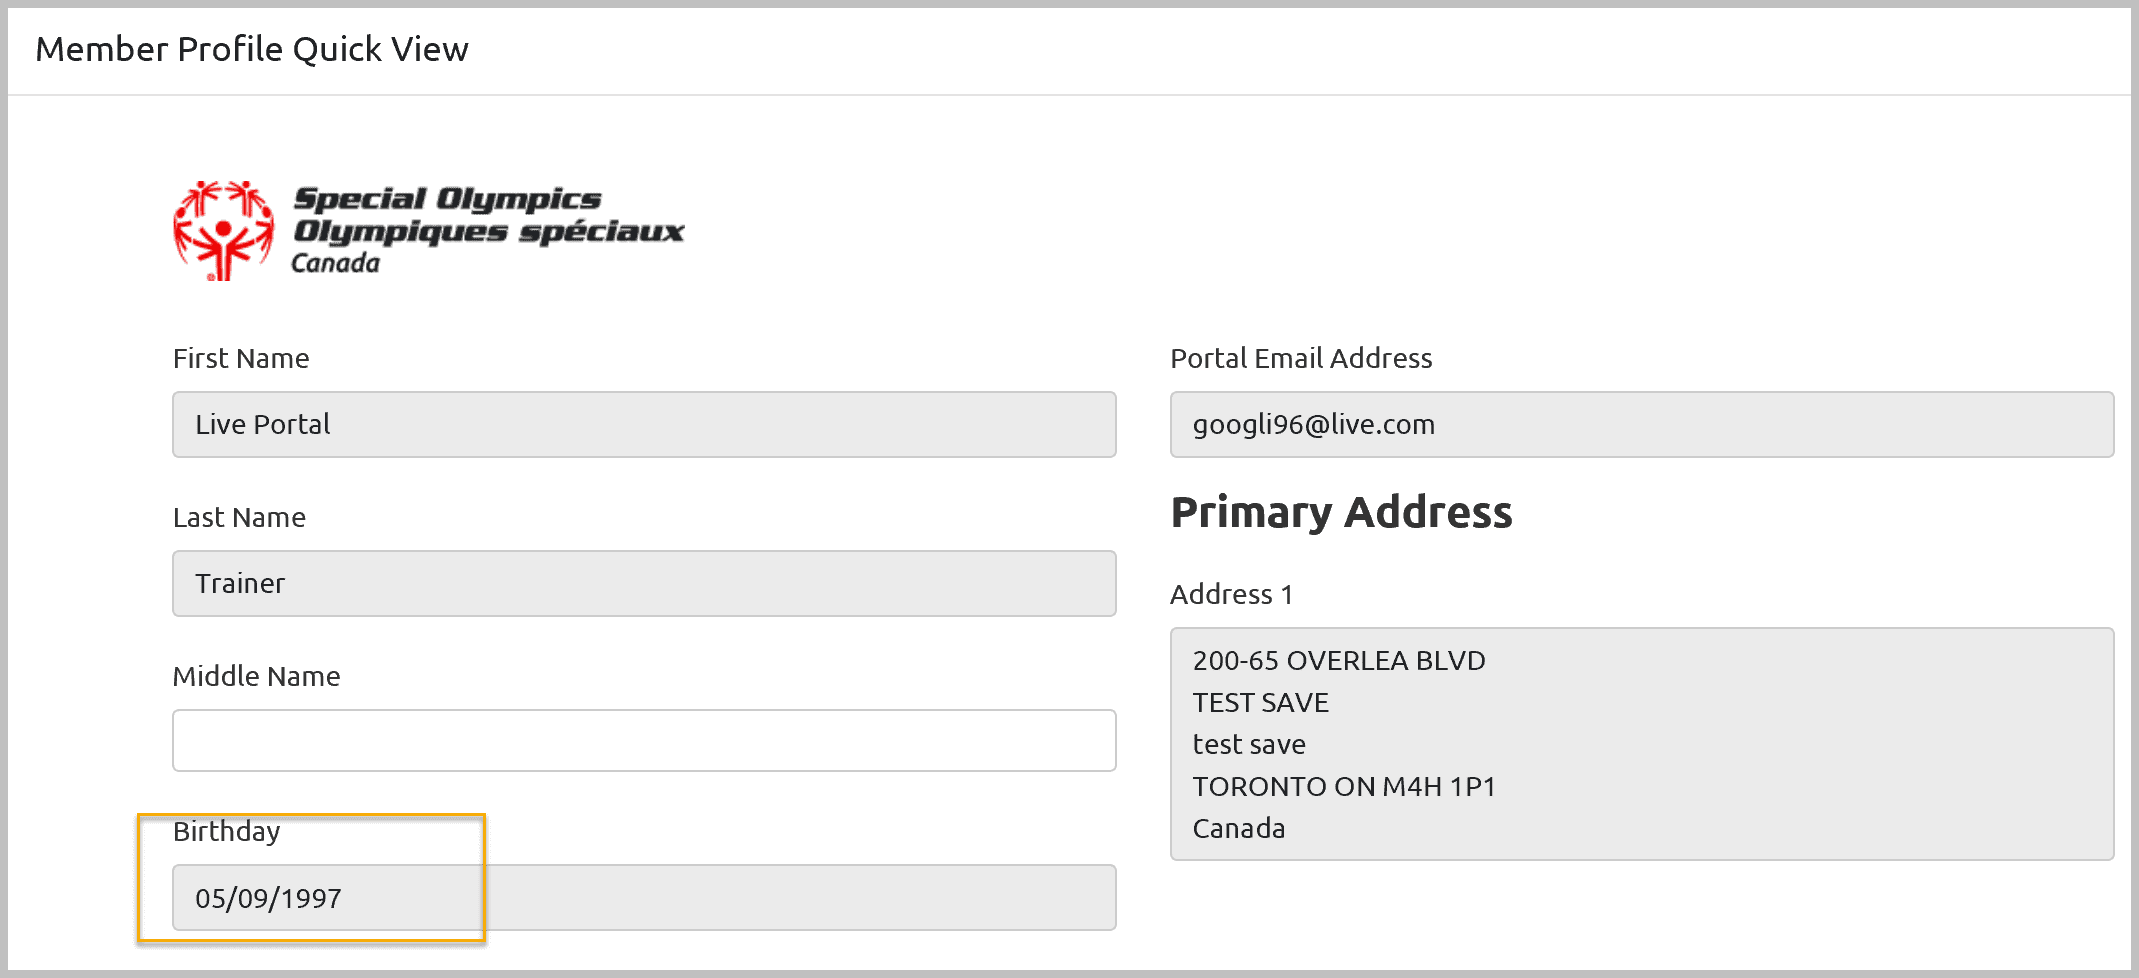
The Pop up Member Profile Quick View window will provide you basic information of member like name, email address and DOB. DOB is a unique character to verify the member.
After name selection click on Next Step – Validate Member
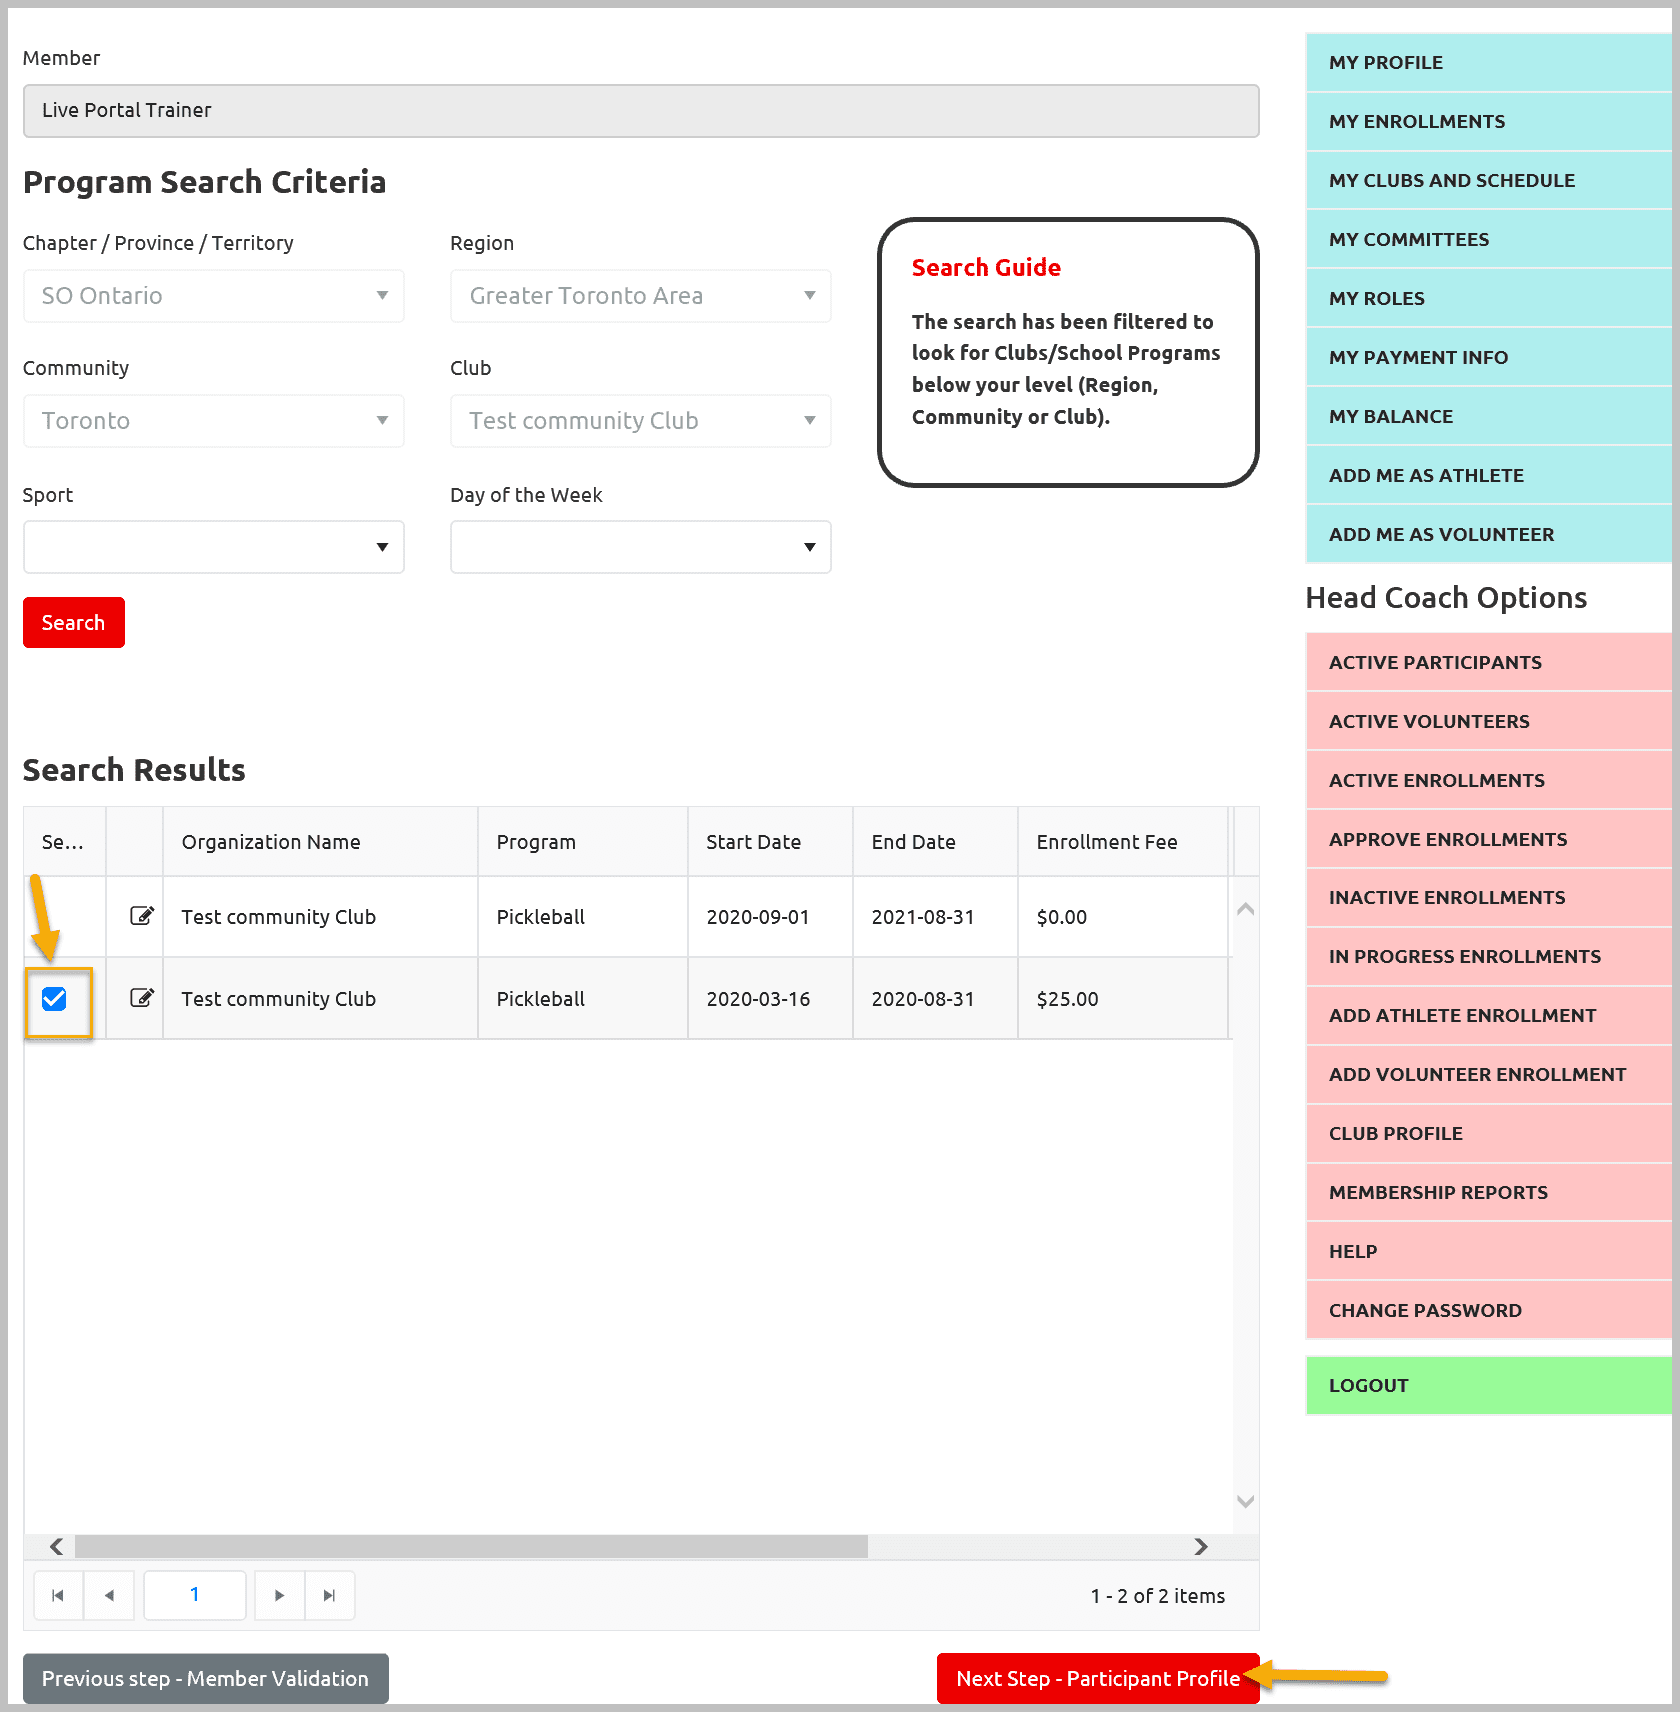
Program Search
Program Search window will open with Program Search Criteria filled in like your Chapter, Region, Community and Club.
Search Result grid will show you Session(s) of the club. Select appropriate Session and click on Next Step – Participant Profile
Note – You can select one session at a time.
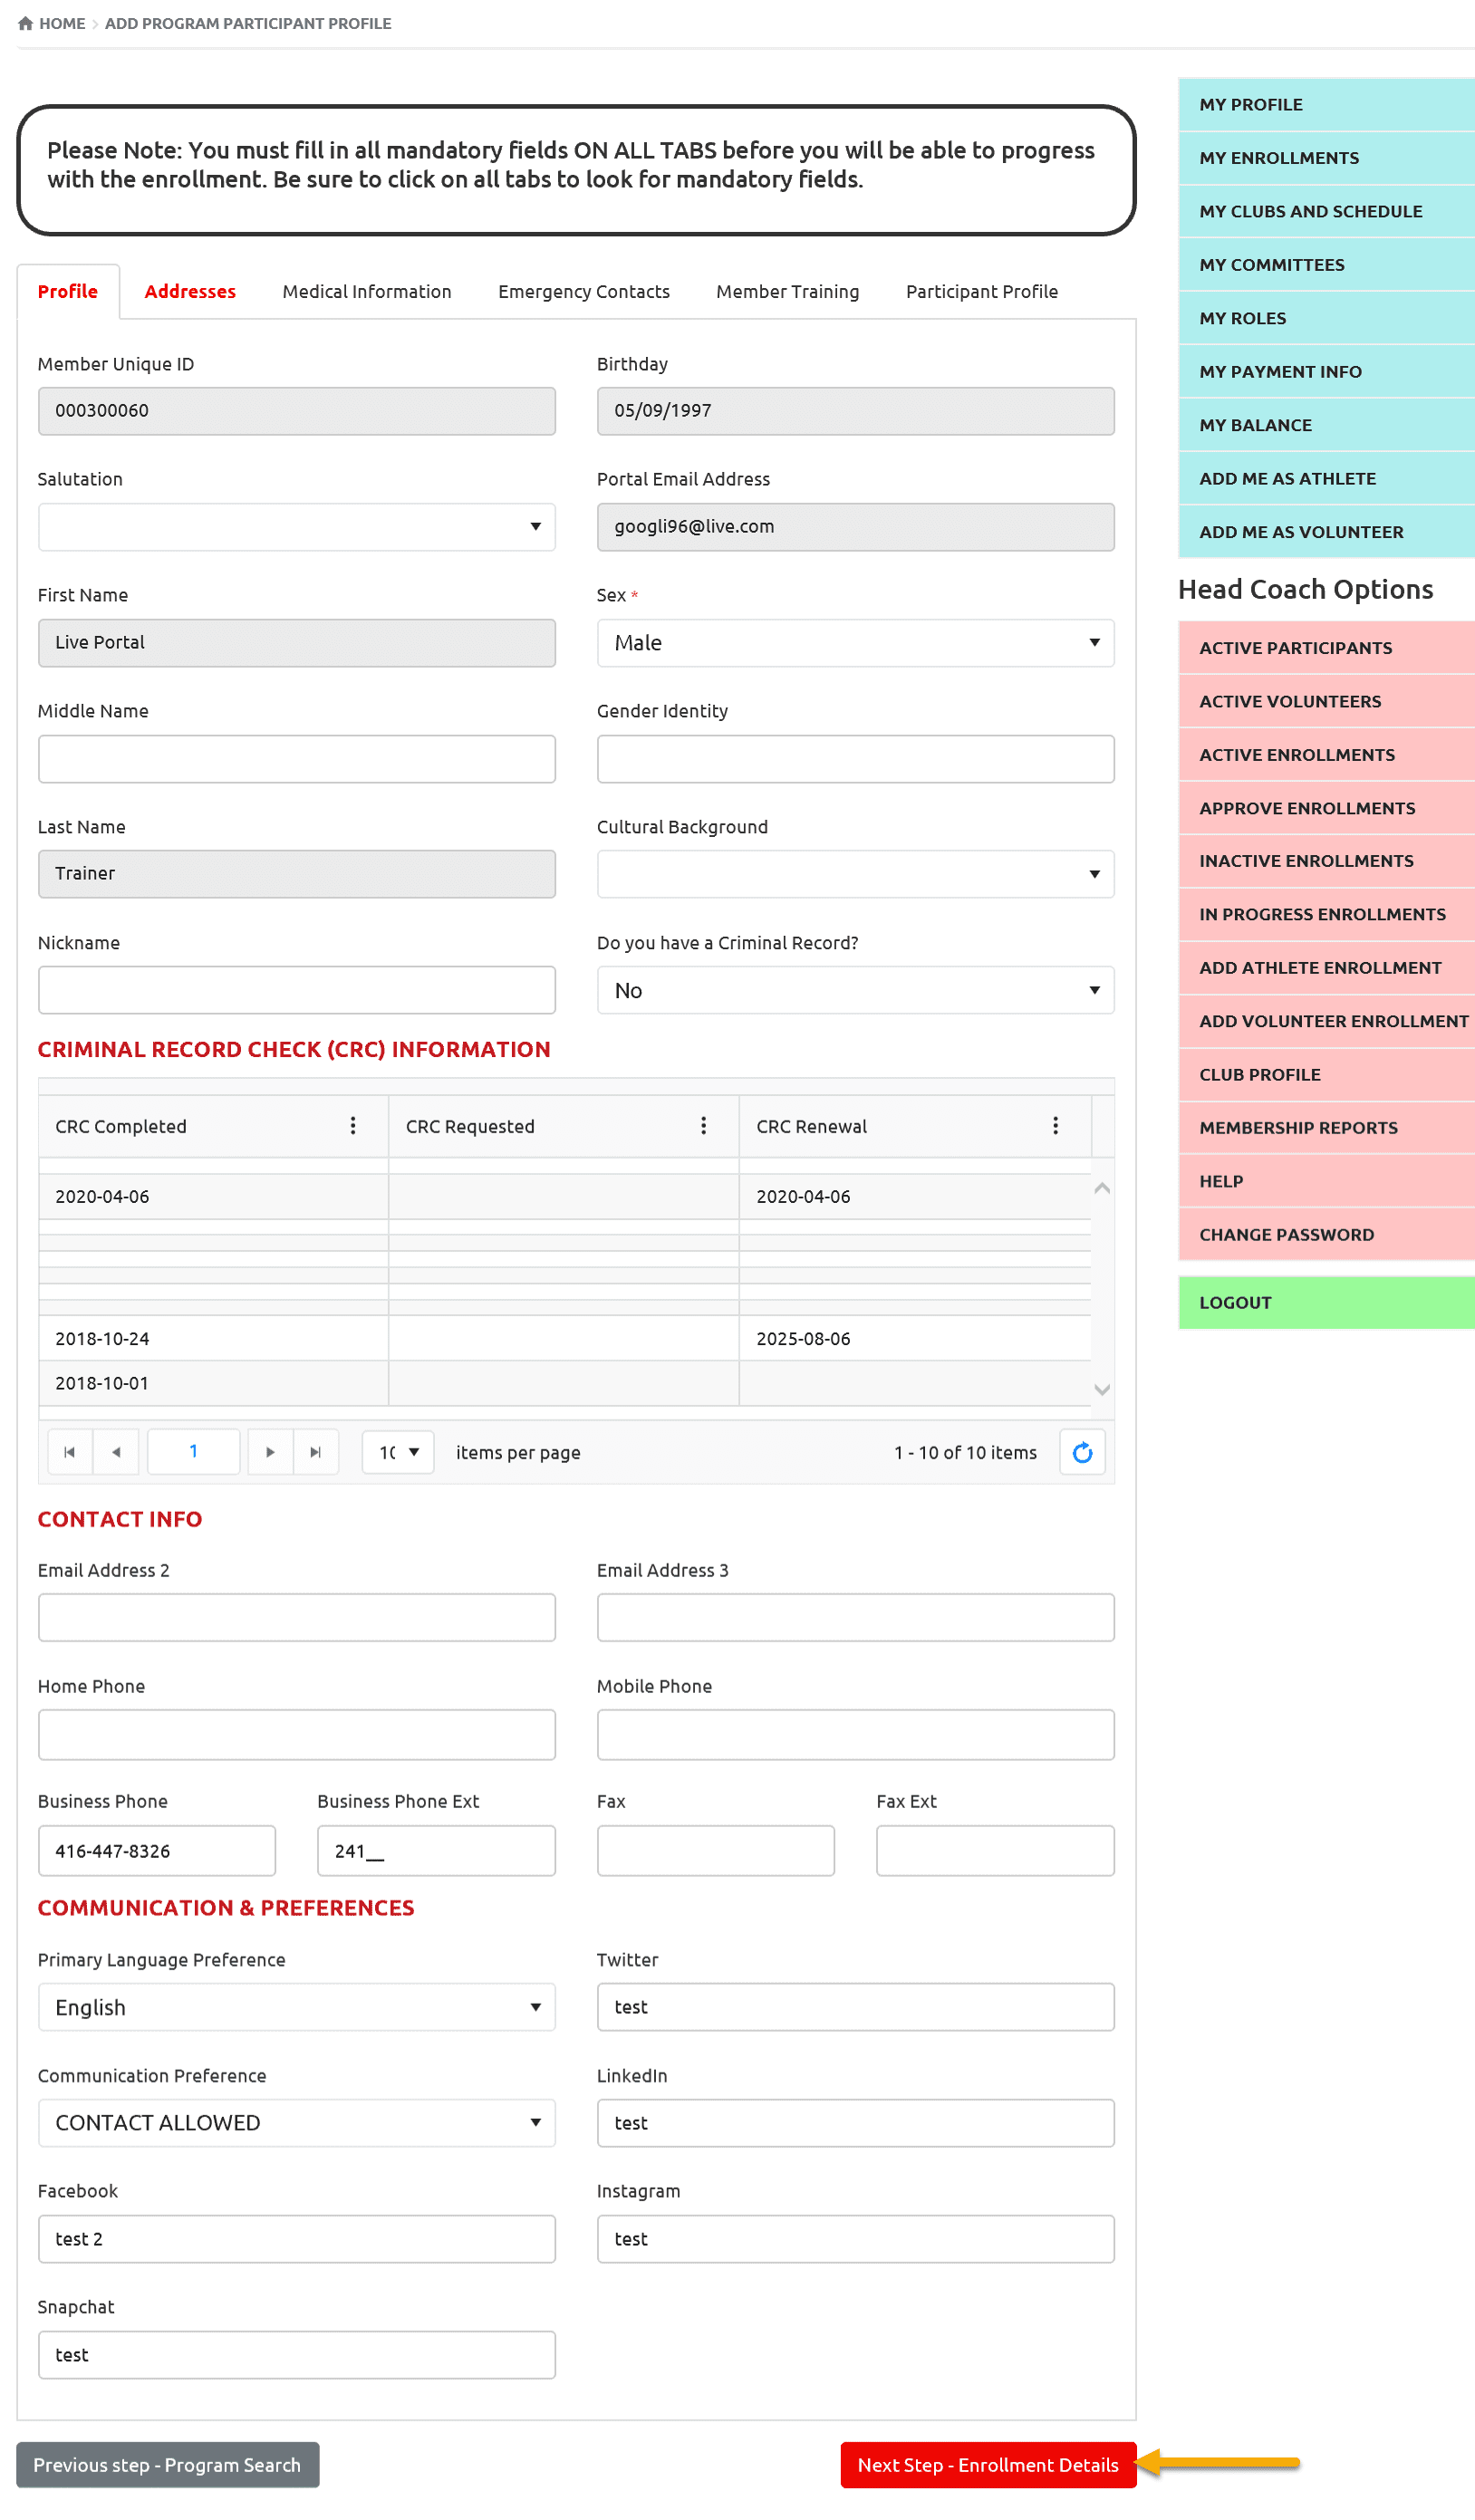
Participant Profile
You can update information here using the available tabs provided at the top of the profile. There are some mandatory fields in some tabs, you will not be able to proceed to next tab if they are blank.
After reviewing all details, click on Next Step – Enrollment Details
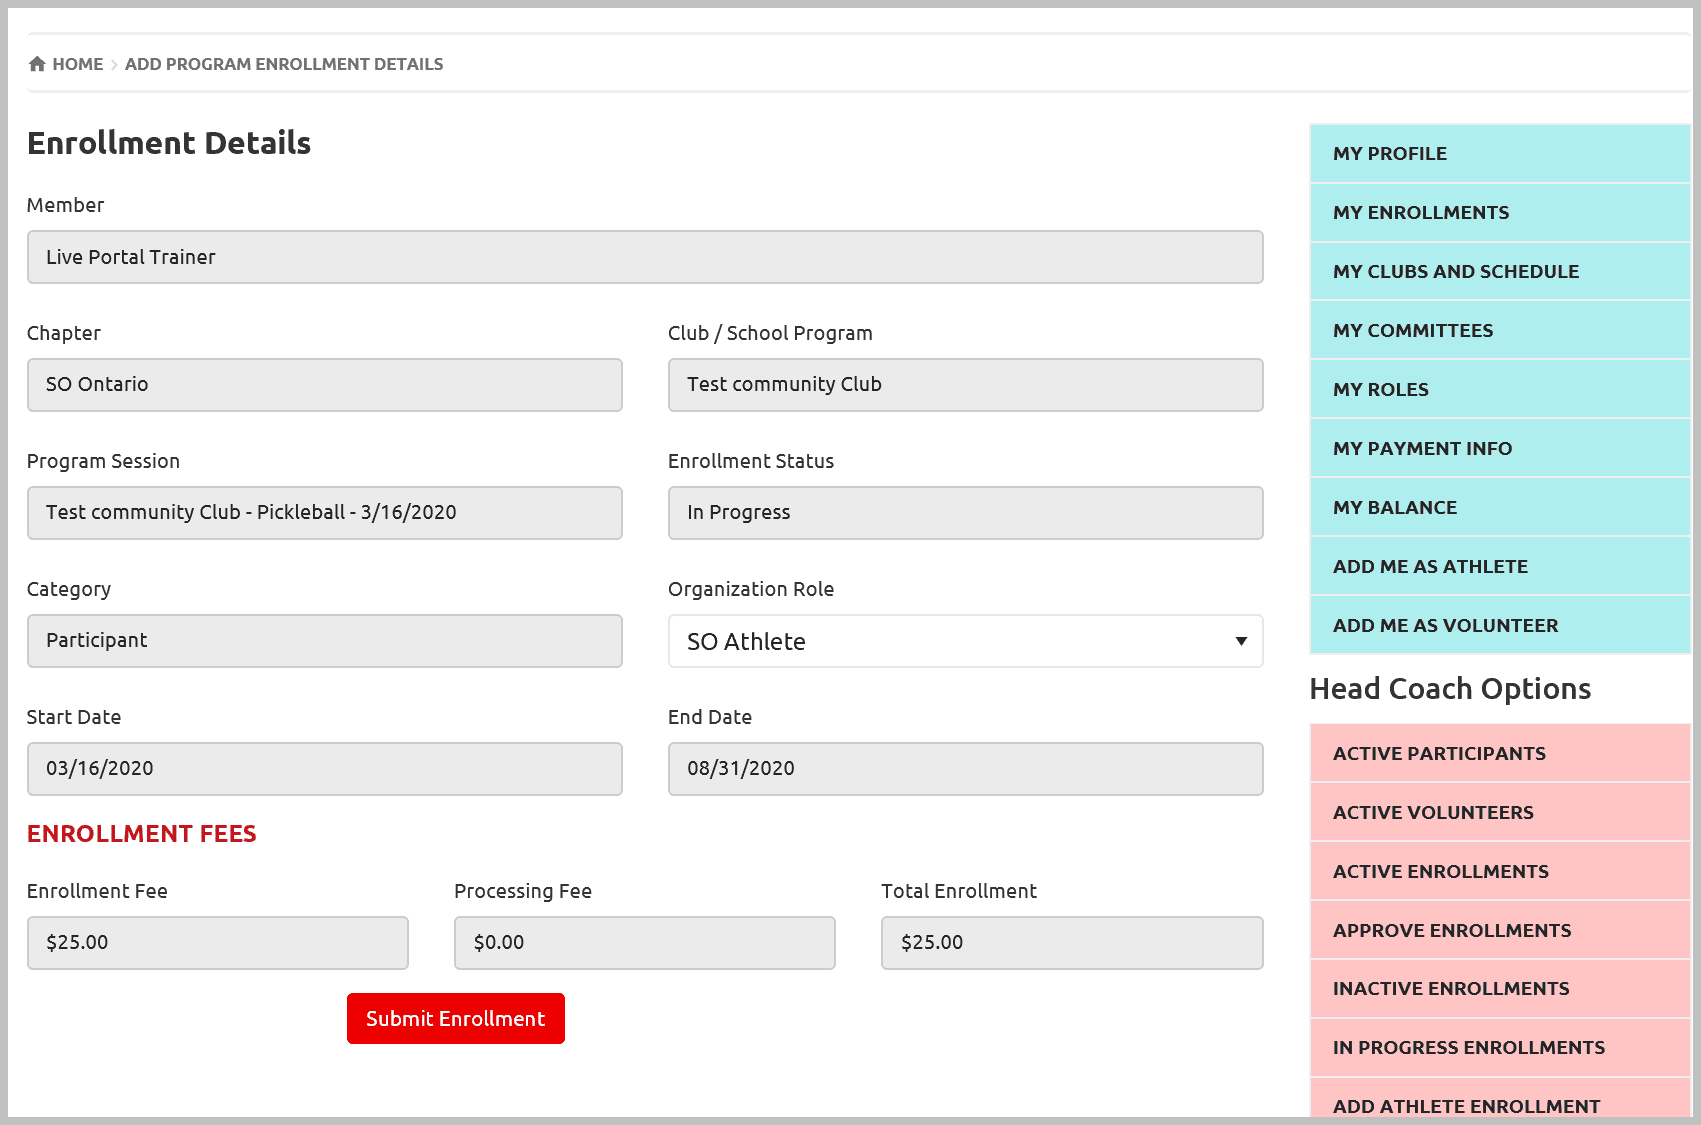
Enrollment Details
Review information in the Enrollment Details window and then click on Submit Enrollment to complete the enrollment process.
Note – in this window you will see Enrollment Status as In Progress as enrollment submission is not done yet. If you will not submit enrollment and move to another tab of Pink menu, the enrollment will be in In Progress Enrollments tab instead of Approve Enrollments tab.
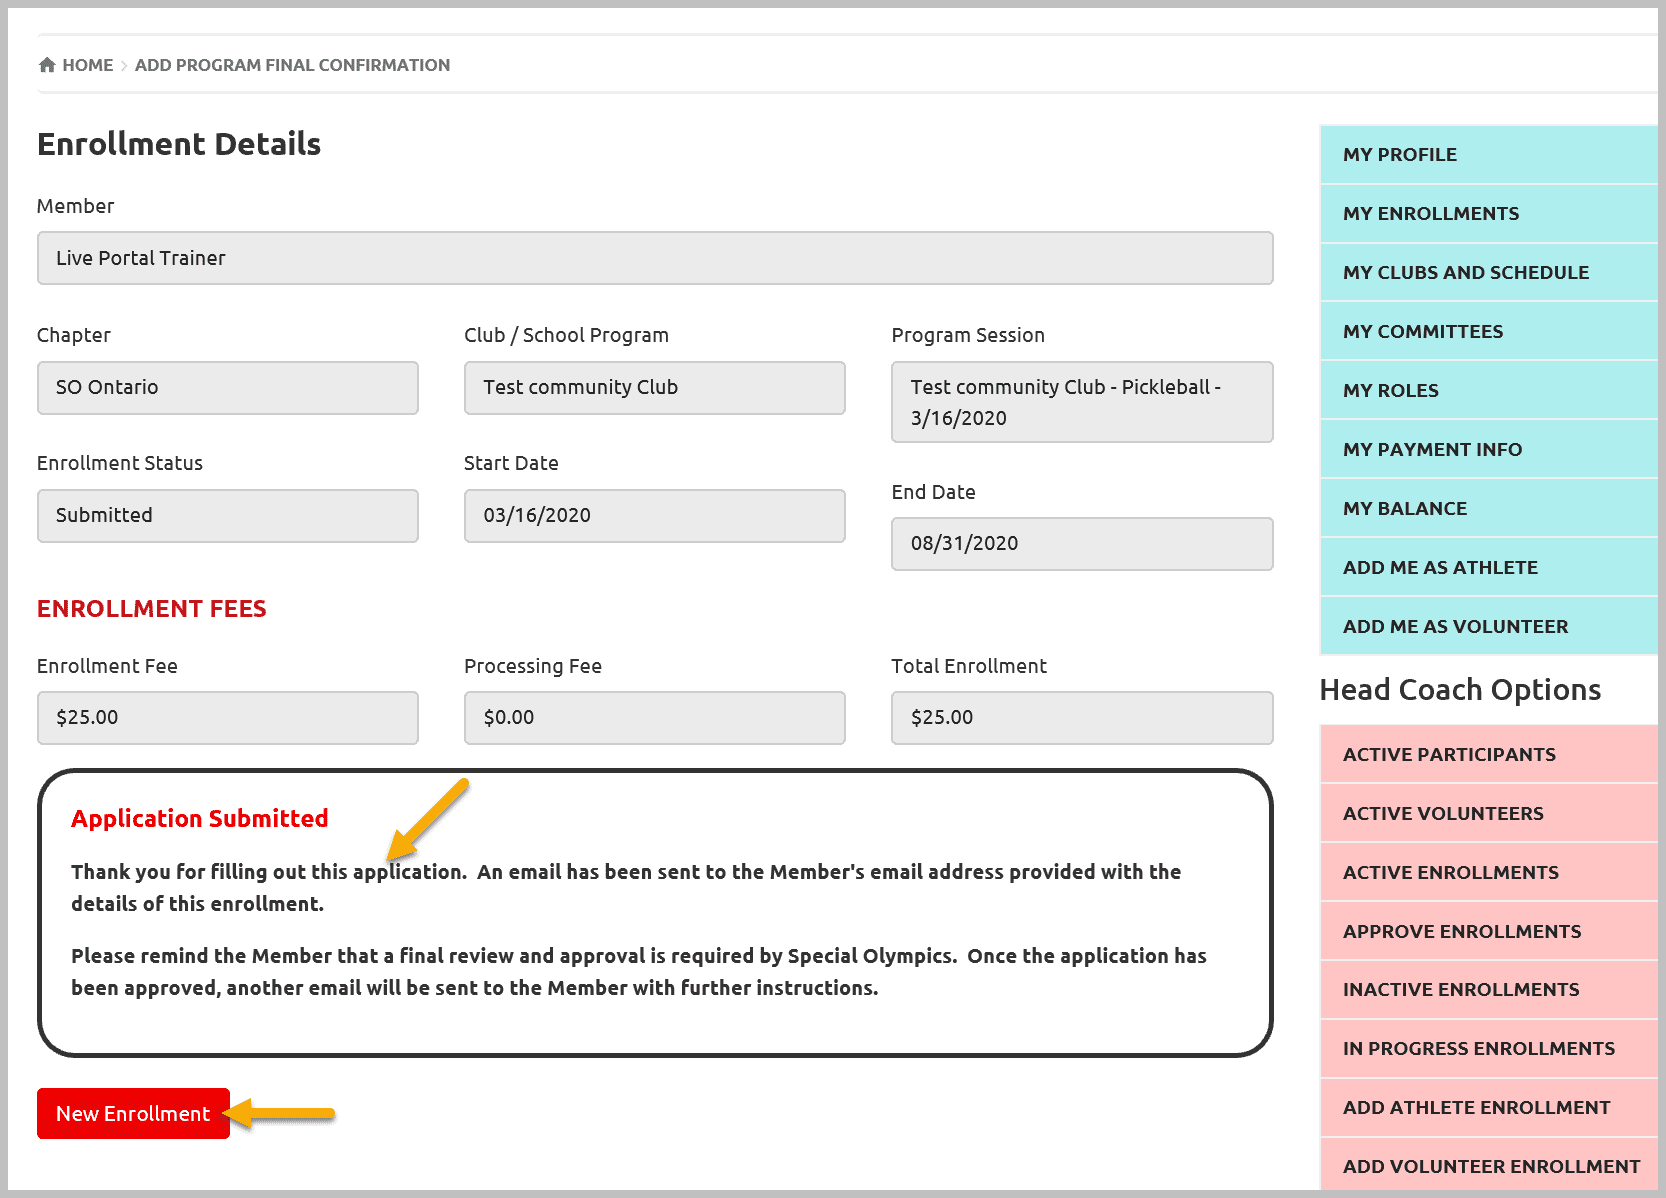
Enrollment Confirmation
The following confirmation window will open, and athlete will be sent a confirmation email (if email is provided in the profile).
If you wish to enroll this athlete in another Session of the club, click on New Enrollment which will allow you to enroll athlete in it with fewer steps. If you do not wish to, then select Add Athlete Enrollment tab again to enroll another athlete.
Note – After adding all Athletes, who came back this year in your club, go to Approve Enrollment tab to approve their enrollments.
Add Volunteer Enrollment
Select Add Volunteer Enrollment from right side Pink menu.
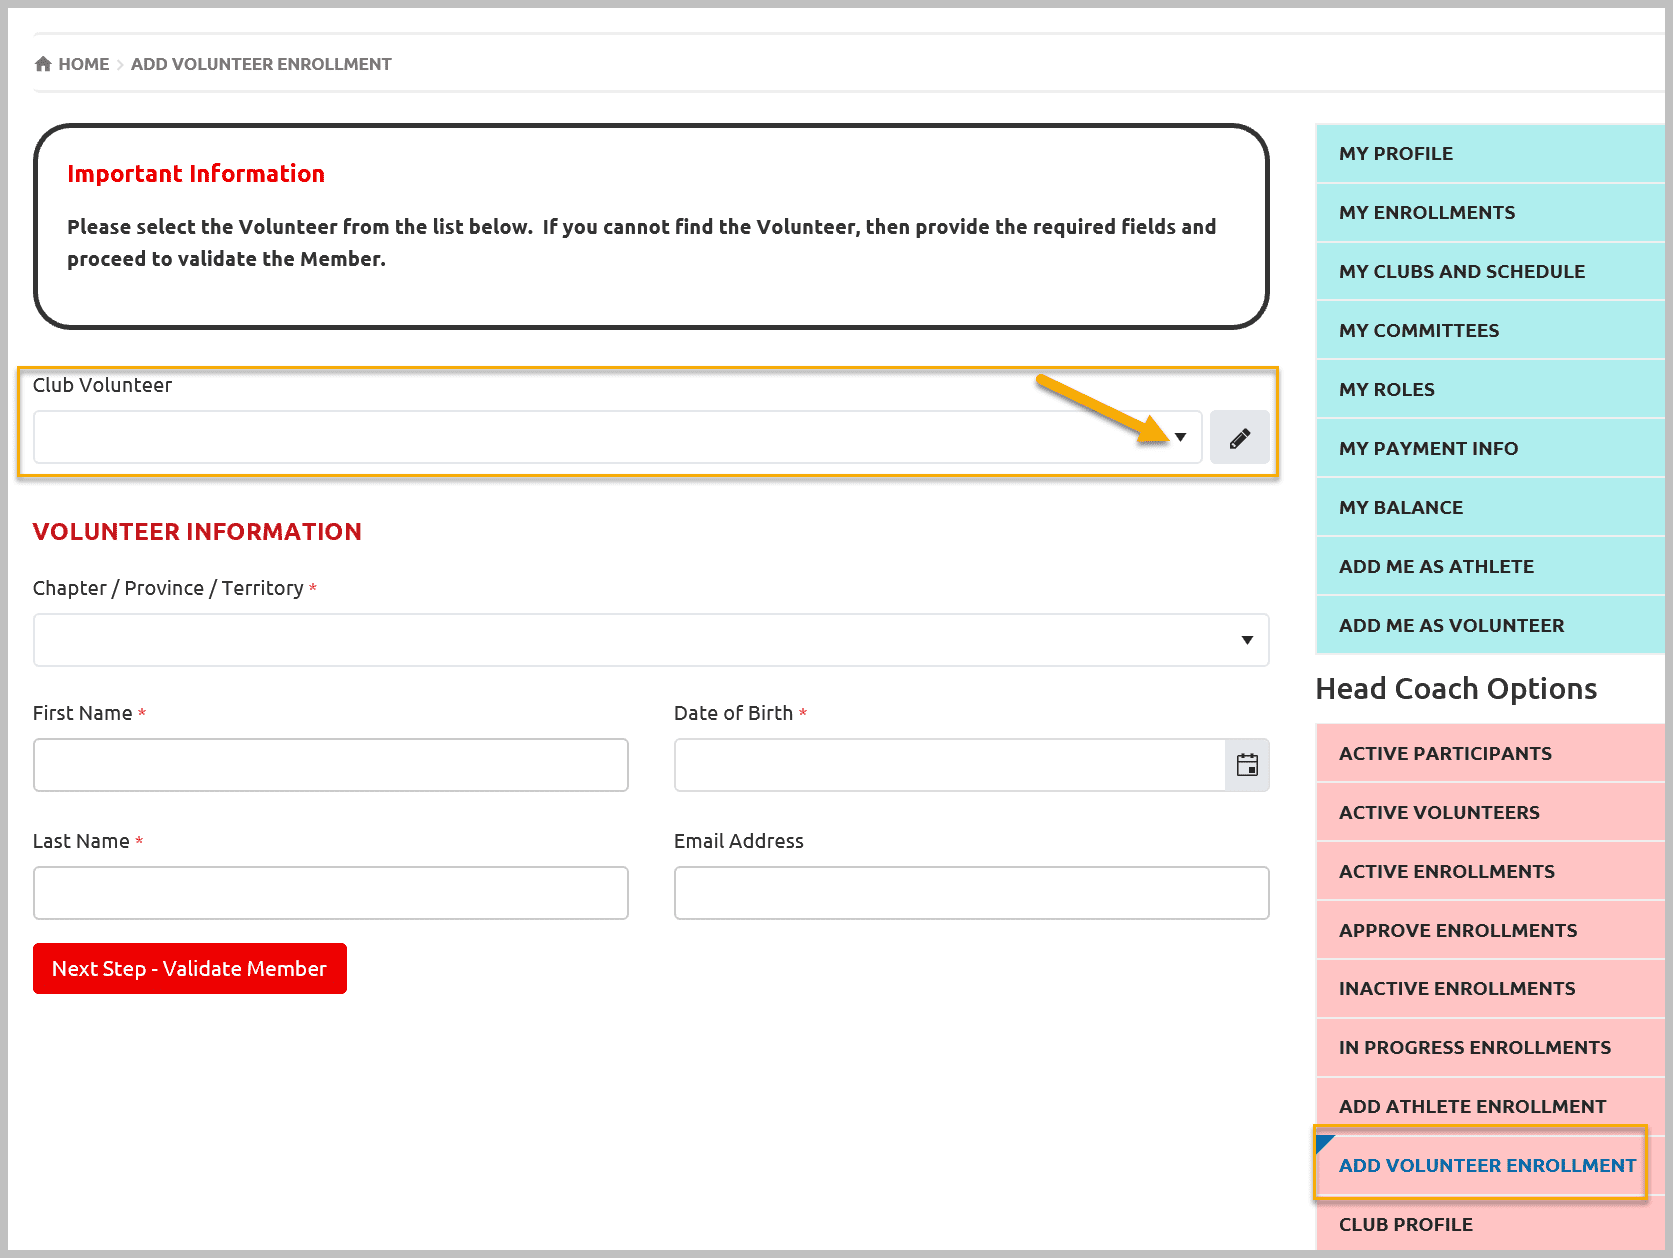
Select the name of an volunteer from the Club Volunteers fields. You can search by name if list is long. If two volunteers have same name and need to verify to select correct one, click on Edit button on right side of Club Volunteers field
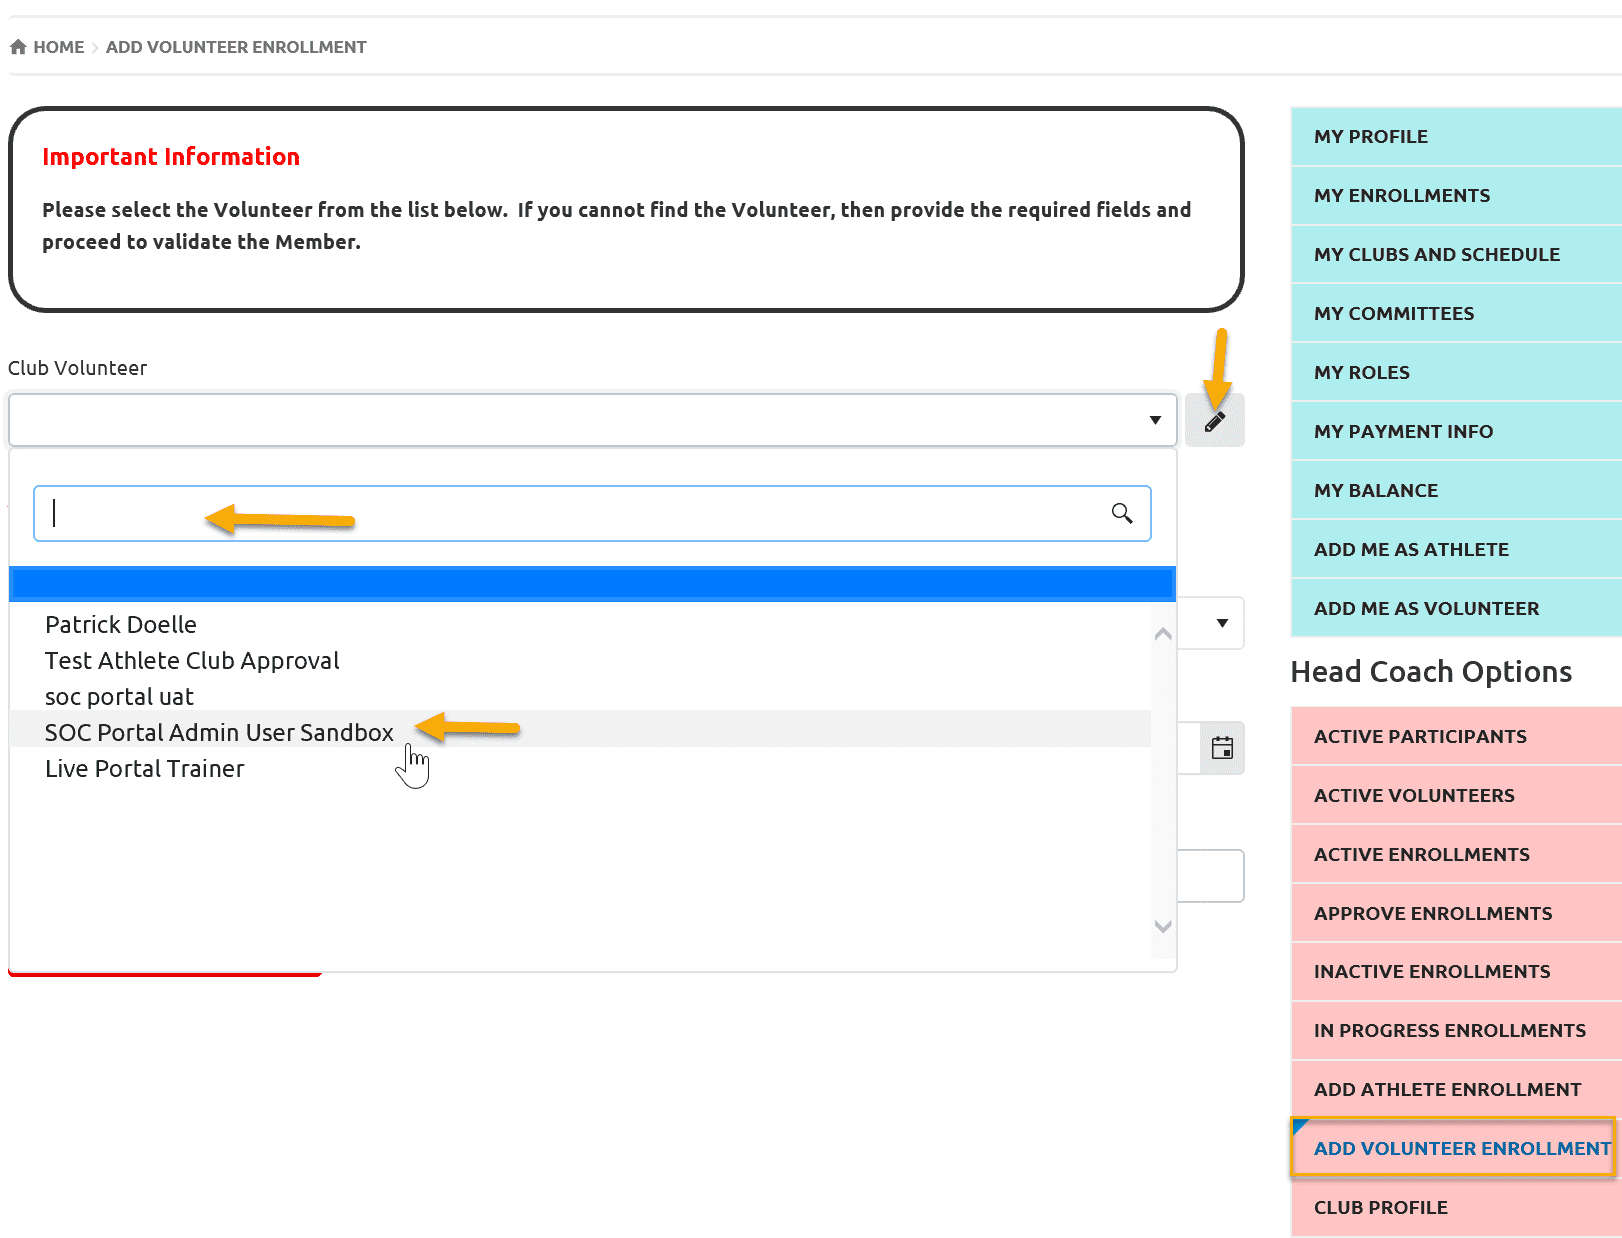
The Pop up Member Profile Quick View window will provide you basic information of member like name, email address and DOB. DOB is a unique character to verify the member.
After name selection click on Next Step – Validate Member
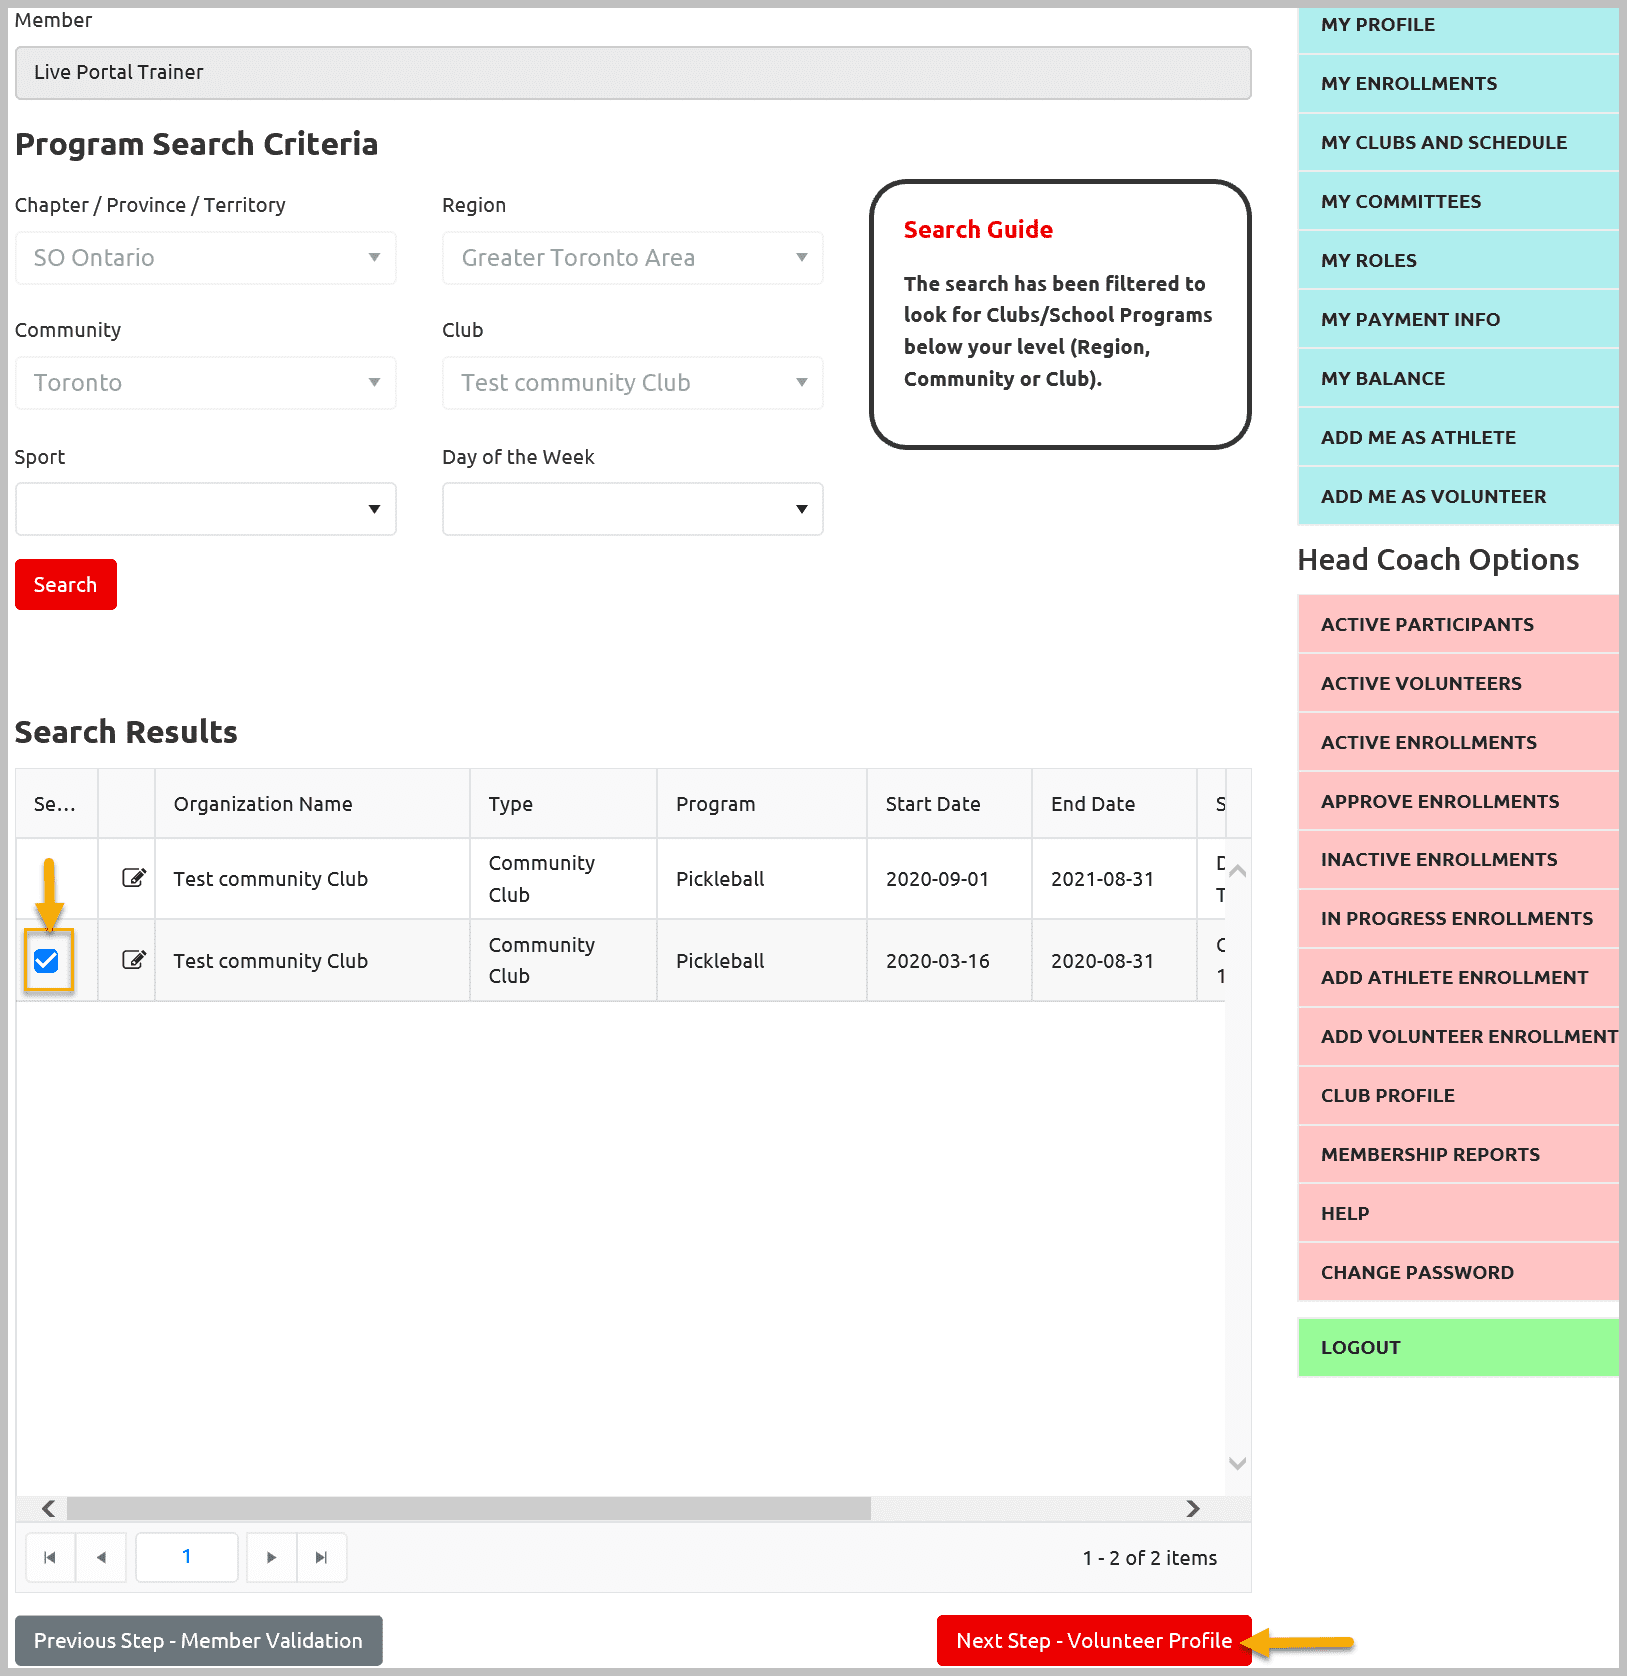
Program Search
Program Search window will open with Program Search Criteria filled in like your Chapter, Region, Community and Club.
Search Result grid will show you Session(s) of the club. Select appropriate Session and click on Next Step – Volunteer Profile
Note – You can select one session at a time.
Volunteer Profile
You can update information here using the available tabs provided at the top of the profile. There are some mandatory fields in some tabs, you will not be able to proceed to next tab if they are blank.
After reviewing all details, click on Next Step – Enrollment Details
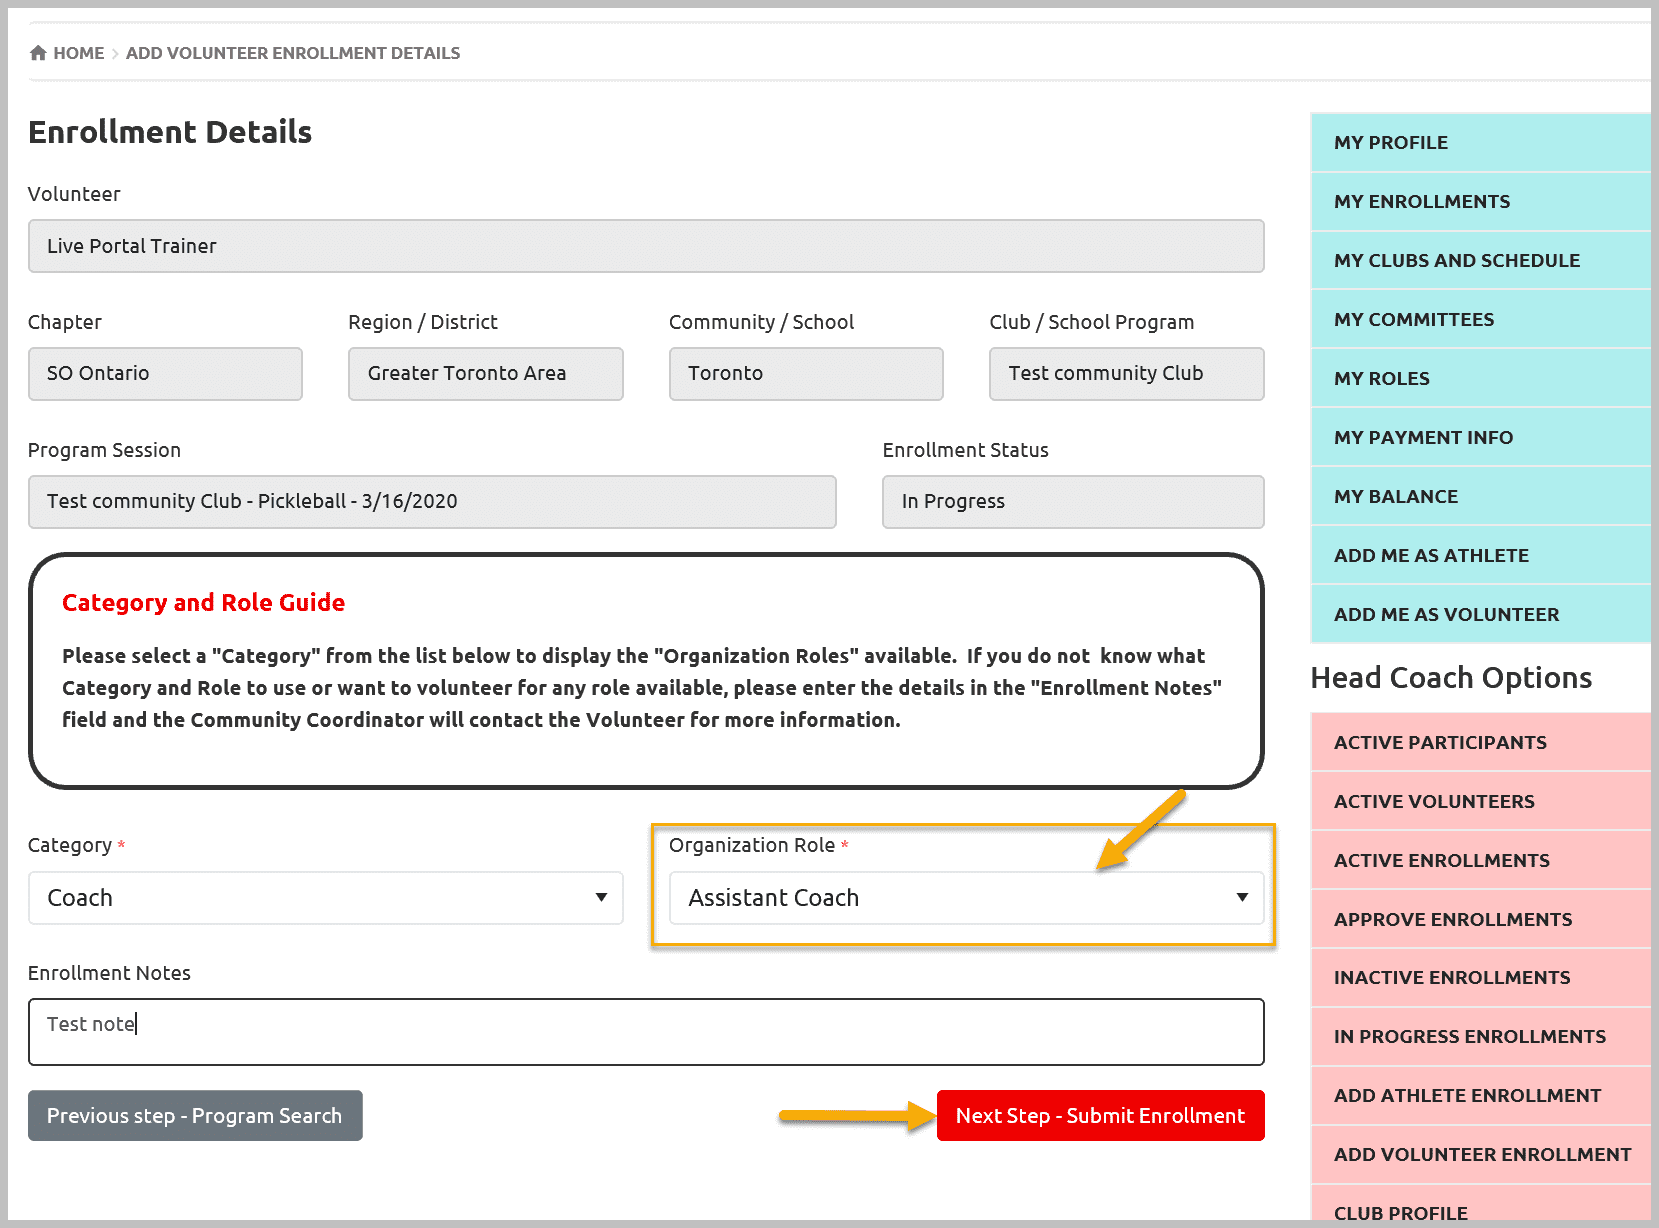
Volunteer Role Selection
Review information in the Enrollment Details window and select volunteer role in the club.
To select volunteer role, select appropriate category from Category field, which will enable the Organization Role field which will display list of roles based on the category you have selected. Select appropriate Organizational Role. Add Enrollment Notes if any and then select Next Step – Submit Enrollment.
Note – in this window you will see Enrollment Status as In Progress as enrollment submission is not done yet. If you will not submit enrollment and move to another tab of Pink menu, the enrollment will be in In Progress Enrollments tab instead of Approve Enrollments tab.
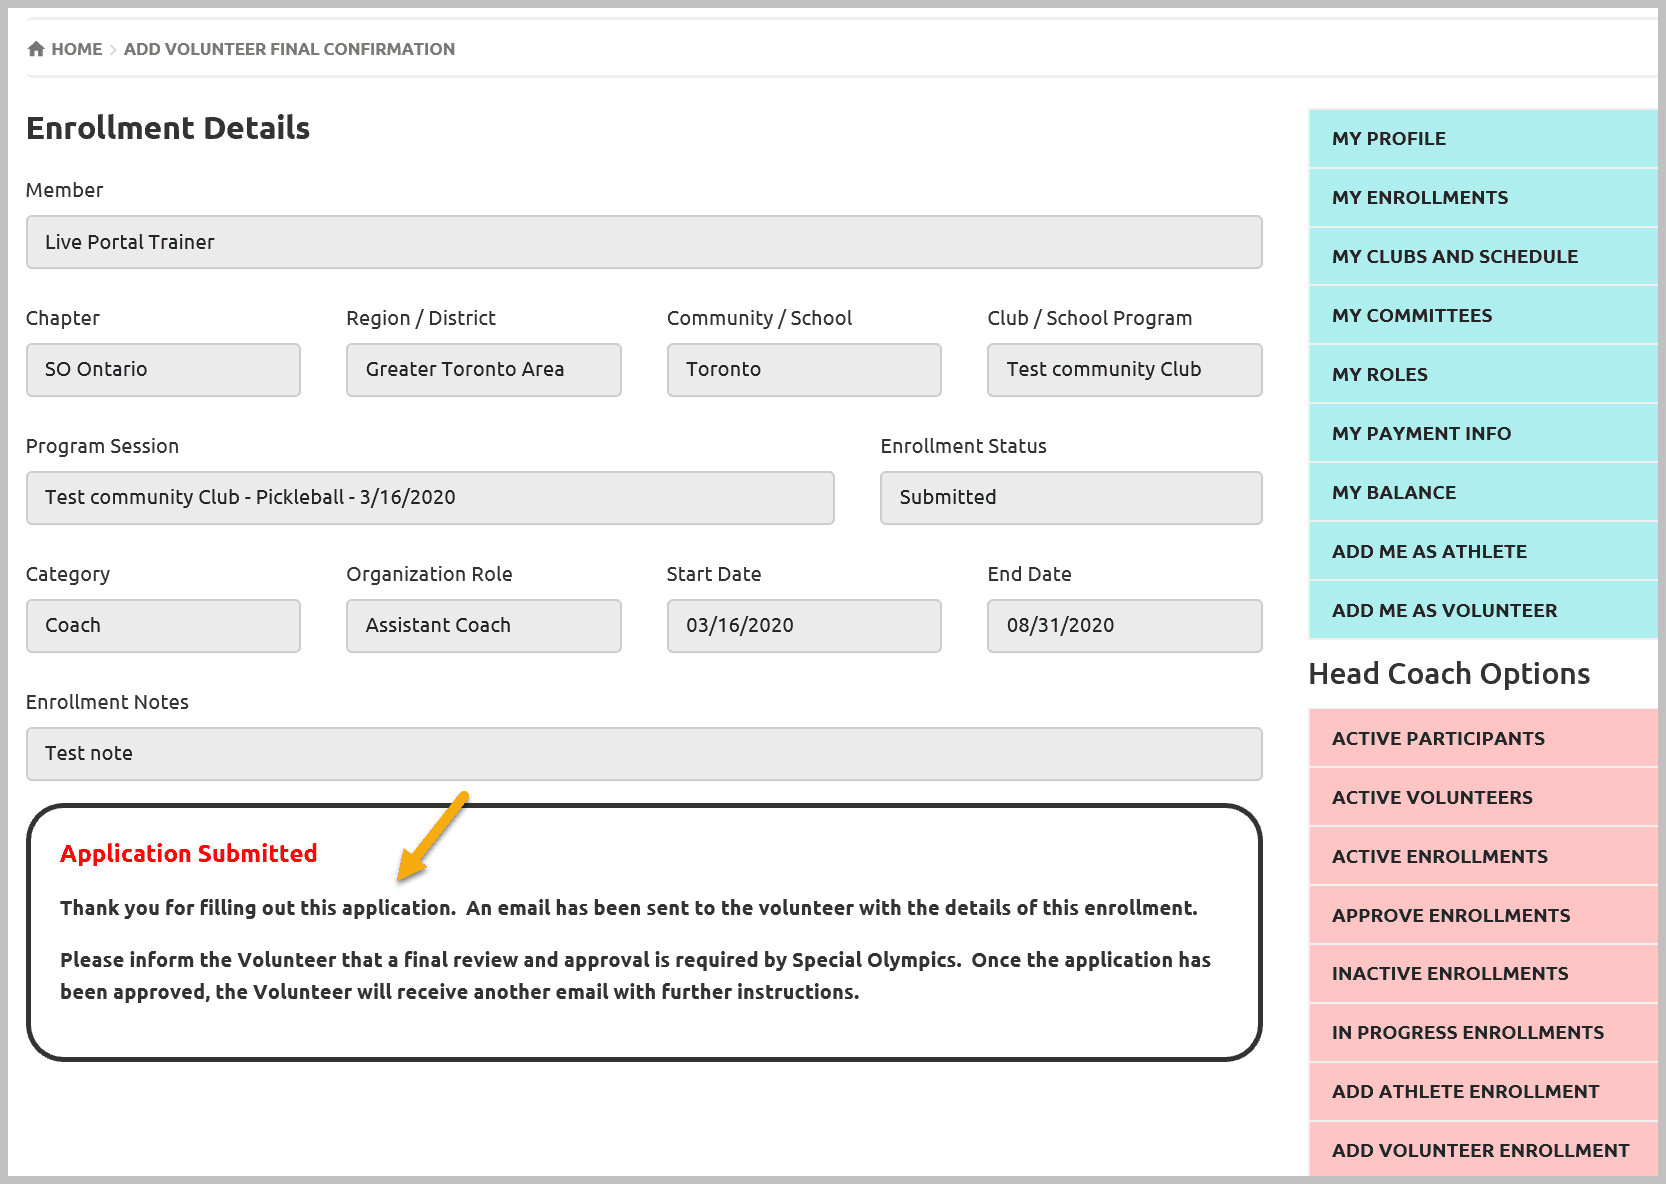
Enrollment Confirmation
The following confirmation window will open, and volunteer will be sent a confirmation email (if email is provided in the profile).
If you wish to enroll this volunteer in another Session of the club, click on New Enrollment which will allow you to enroll volunteer with fewer steps. If you do not wish to, then select Add Volunteer Enrollment tab again to enroll another volunteer.
Note – After adding all volunteers, who came back this year in your club, go to Approve Enrollment tab to approve their enrollments.
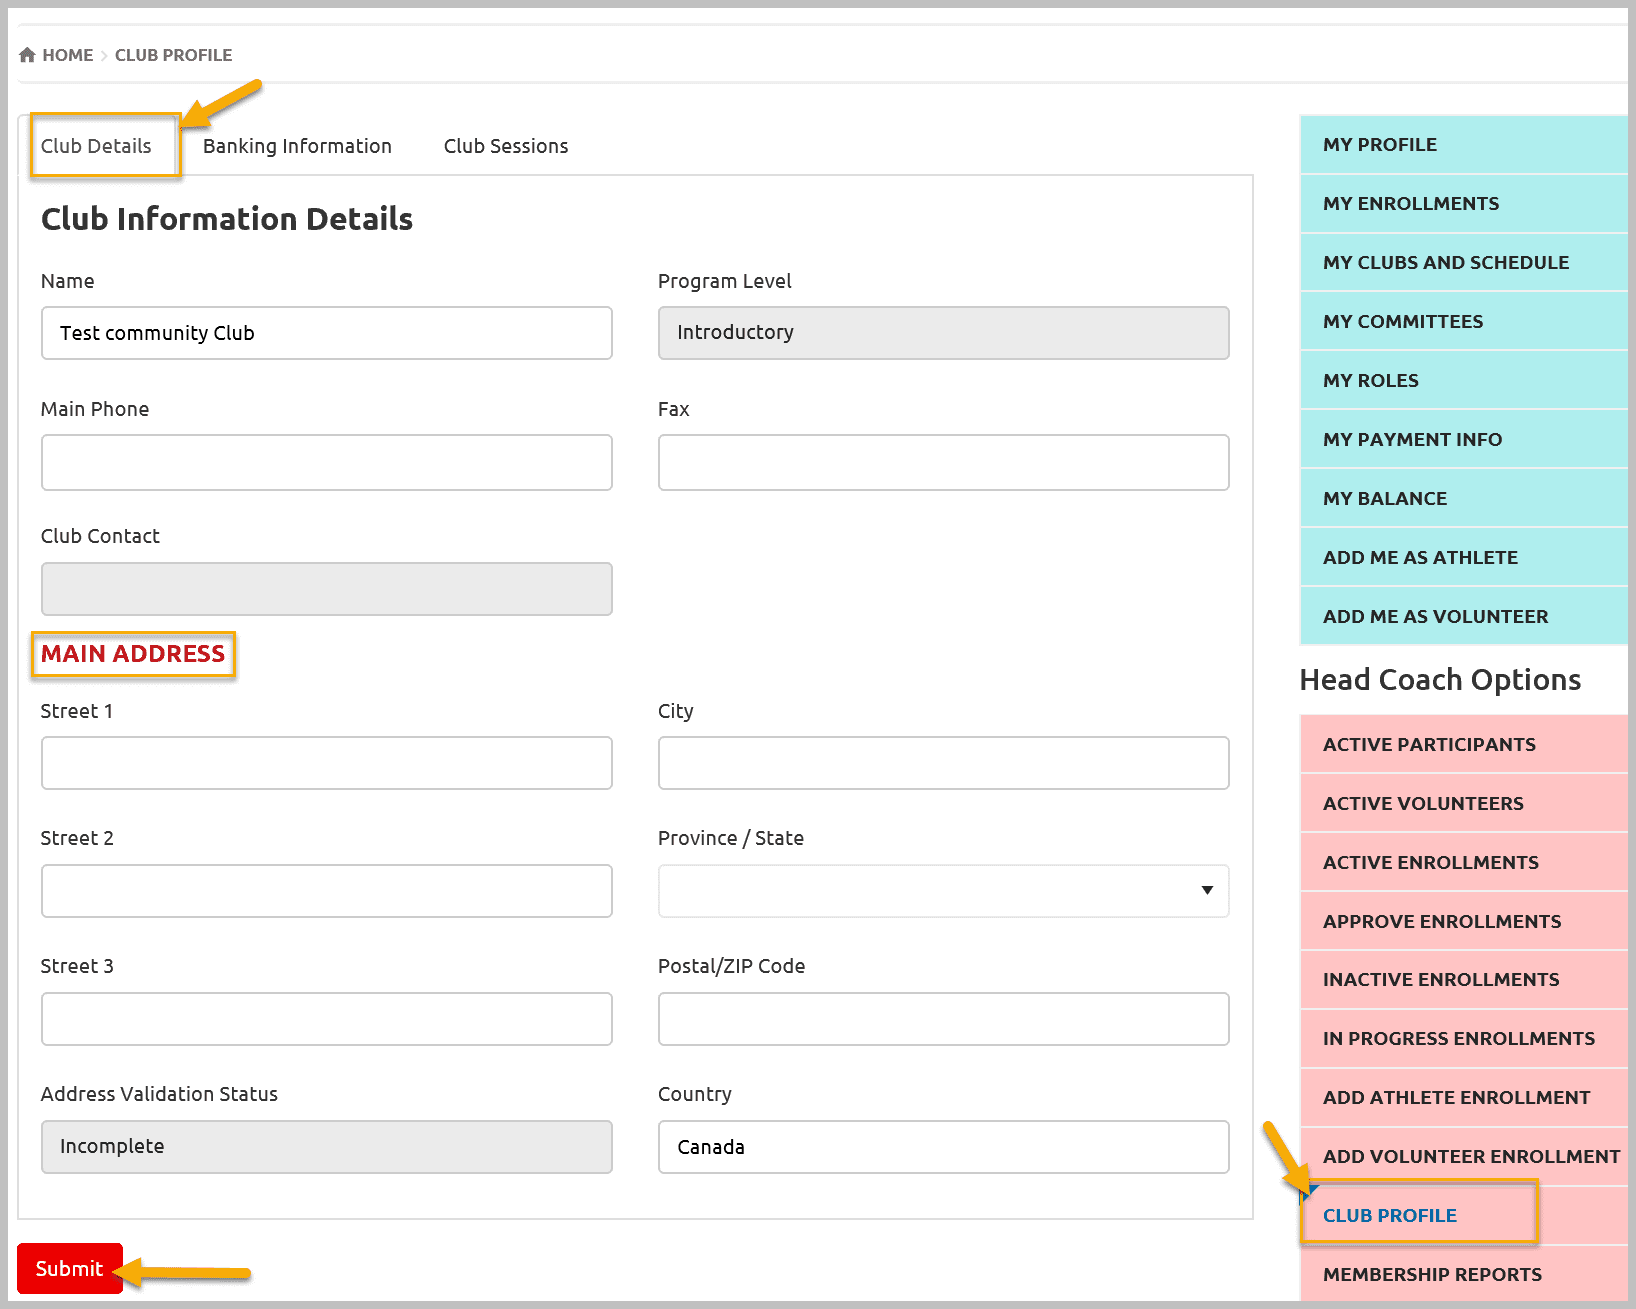
Club Profile
Select Club Profile from right side Pink menu. This window will provide you information on Club Details, Banking information & Club Sessions
Club Details
This tab will provide information on Name of club, Program Level ,Club Contact name and Facility address where sport practices takes place. You can update certain information on this tab. To save the information you have changed, click on submit and navigate to the next tab Banking Information.
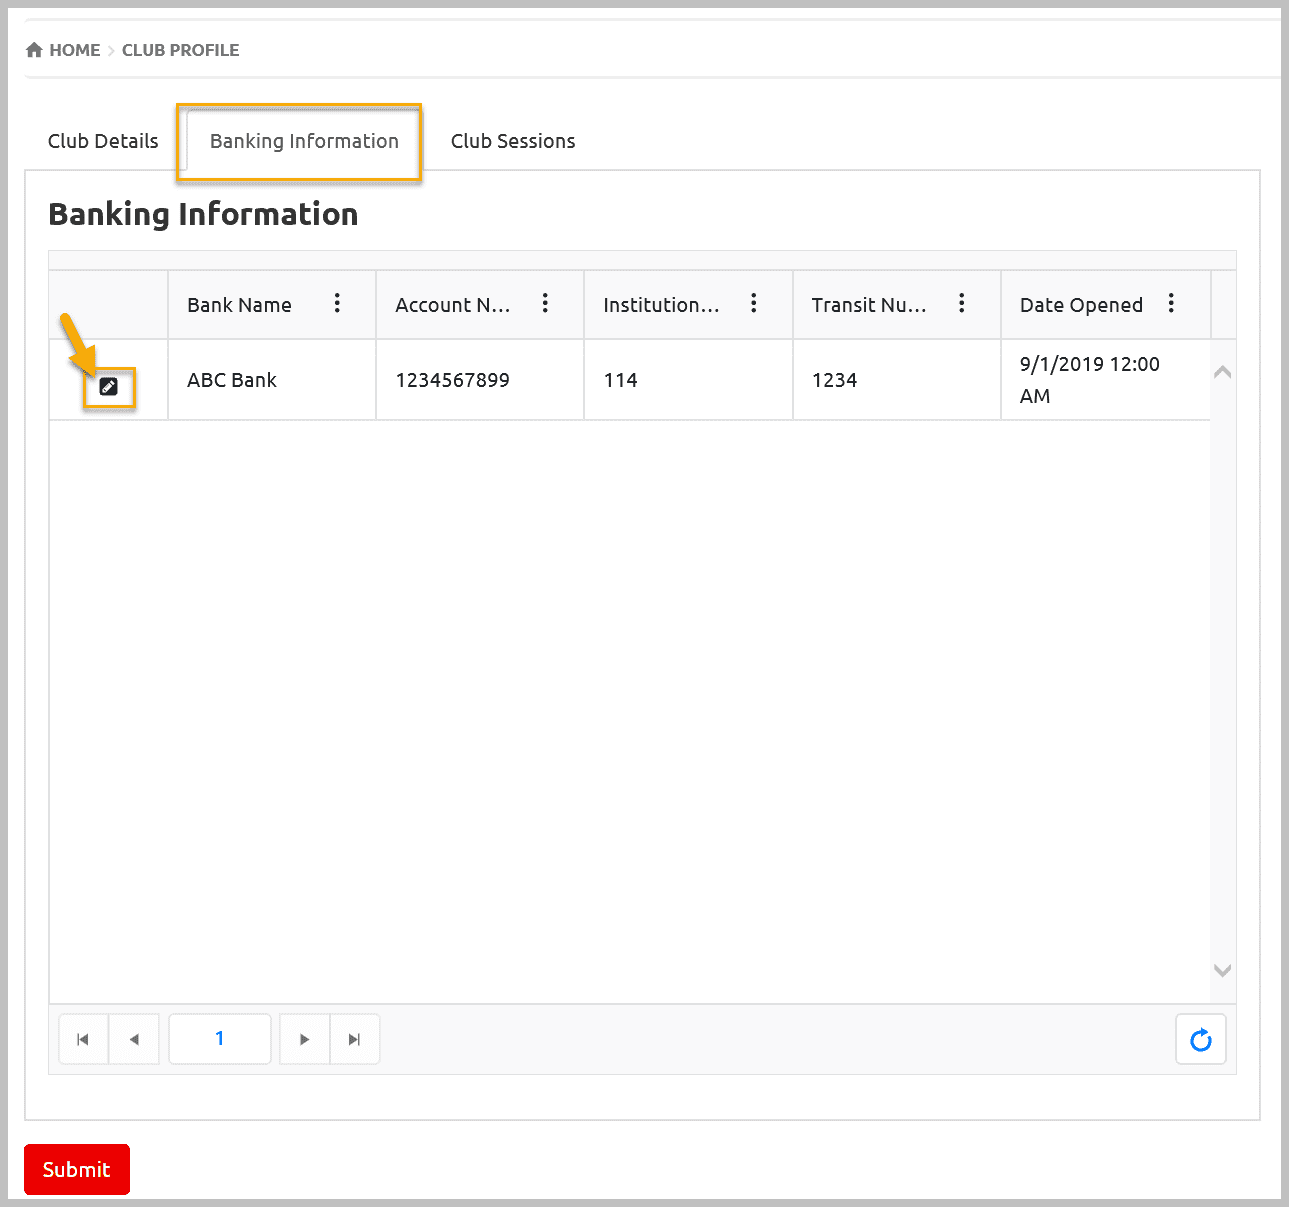
Banking Information
Banking Information tab will provide you bank name, account number and other information of your club bank account if it has.
To view detailed information click on Edit button beside the name of bank.
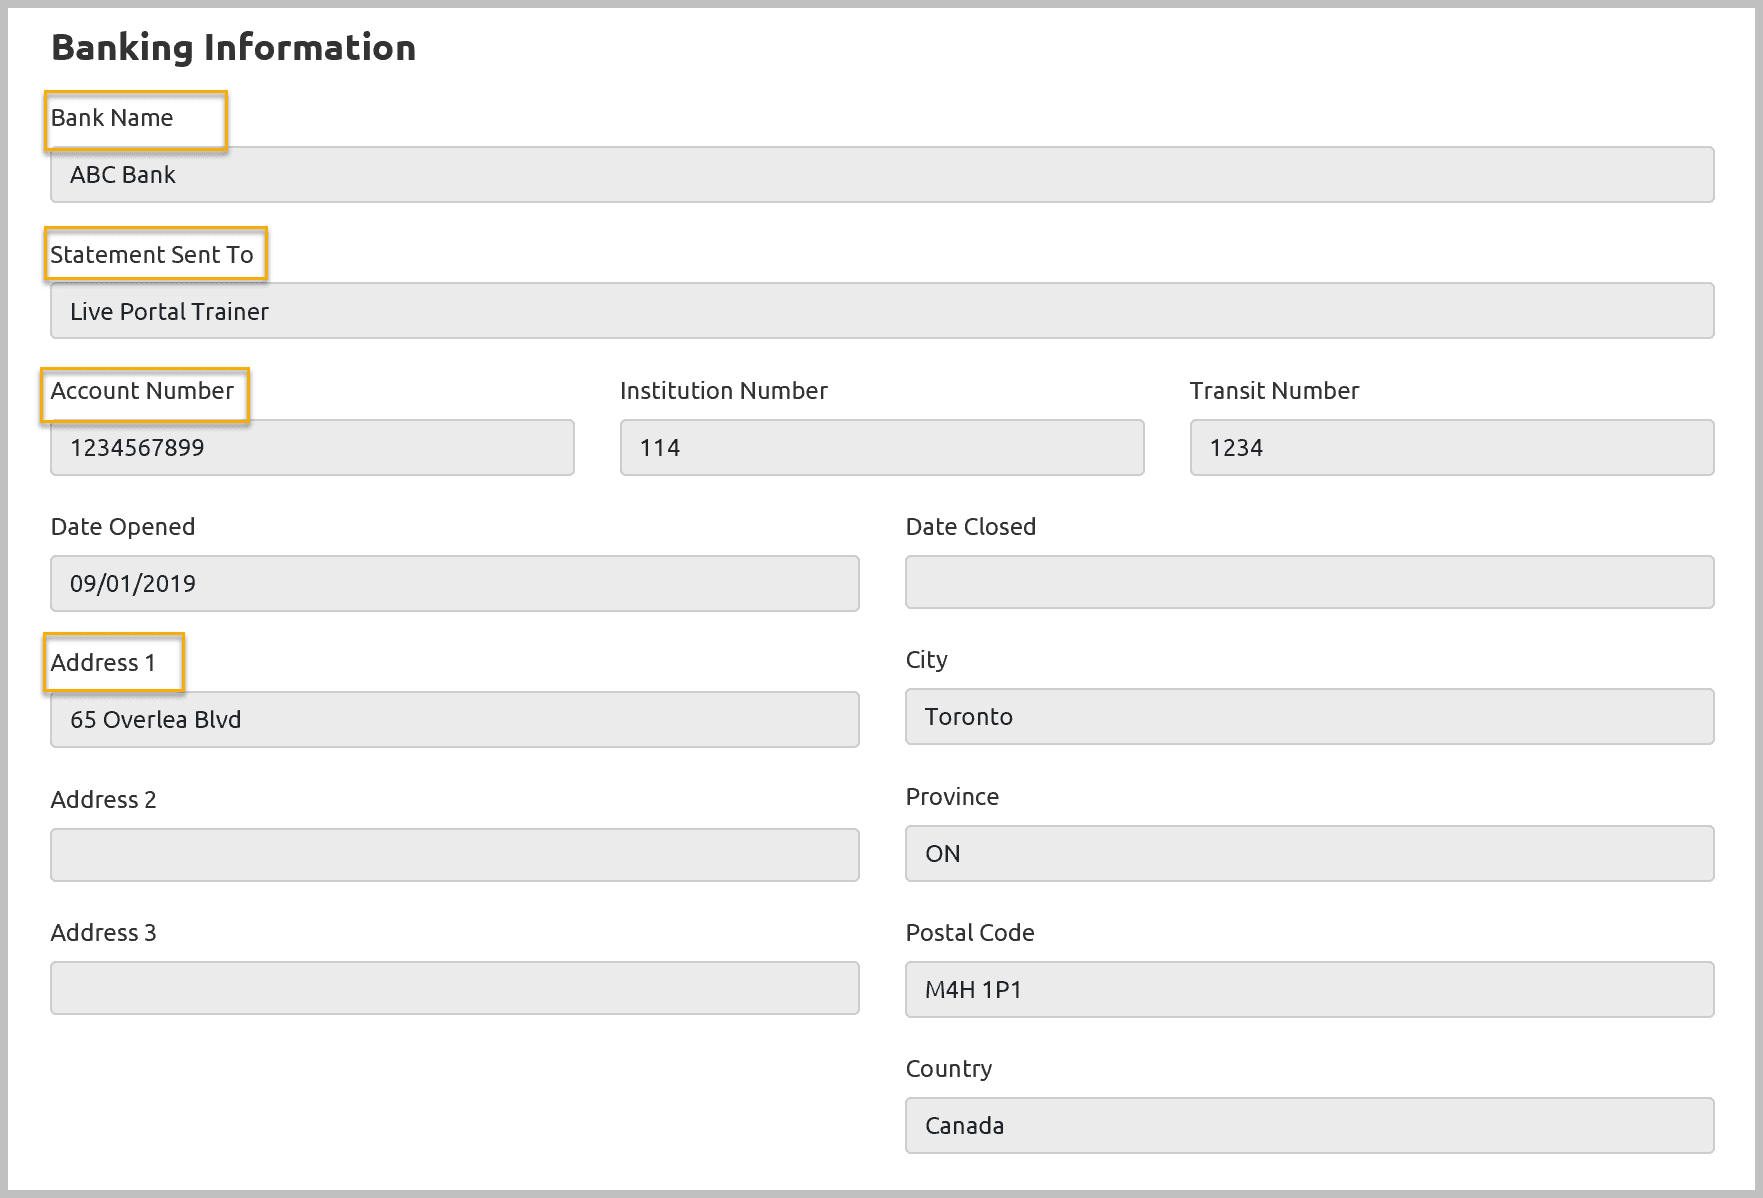
Banking information detail window will proved you address of bank, and the member name who will get Bank Statement (this could be head coach/team manager/treasurer). This information is read only so click on X to close the window and navigate to next tab Club Sessions.
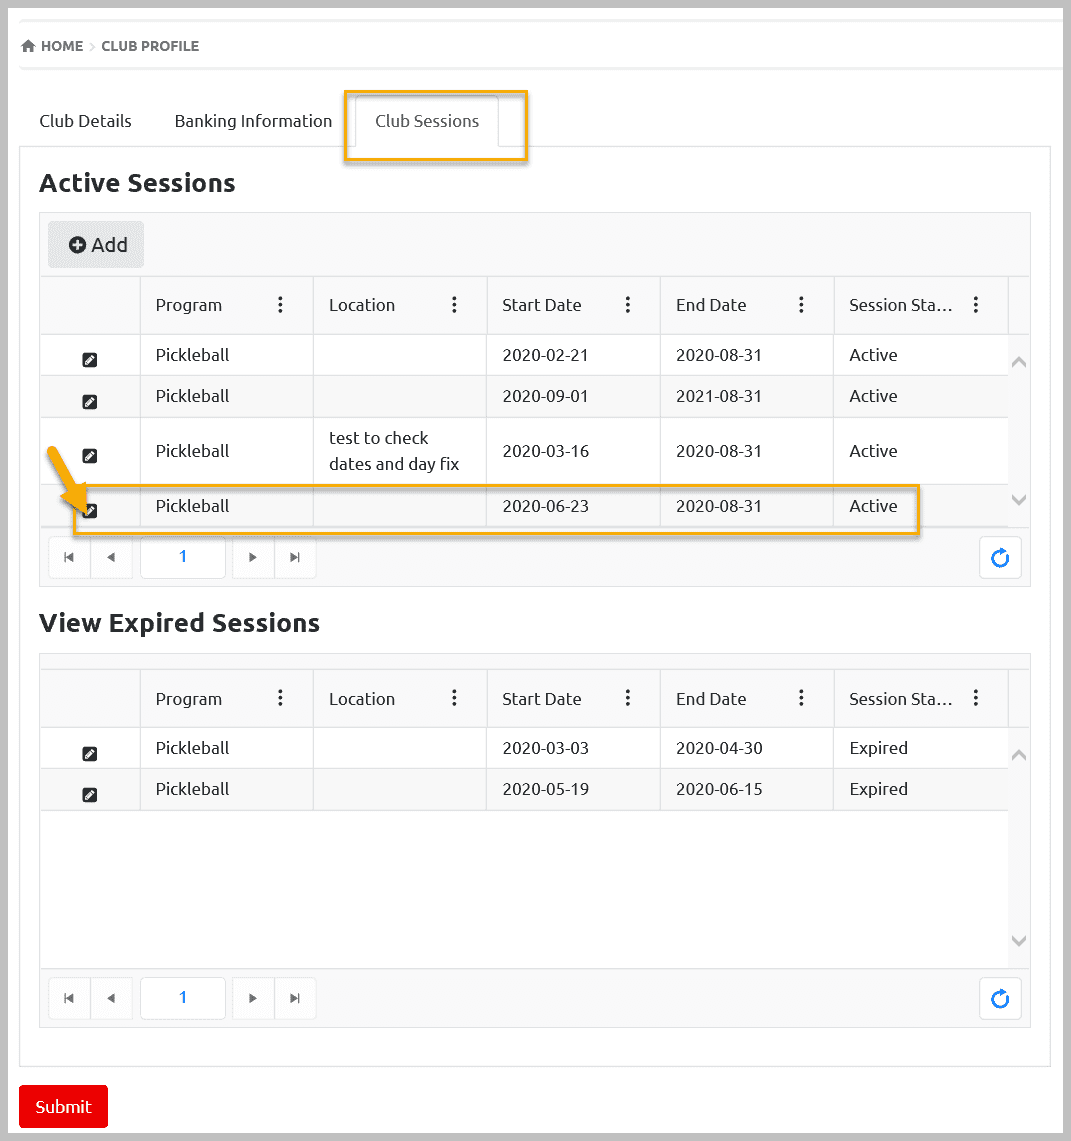
Club Sessions
Club Sessions tab will provide you list of club’s Active Session(s) and Expired Session(s). It also provides you ability to add new session.
You can view the sport name, location , start, end date and status of the session from this window.

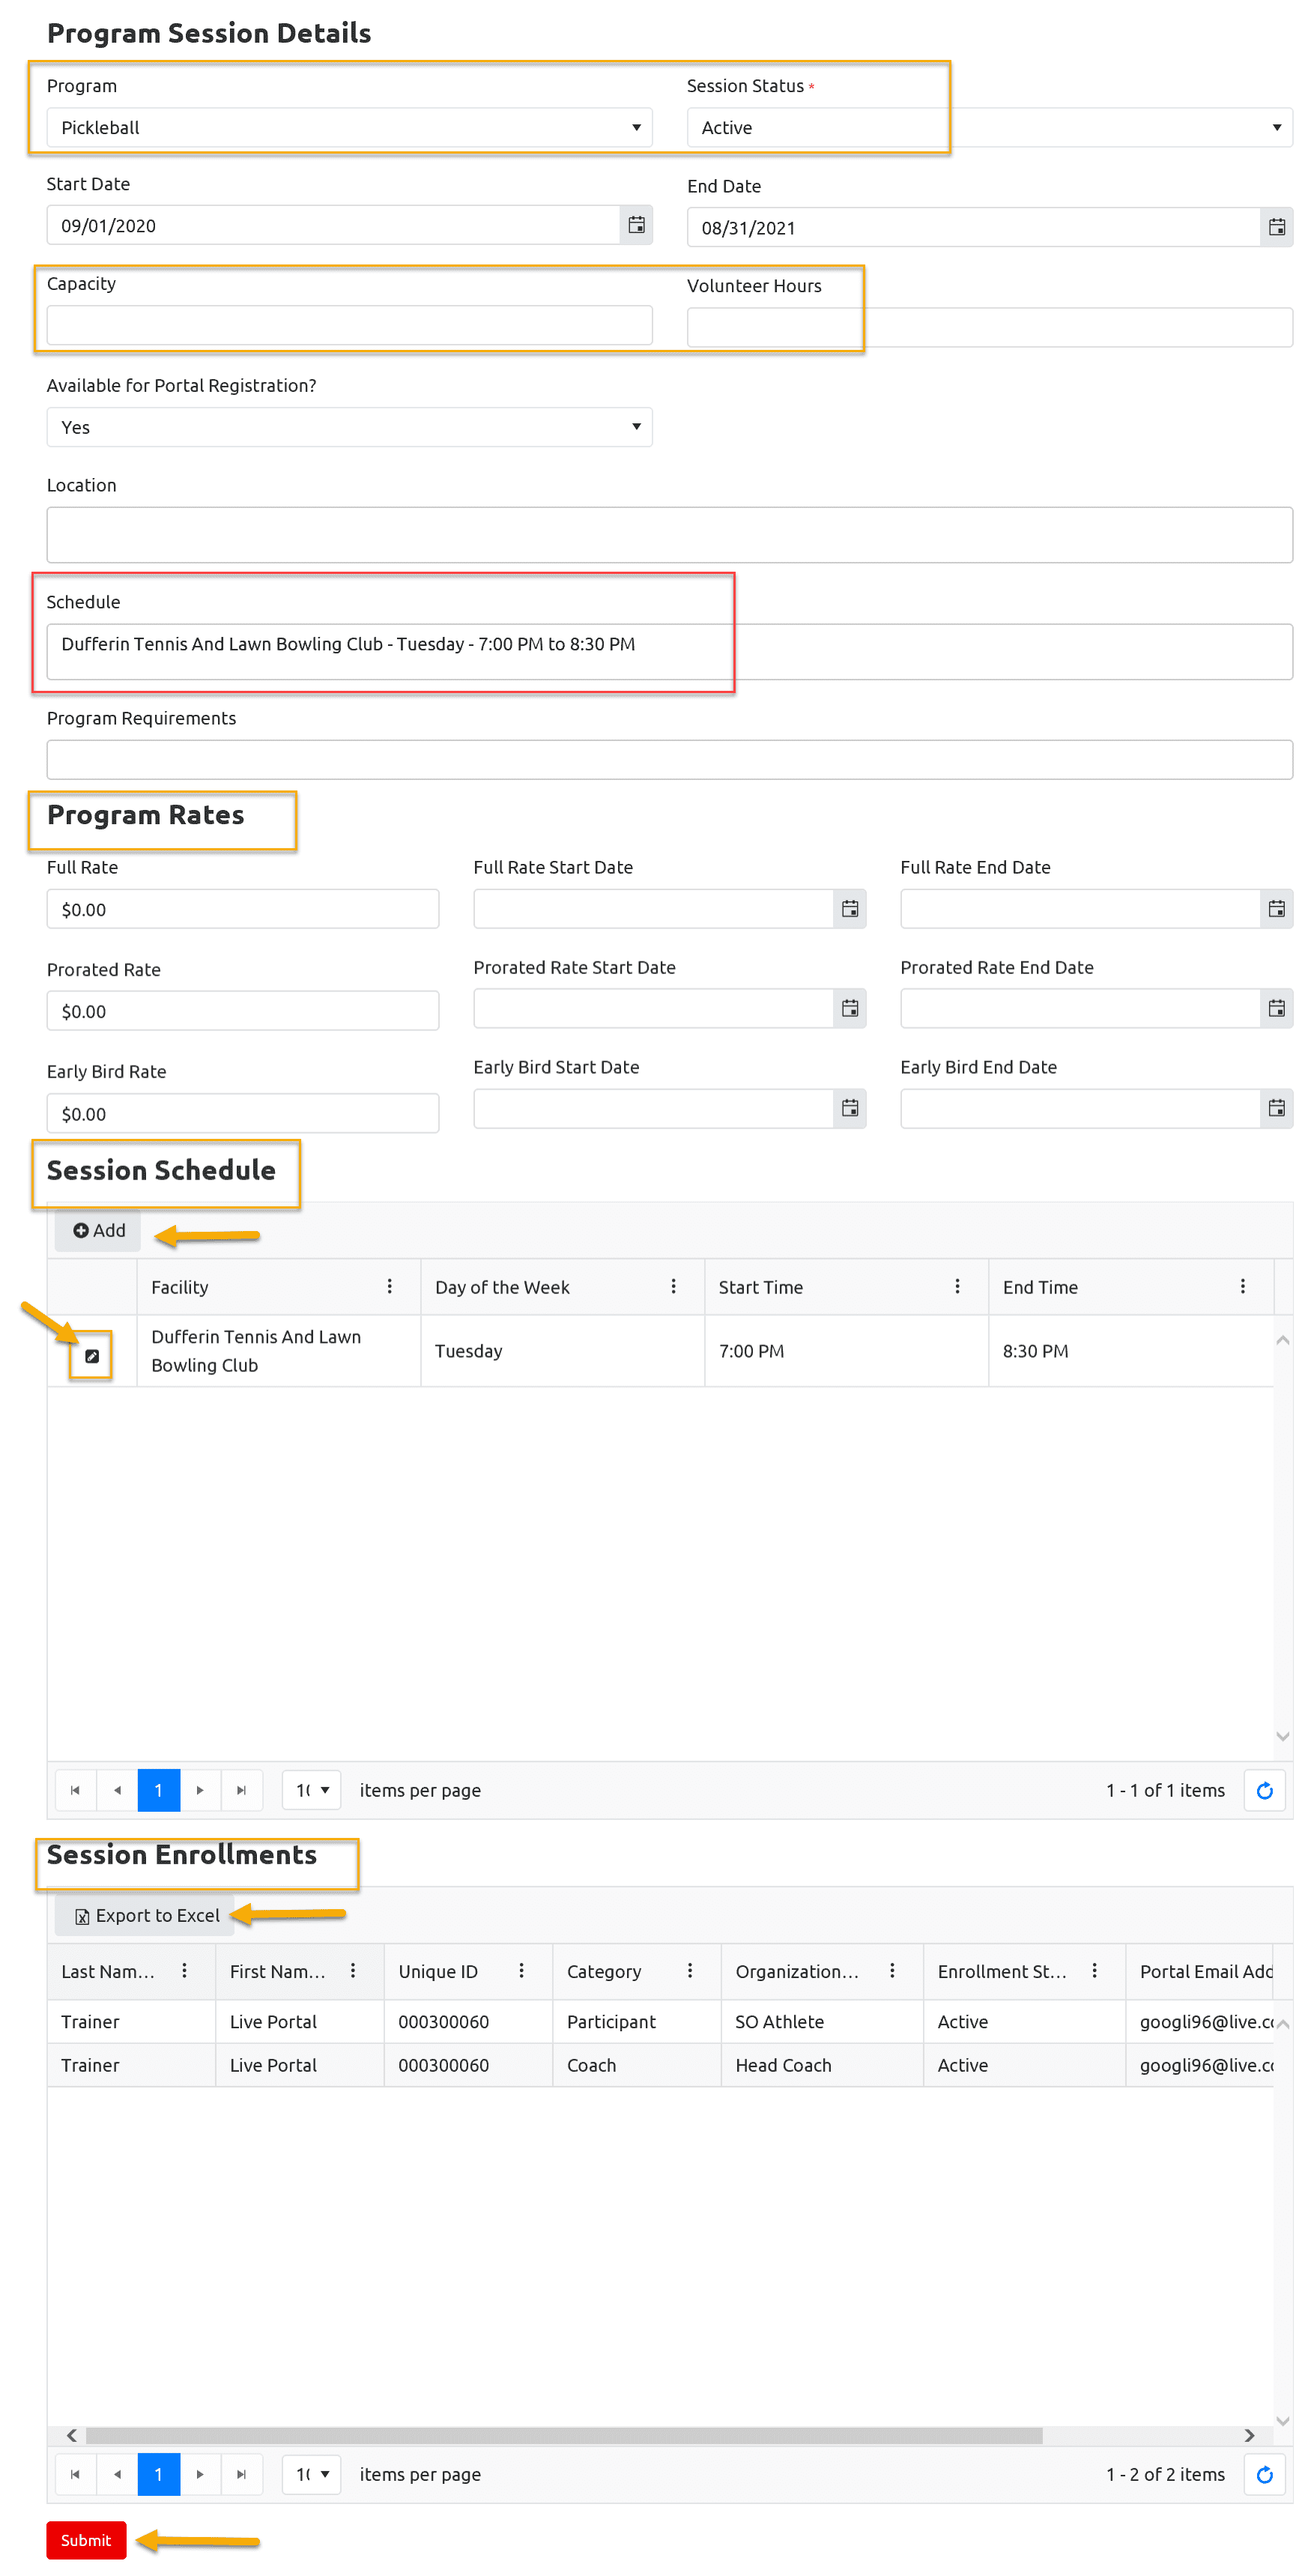
Program Session Details of Active Session
To view details of an Active Session, click on Edit button beside the name of Program/Sport
Program Session Details window will provide more information like Capacity, volunteer Hours, available for Portal Registration, Schedule, Program Fee and Program Requirements information.
Your will also be able to see list of enrollments for this session in Session Enrollments which is view only grid. You can export this list to Excel by clicking on Export to Excel button.
If you have updated any information click on Submit to save this information.
Note: if you will be updating Session Start /End Date, you MUST have to update Enrollment Start /End Date of this session’s all enrollments too.
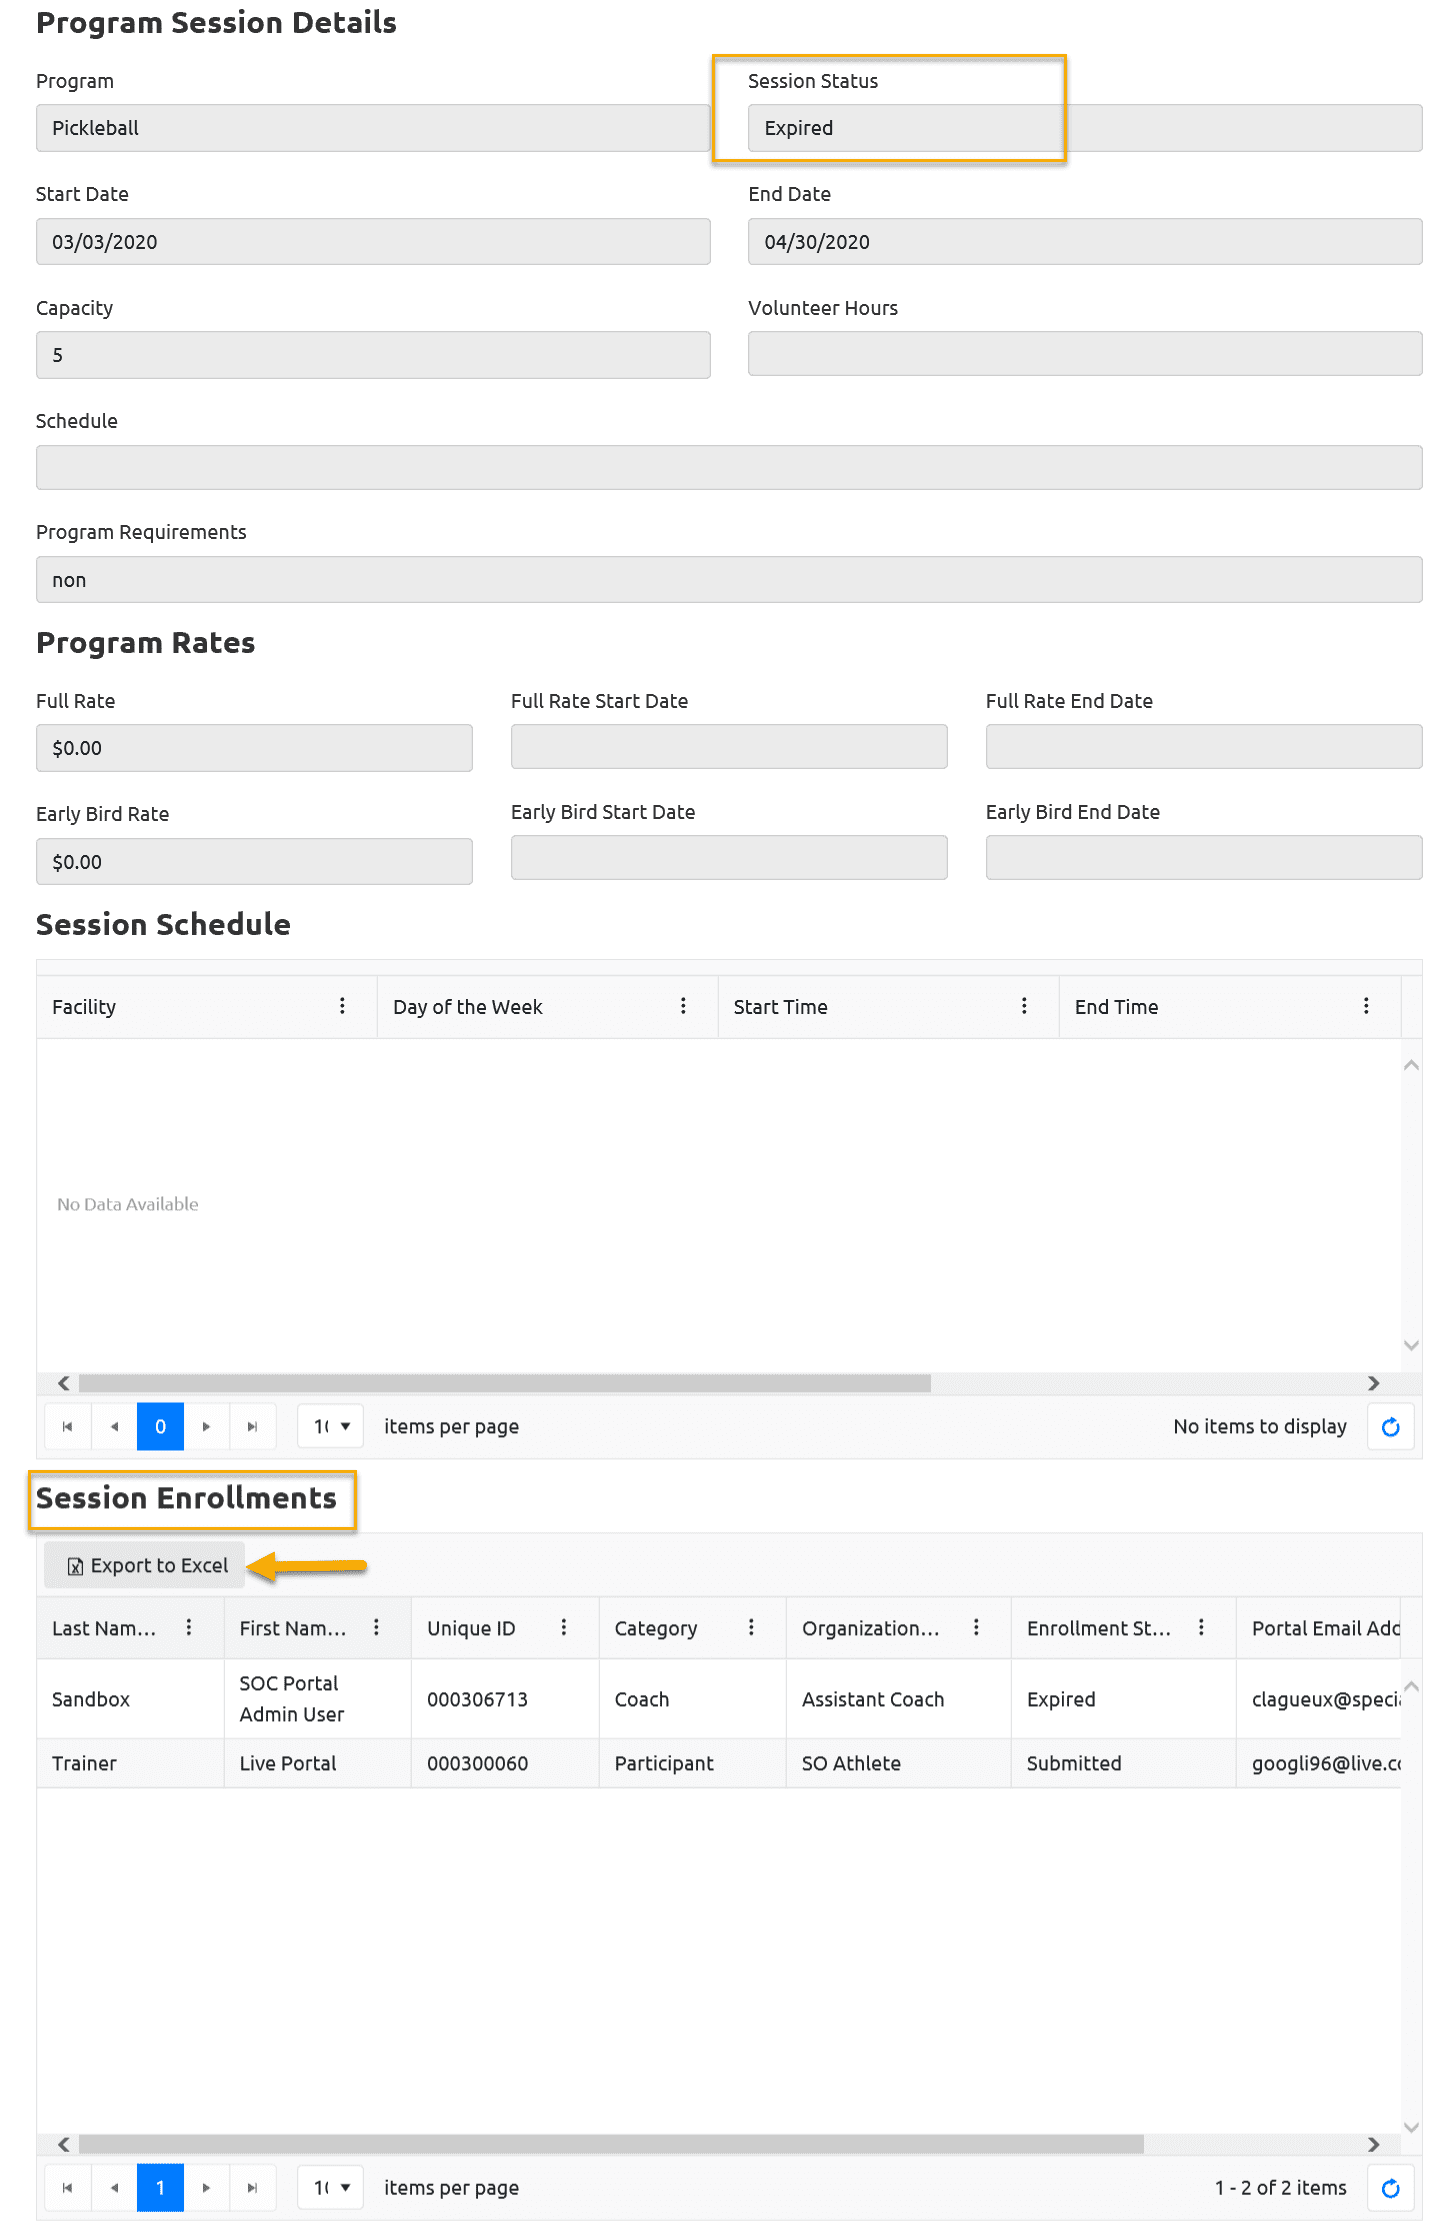
Program Session Details of Expired Session
To view details of an Expired Session, click on Edit button beside the name of Program/Sport
Program Session Details window will provide more information like Capacity, volunteer Hours, available for Portal Registration, Schedule, Program Fee and Program Requirements information.
Your will also be able to see list of enrollments for this session in Session Enrollments which is view only grid. You can export this list to Excel by clicking on Export to Excel button.
Note: This is view only information.
Add new Session
To add New Session click on Add in the Club Sessions window
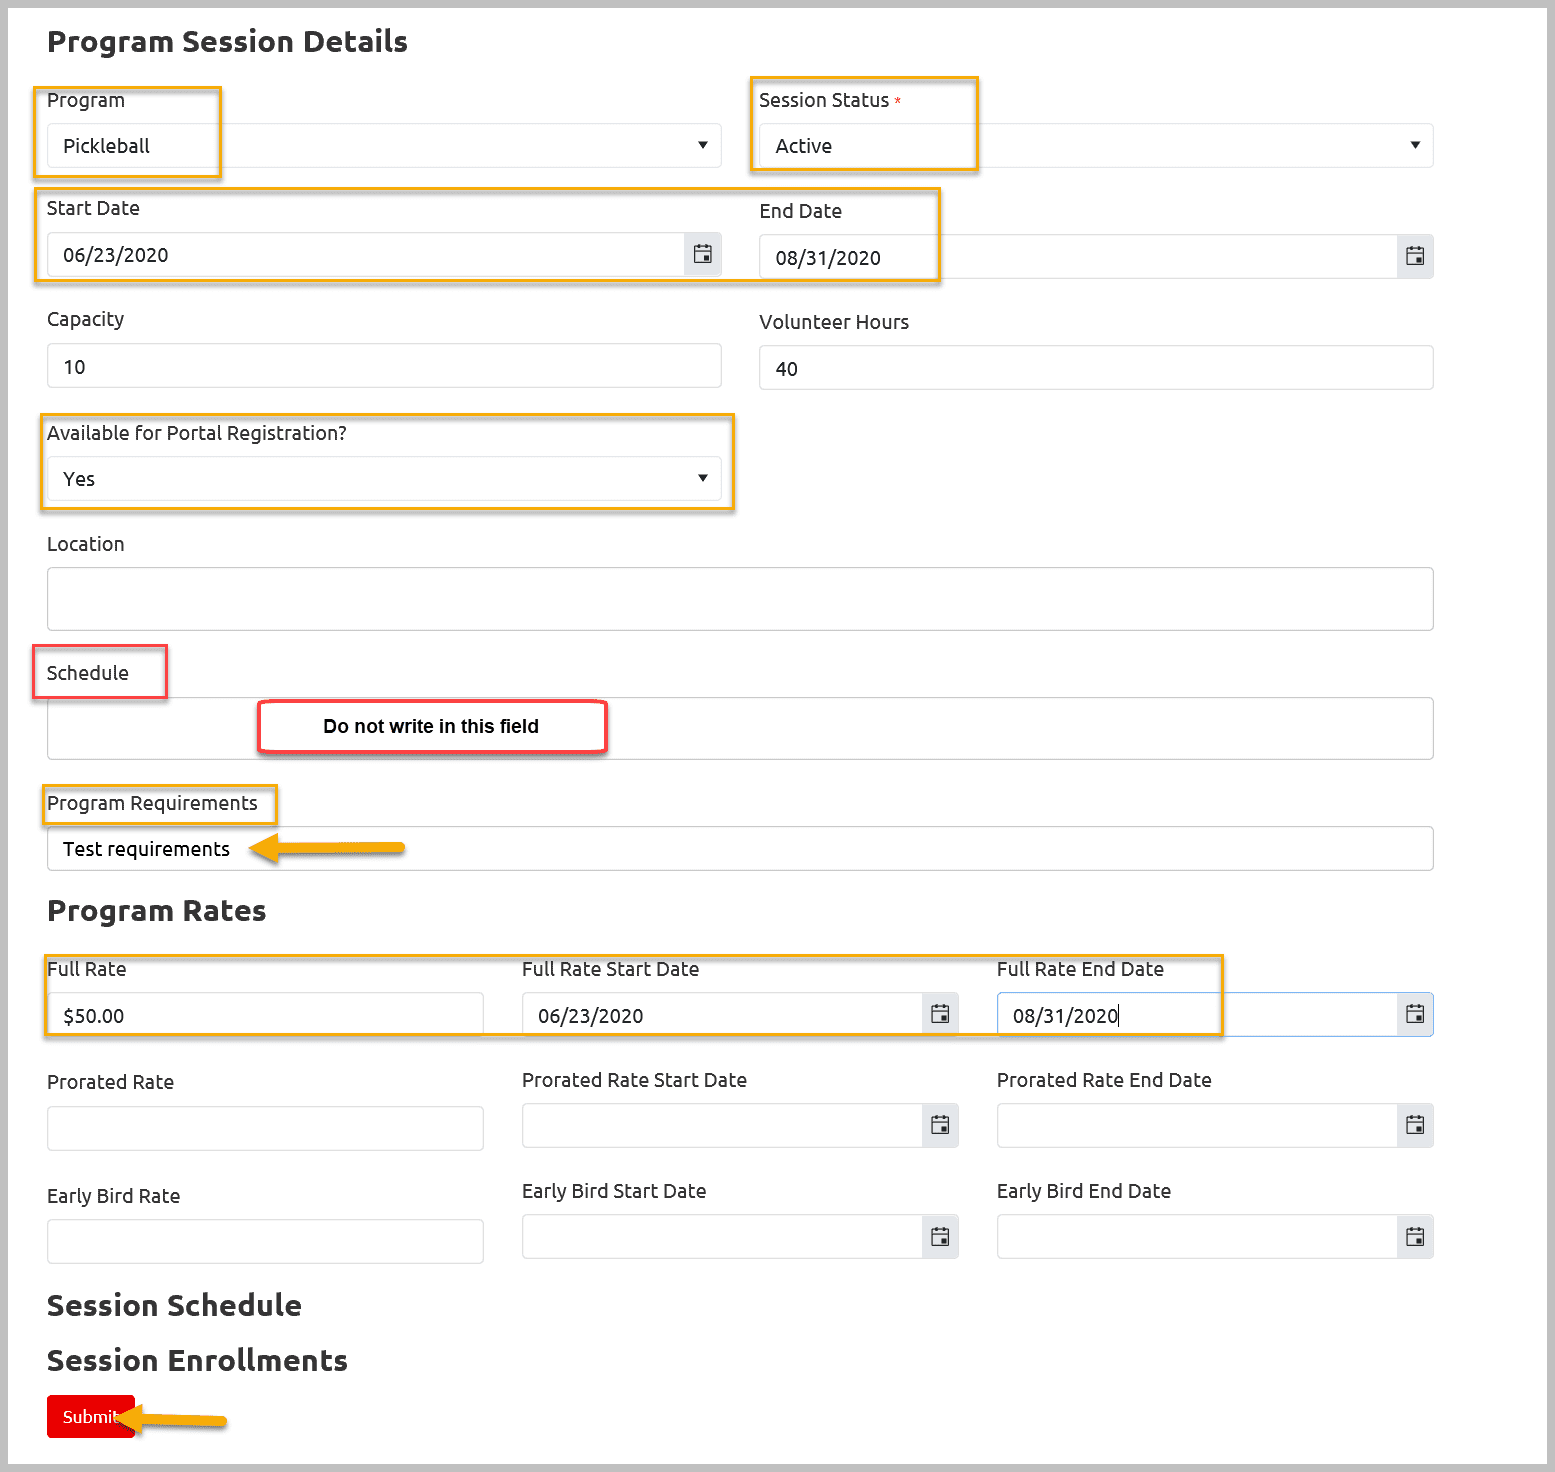
Select Program, Session Status Active/New, Session Start and End Dates.
Available for Portal Registration – Yes will make this session available to you once Session Start Date will pass. if you wish to work on this club session like enroll members before the start of its practices, you have to contact SOO Staff to approve it.
Schedule – do not write in this field as schedule information will pop up in this field when you will enter the Facility and Schedule information.
Add Full Rate (club registration fee), Full Rate Start & End Date and Program Requirements if any. Click Submit to save this information
Note: You can not add Session Schedule until to Submit to save this information
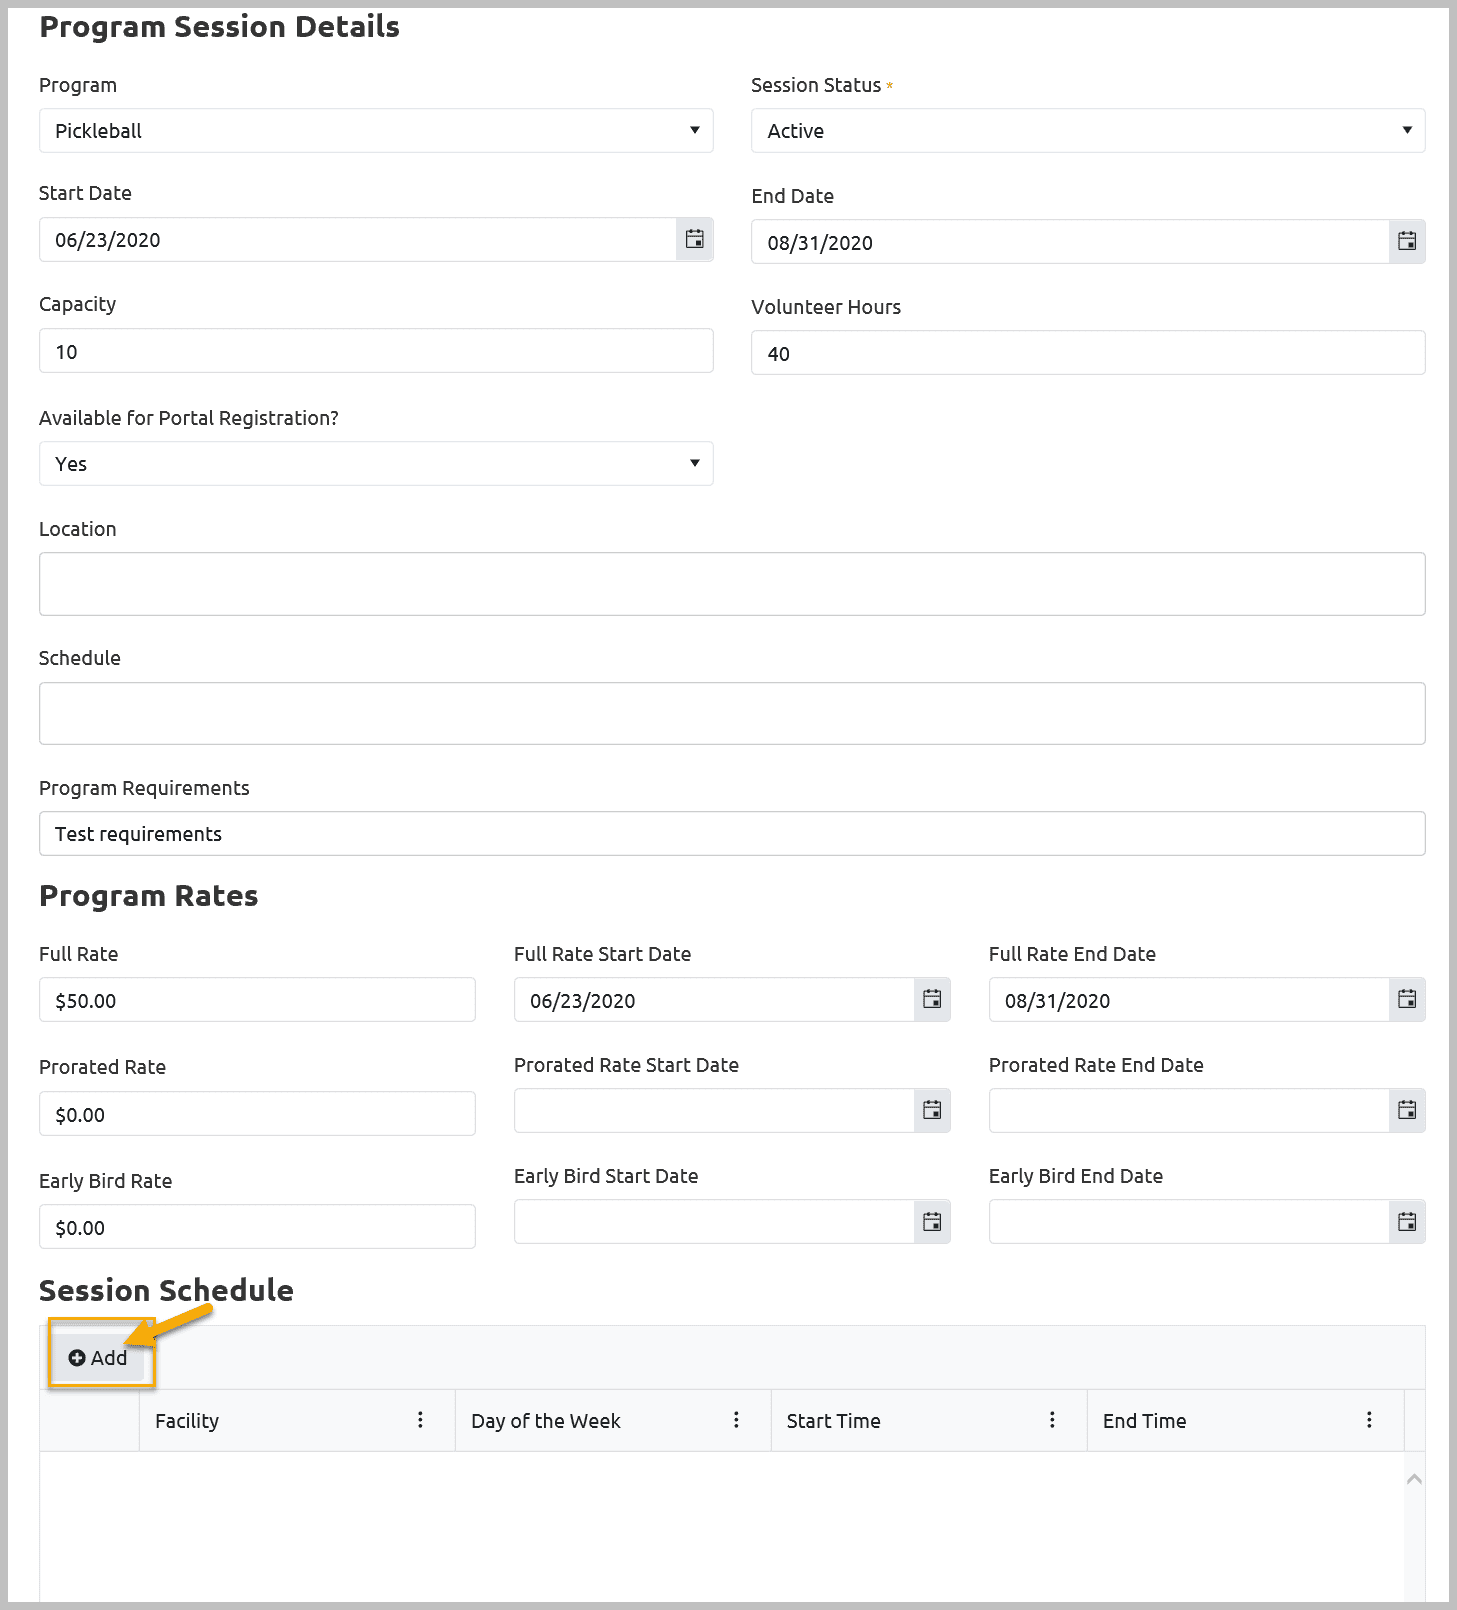
Open newly created session by clicking Edit button beside the name of Sport
Add Session Schedule
Now you will be able to add session schedule. Click on Add button
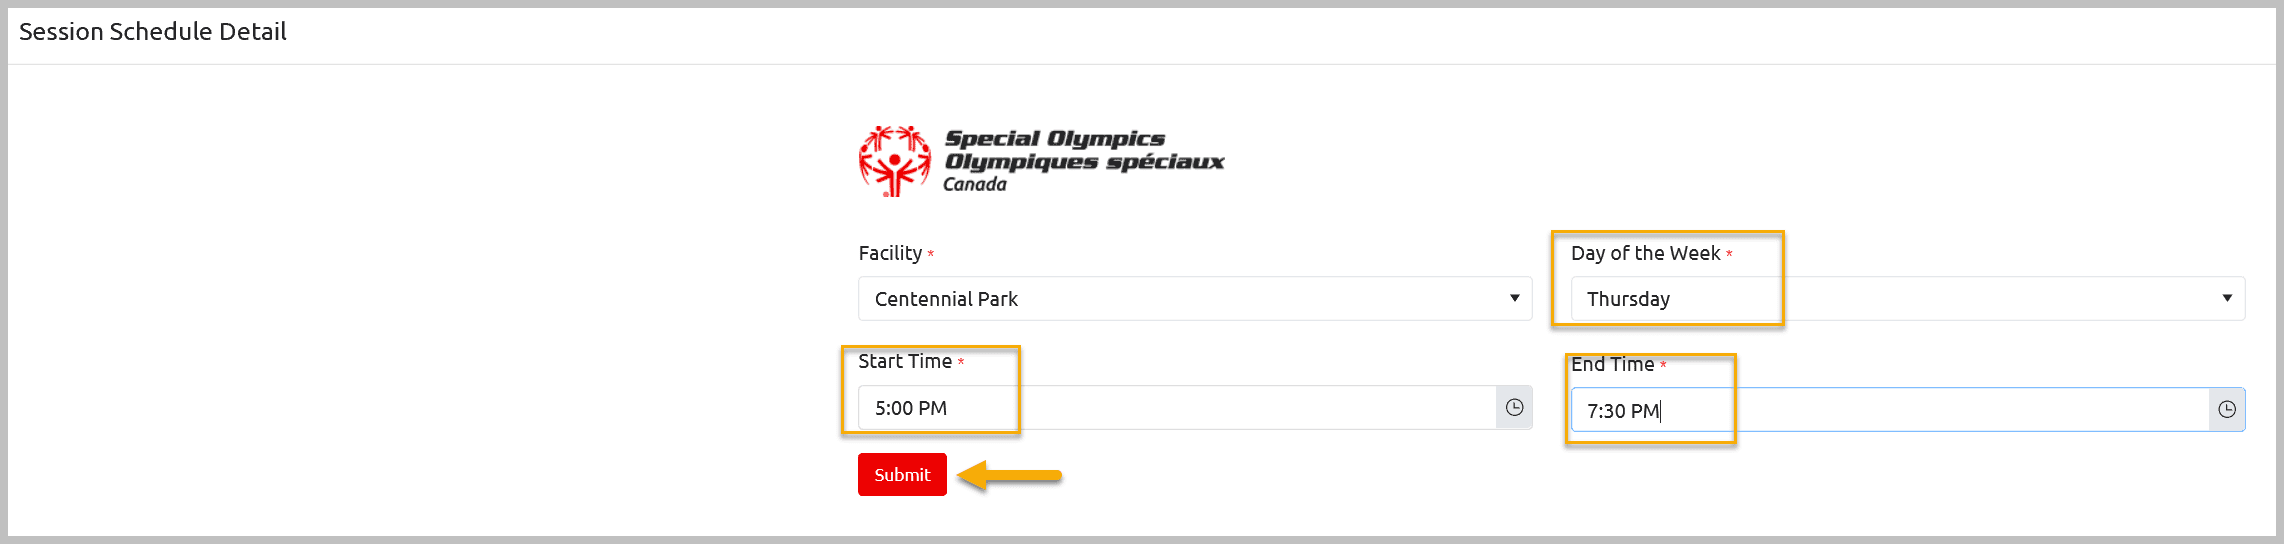
In Session Schedule Detail window search for facility in Facility field. Select appropriate Facility from the list. (if you do not find the name of the facility you are looking for, this means it is not registered in database. Send facility information to your community Data Admin / SOO DBA to register it)
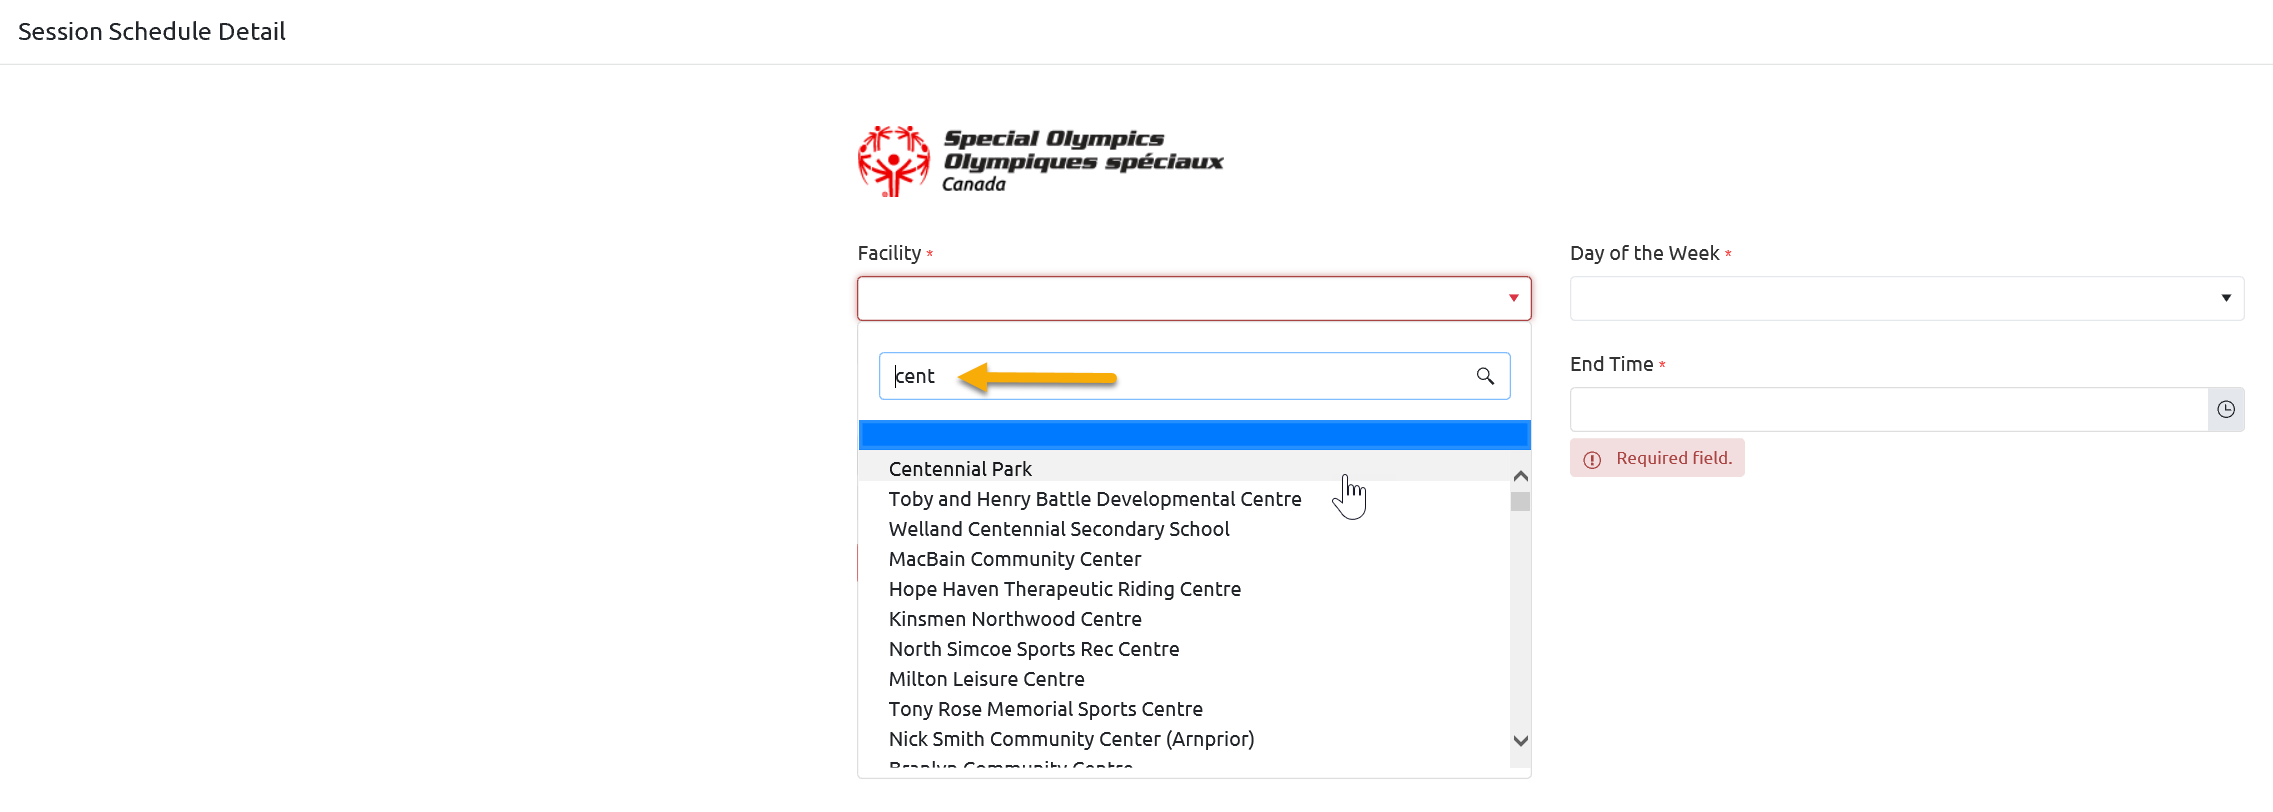
Select Day from Day of the Week field, Start & End Time and Submit to save this information.
Note: Time is provided in 30 minutes internals in list. If you have to enter time like 5:15 & 7:45 . Select 5:00 PM from the list and then edit this time by inserting cursor in the Start Time field which will allow you to edit time, so update it as 5:15 PM. Repeat this for End Time as well.
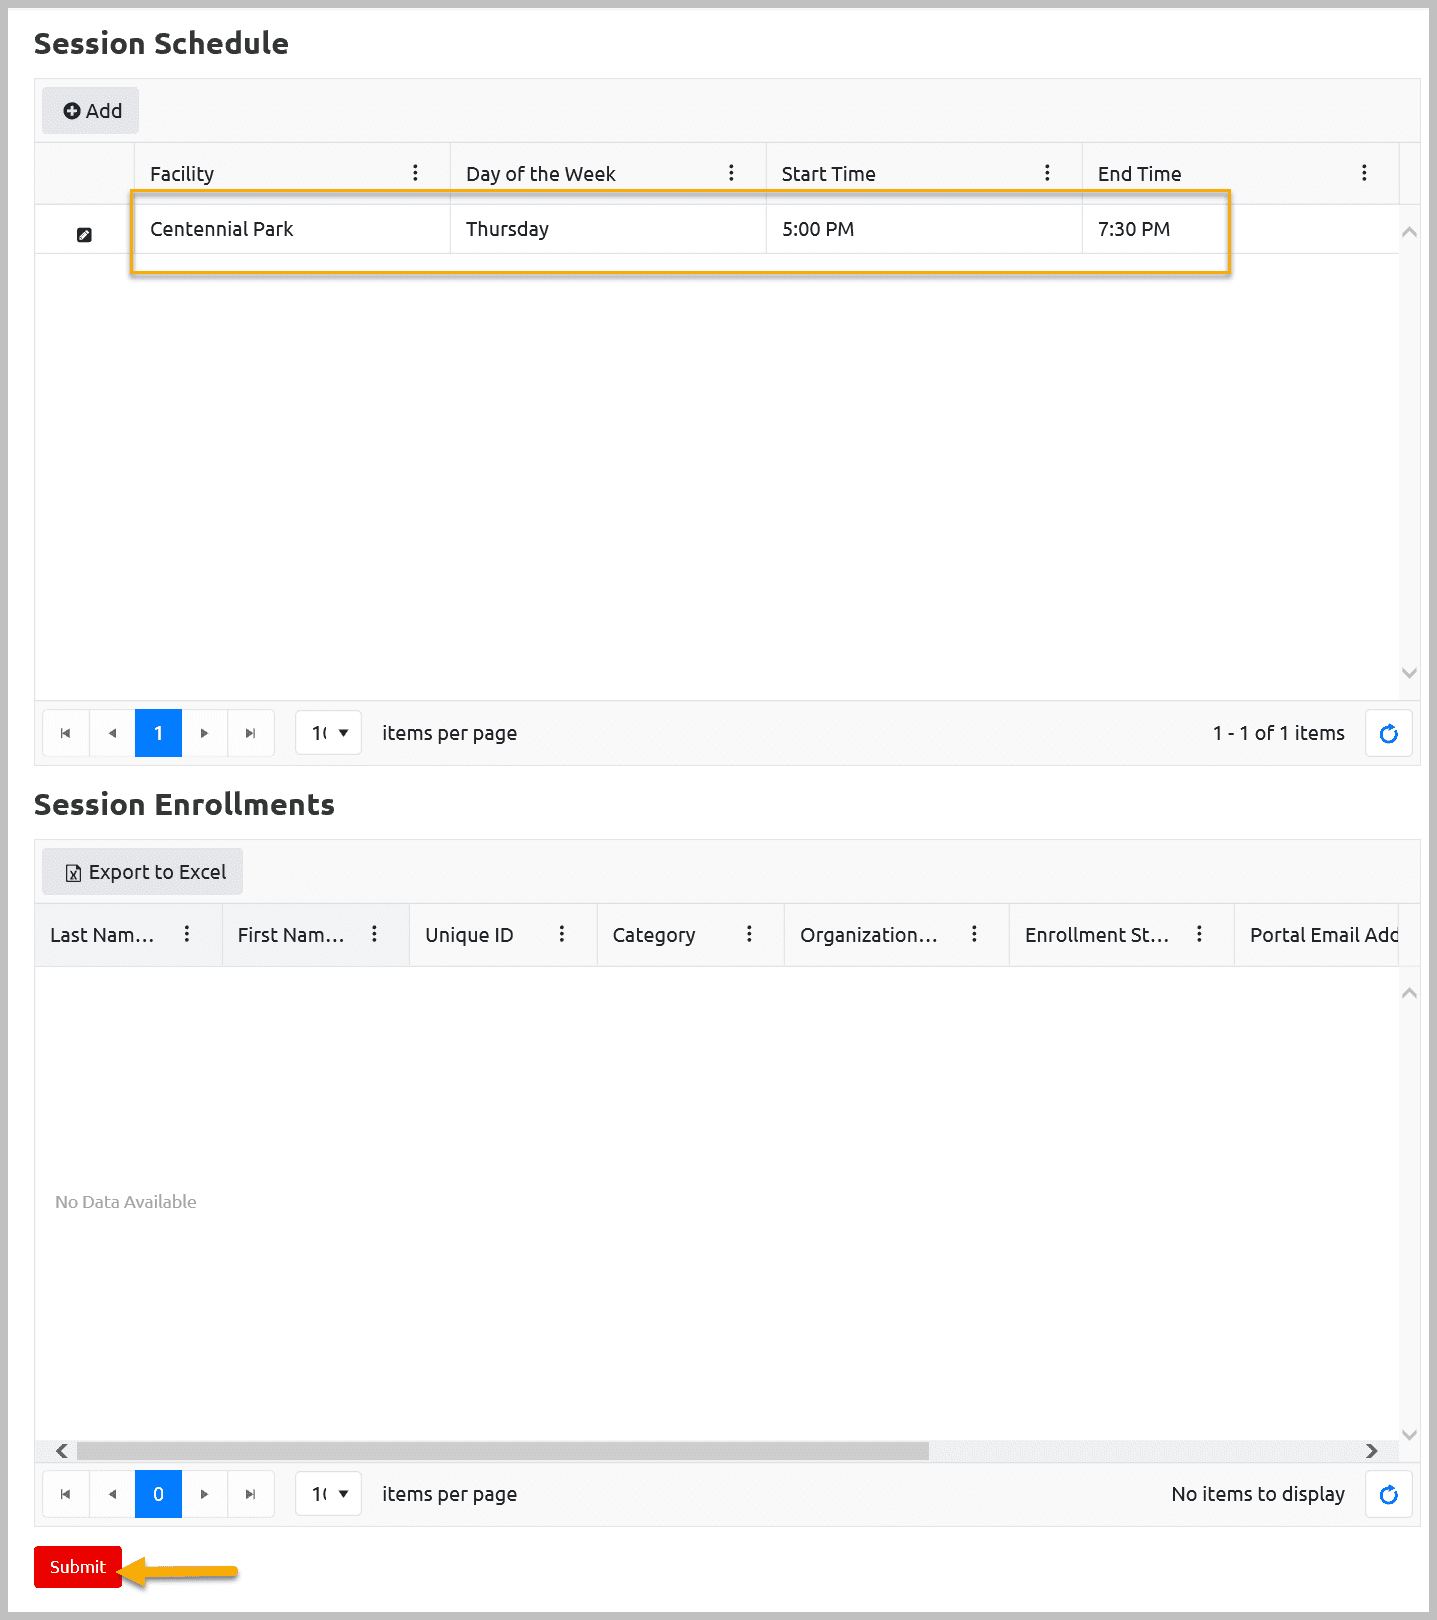
You will see your Session Schedule information. Submit to save and close this window
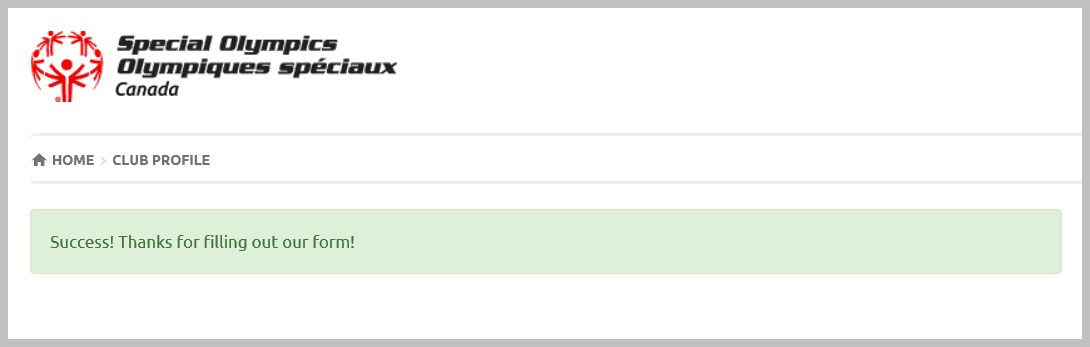
Confirmation Notice
You will get the following Success notice which means your session has been created successfully.
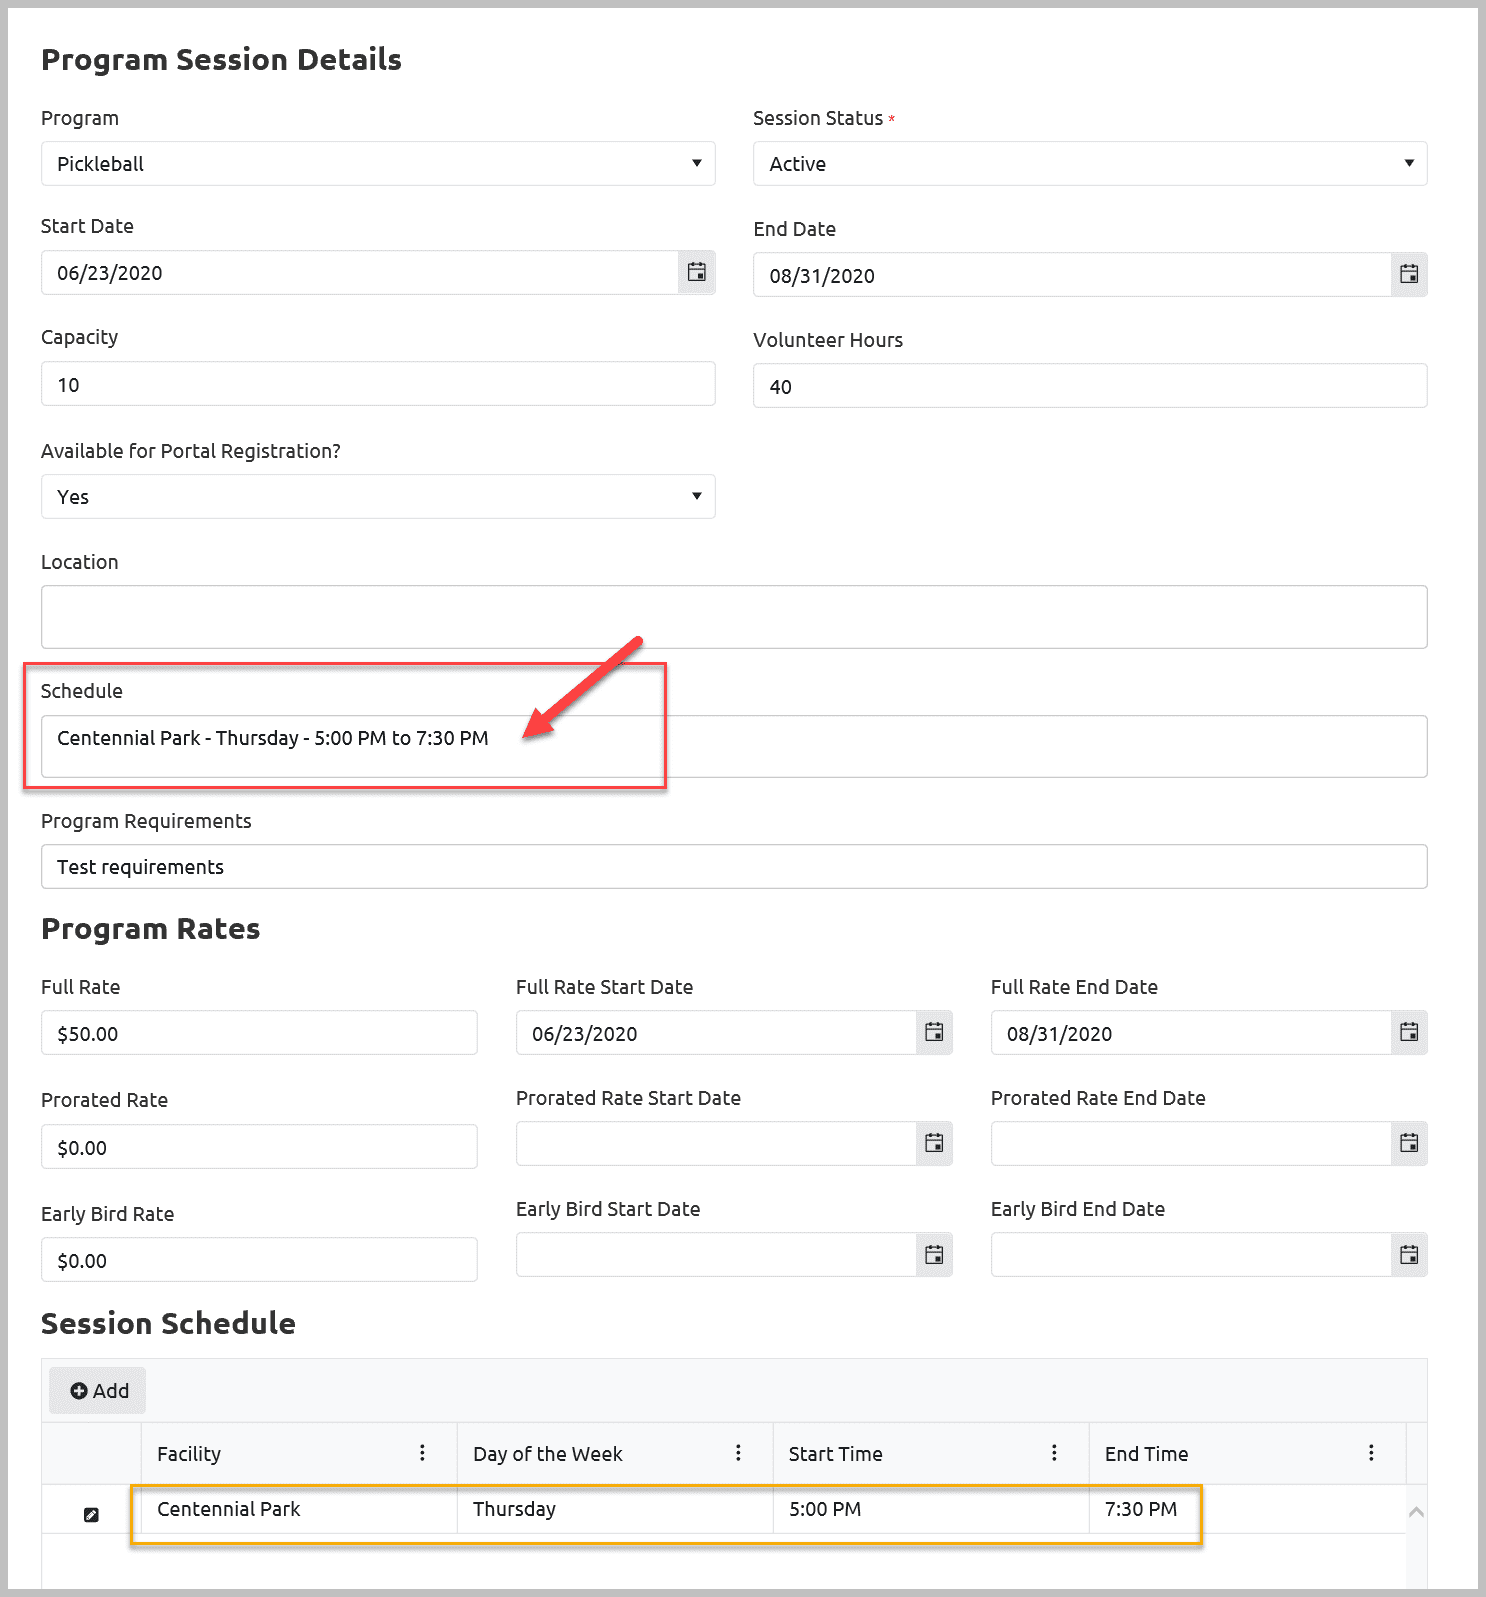
Open this new session again to review the information.
Check the Schedule field which was left blank, you will see auto filled information in it displaying Facility Name, Day and time of the practice.
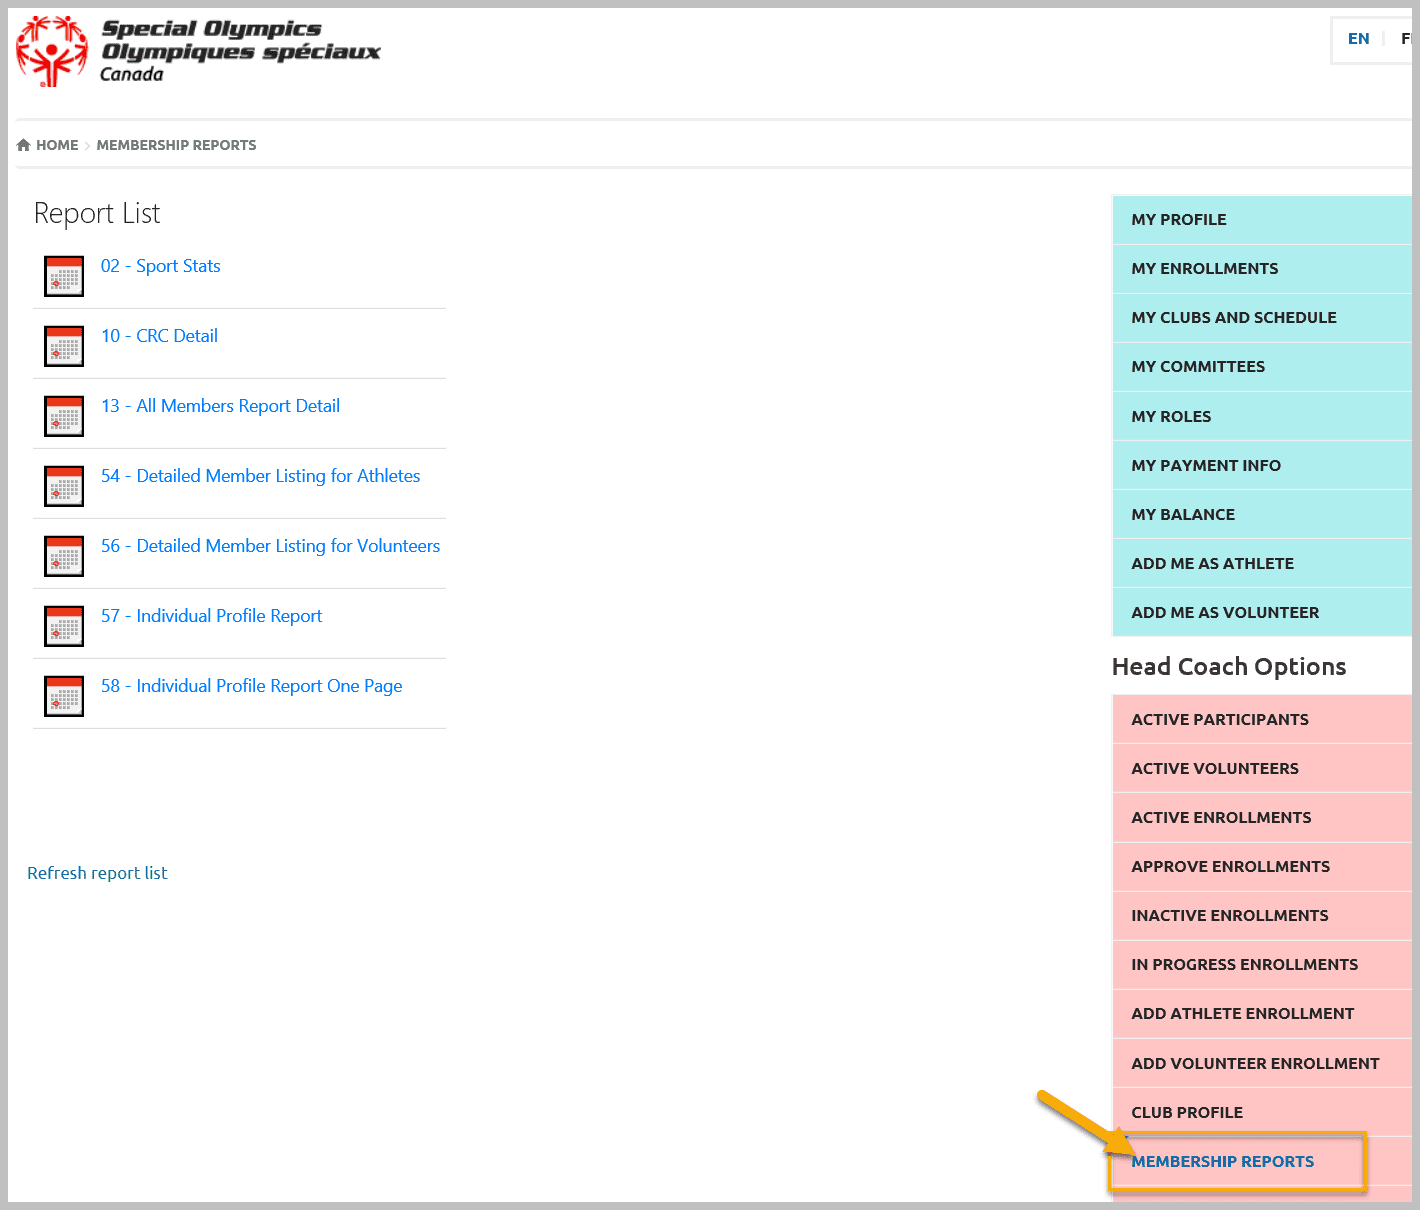
Membership Reports
Follow the instructions: https://www1.specialolympicsontario.com/support/documentation/membership-reports/
More Topics In Club Admins
- Attendance Tracker Form - How to Record this Information
- Membership Portal Account Creation Instructions for Already Registered Members
- Waivers Data Entry by Data Admins on Membership Portal
- Session Duplicator Tool - Instructions to duplicate Active or Expired session
- Concussion Awareness - Where and How to record this information
- Usability Membership Portal - New Group Home Coordinator and New Group Home Athlete Registration Instructions
- Usability Membership Portal - Volunteer Self-Enrollment and Waivers Update Instructions
- Usability Membership Portal - New Volunteer - Registration Instructions
- Usability Membership Portal Login Instructions
- Template - Invitation to Membership Portal for already registered Athletes
- Steps to follow by club admins to create and manage yearly new sessions
- Template - Invitation to Membership Portal for already registered Volunteer
- How to Enroll registered Volunteer to another Sport?
- How to upload Atlanto Axial Form or Medical Document
- Add New Club Session
- How to approve enrollments by Community Data Admin, Head Coach & Team Manager - Submitted to Approved
- Covid Declaration Form Received - Where & How to Record this Information
- Manage My Account - All Registered Volunteers - Blue Menu
- Member Enrollment Status - Full Explanation
- Membership Reports
- How to upload your Police Check
- Enrollments with In Progress Status
- New Volunteer - Community Approval Instructions
- Usability Membership Portal - Registered Volunteer Portal Login / Account Creation and Profile update Instructions
- Head Coach/Team Manager Role Instructions
- Family Administrator - Introduction
- Athlete not found in Database - Instructions to register New Athlete by Data Admins
- Instructions to add a Session
- Program Sessions - Introduction
- How to change my Password?
- How to Cancel Athlete/Volunteer Enrollment?
See Also
- Toronto Volunteers - Instructions to get Police Check
- Membership Portal - Family Admin Role Instructions to update your Athlete Information
- Membership Portal Account Creation Instructions for Already Registered Members
- New Junior Volunteer Registration Instructions
- Waivers Data Entry by Data Admins on Membership Portal
Search