Community Coordinator/ Data Administrator (Registrars) Role Instructions
Steps to register/login to Portal
From the home page click on Portal user Registration
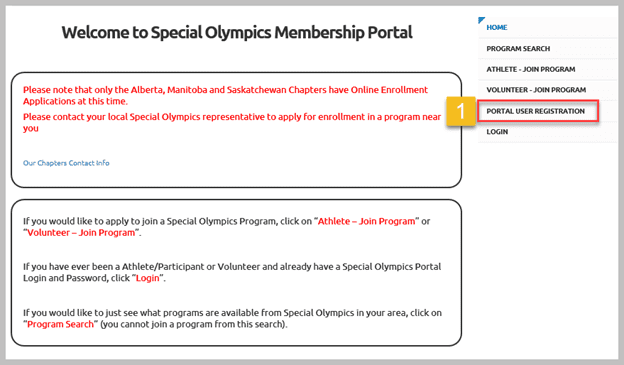
OR
Copy and paste the following URL in your browser:
https://portal.specialolympics.ca/member-registration
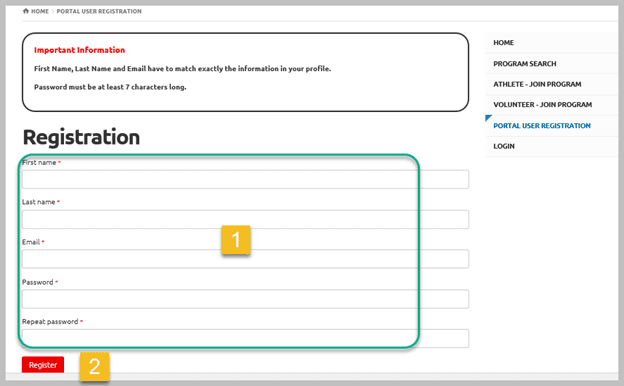
- Provide the necessary information to create your user account.
Note: First Name, Last Name and Email have to match exactly to your profile in the Special Olympics Membership system
- Click on the “Register” button to initiate the process. An “activation” email will be sent to you with a link to activate your account. After you activate your account you will be prompted to log in
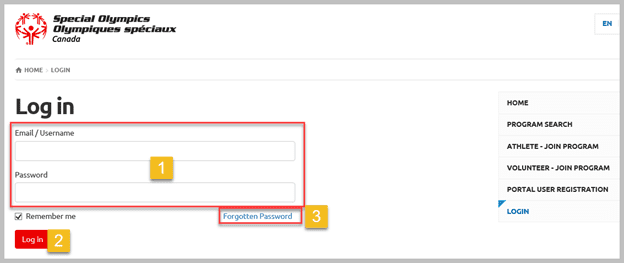
- Enter the email you registered with and the password you selected
- Click Login
- If you’ve forgotten your password click Forgotten Password to reset.
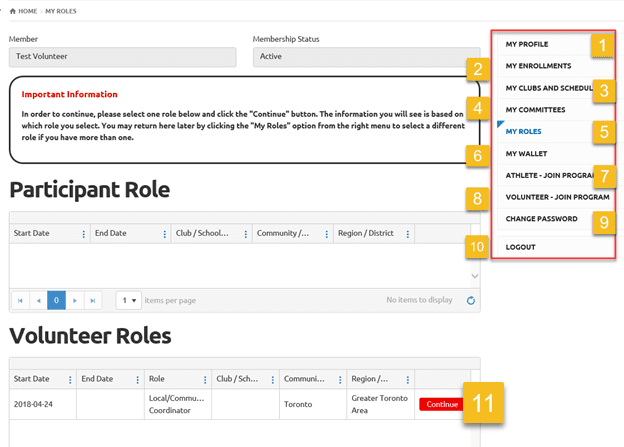
After login, you will see the following screen.
Until you Select a role, you will only see the “My” Account buttons on the Right. These buttons are available to all users.
Below is Detail of side Menu buttons
- My Profile – your personal information, update your address or medical info here
- My Enrollments – see the status of your all enrollments
- My Clubs and Schedules – see the Clubs you’re associated with and the published schedule for the sessions
- My Committees – if you hold a position on a committee, you will see it here
- My Rolls – the Page you are on now to select your role
- My Wallet –
- Athlete – Join Program – if you wish to join another program, click it to start a new application
- Volunteer – Join Program – if you wish to join another program, click to start a new application
- Change Password – click on it if you want to change your password
- Logout – Click if you have finished to view/ updates your profile to leave the system
- Continue – to Select your Role
Select Local/Community Coordinator Role Or Data Administrator Role (Registrar)
Note: Both roles have same database access and rights to update database
You will see the following Landing page
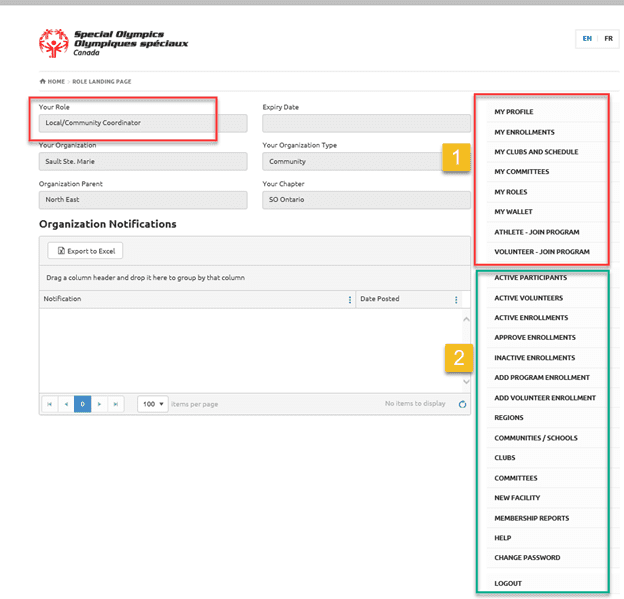
- These are “MY’ buttons – detail provided above.
- Buttons available to Admin Volunteers
Here is detail for Admin Buttons (which you will get when you will click “Continue” button beside your role like Registrar/CC, from “My Roles”)
- Active Participants – See a list of all Athletes in your area that you have permission to view and edit
- Active Volunteers – See a list of all Volunteers in your area that you have permission to view and edit
- Active Enrollments – See a list of all enrollments in your area that you have permission to view and edit
- Approve Enrollments – See the list of submitted enrollments for your clubs which you will approve for participation following the business procedures
- Inactive Enrollments – In this screen you can see all enrollments that have expired or otherwise are not current
- Add Program Enrollment – Enroll existing or already registered athlete in other sports clubs (for New ask their Parents/Guardians to fill out online form)
- Add Volunteer Enrollment – Enroll existing or already registered volunteer in other sports clubs (for New ask them to fill our online form)
- Regions – You can see list/ basic info for regions you have permission to access(only if you are regional coordinator)
- Communities – See list of communities/basic info you have permission to access
- Clubs – See list of clubs you have permission to access
- Committees – See a list of committees you have permission to access
- New Facility – You will be able to add New Facility (Program activity location) to your club
- Member Ship Report – you will be able to generate reports for your members and club verification reports
- Help – Find some help documents and videos to register new athlete from Home Page (these instructions are generic for all chapters – Ontario full instructions for new athlete/volunteer to register through portal home page will be provided soon)
Functionality Details for each Tab to update Database starts here:
Active Participants
Note: This tab will not allow you to Cancel/Update member’s enrollment
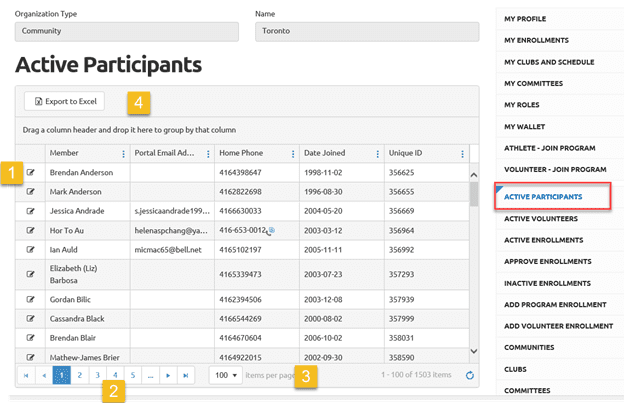
You will see list and basic info of active participants (Athletes) of your community. Basic info includes name, Portal email (tied to portal access), phone, Date Joined to SOO and Unique ID (Registration No.)
Details of window:
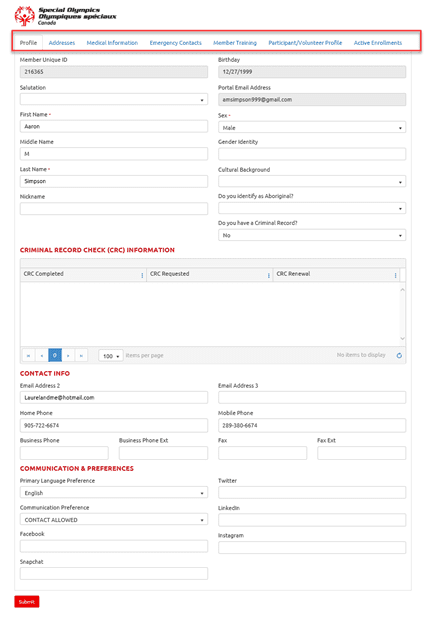
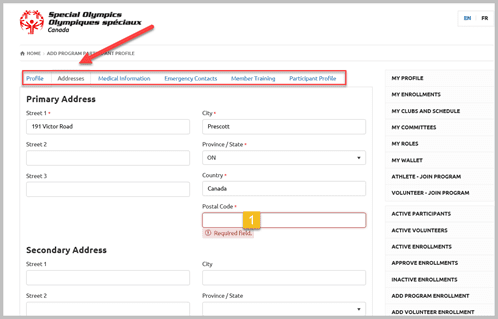
- Click on Edit icon beside the name of participate, you will be able to view/update participant’s info. At top you will find different tabs like Address, Medical info, select the appropriate tab and update info and after update click Submit
- Pages – navigate pages, first to last
- Select the number of participant records you want to see on a page
- Export excel list of the participants.
Active Volunteers
Note: This tab will not allow you to Cancel/Update member’s enrollment
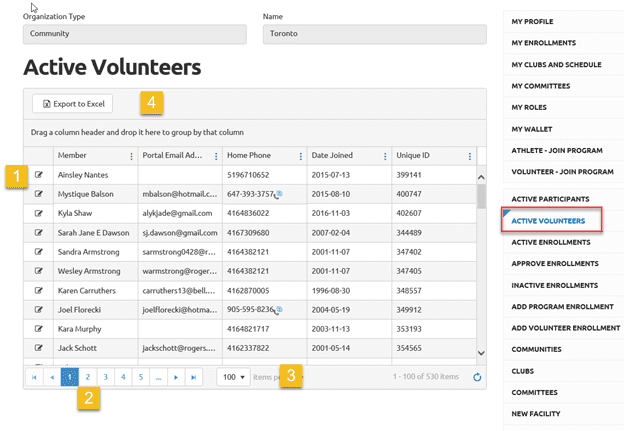
You will see list and basic info of active Volunteers of your community. Basic info includes name, Portal email (tied to portal access), phone, Date Joined to SO & Unique ID.
- Click on Edit icon beside the name of volunteer, you will be able to view/update volunteer’s info. At top you will find different tabs like Address, Medical info, select appropriate tab and update info and after update click Submit. (same as for Active Participants)
- Pages – navigate pages, first to last
- Select the number of volunteer records you want to see on a page
- Export excel list of the volunteers.
Active Enrollments
Note: This tab will allow you to cancel enrollments of athletes/volunteers from the clubs they quit. (They will get deleted from that club only, not from database)
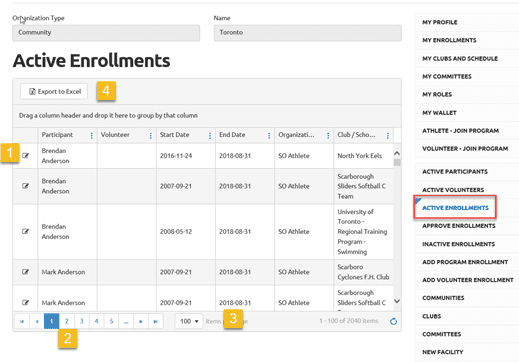
You will see list and basic info of active enrollments of participants & volunteers for your community. Basic info includes name, Start date & End Date (program session start & end dates)
- Click on Edit icon beside the name of participant / volunteer, you will be able to view/update member’s enrollment.
- Pages – navigate pages, first to last
- Select the number of member records you want to see on a page
- Export excel list of Members
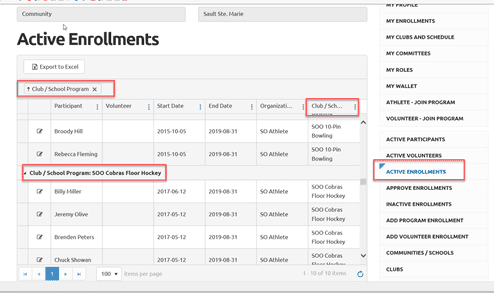
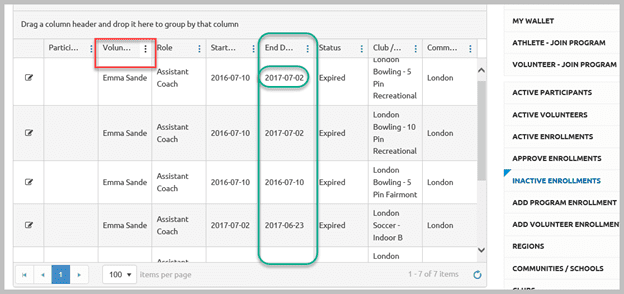
You can do grouping of any column. Just drag and drop column header in the space above, you will get enrollments by that field. Like the following window shows enrollments grouped by the clubs:
Steps to update and enrollment:
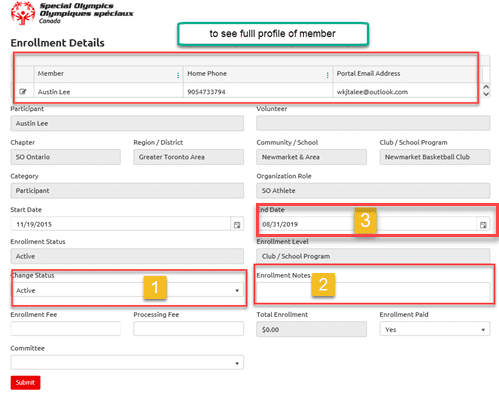
- Click on Edit icon beside the name of participant / volunteer, you will be able to view/update member’s enrollment.
If participant or volunteer is no longer involved in a program
- Change the status to Cancel
- Add Enrollment notes if any
- Change End date and click Submit
Approve Enrollments
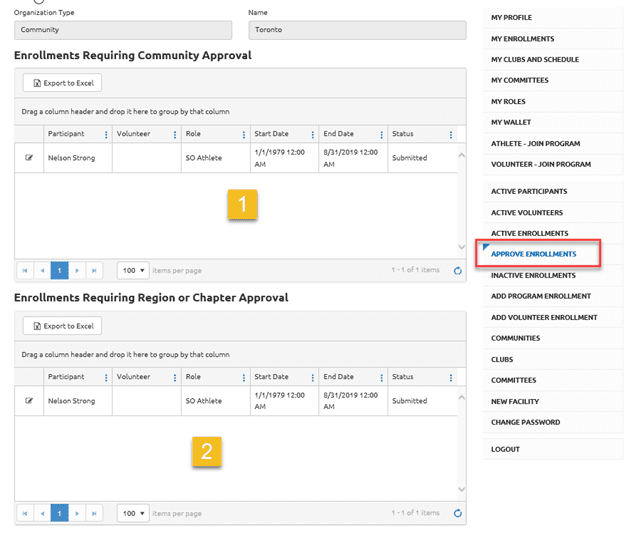
You will see two windows:
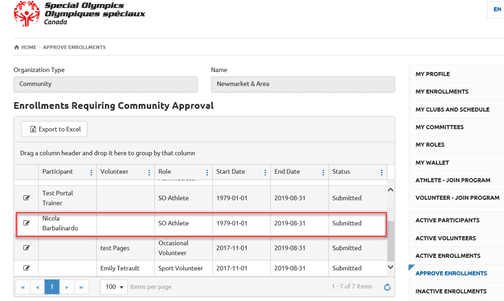
- Enrollment Requiring Community Approval
List of already registered athletes/volunteers who are enrolling in other programs of your community, you will be able to approve them which will be then activated by System and you don’t need to send email to head office.
Note: Status update Tool runs daily at Midnight, so after approving enrollments, you have to wait till next morning to see these members in your clubs.
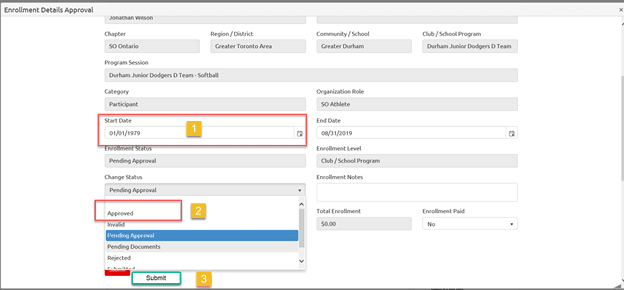
Note: Change the Status of:
- Athlete/Participant from Submitted to Approved
- Volunteer form Submitted to Approved (no new police check is required) for volunteers who are active or were inactive for less than a year. Change the status form Submitted to Pending Document and advise them to get and send police check to SOO office who were inactive for a year or more.
- Enrollments Requiring Chapter Approval
This is the List of New members who will submit their registration forms through Home page, using Athlete – Join Program OR Volunteer – Join Program. Or if Data admin will add new members from the paper registration forms. These new Athletes/Volunteer enrollments approval have 3 steps:
- First Approved by DBA and you will see the status as Submitted, Pending Approval or Pending Document but the profile will remain in the same window.
- Athlete/Participant – status will remain Submitted but DBA will grant you access and you will find this new athlete in your window Enrollments Requiring Community Approval – you have to approve them based on the availability of seat/vacancy in the club. You have to check the references of the volunteers and advised them to get and send their police checks to the head office.
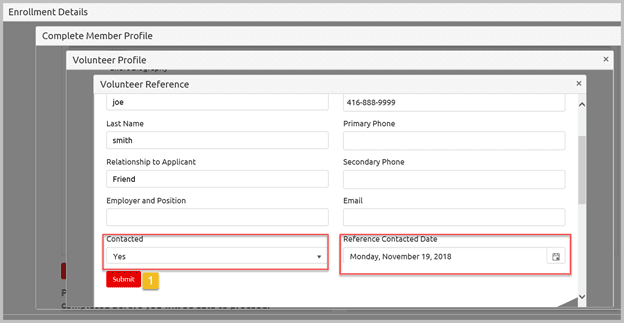
- Volunteer form Submitted to Pending Document or Pending Approval – but in the same window, you have to check references and advise them to get and send police checks to the SOO office. You will endorse this volunteer by adding Date contacted after checking references in the Volunteer profile.
The head office will activate volunteers once a police check will be received. The community will not have to send email to head office to inform regarding volunteer’s reference checks, as community will update reference check info in volunteer’s profile
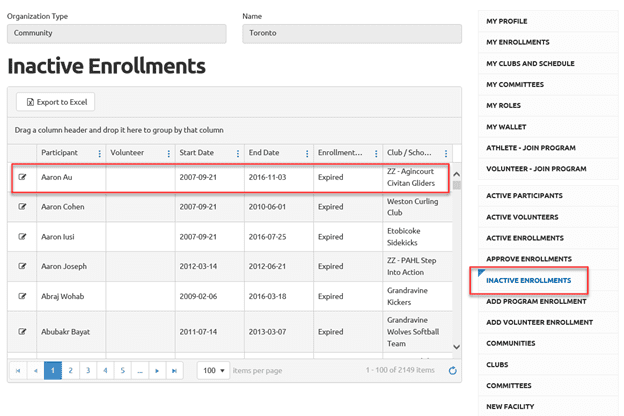
Inactive Enrollments
This tab will serve as a history tab, you will find your member’s involvement in different programs in the past and you will be able to have info for your inactive members. You will be able to reactivate them through Add Program Enrollments & Add Volunteer Enrollments tab in your programs.
Add Program Enrollments
This tab can be used to enroll all your active, expired and dormant athletes in other sports.

- Community Participant field will provide you list of all athletes with active and expired status. Search by typing the first name & select the name you wish to add in another club or you want to activate an expired athlete in a program.
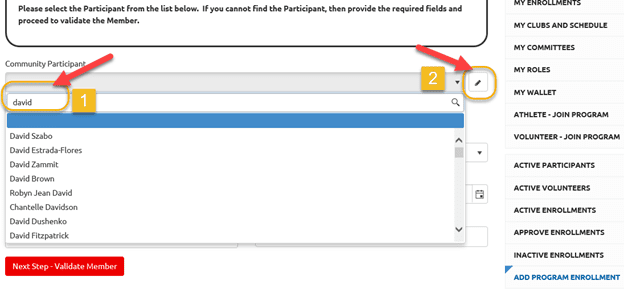
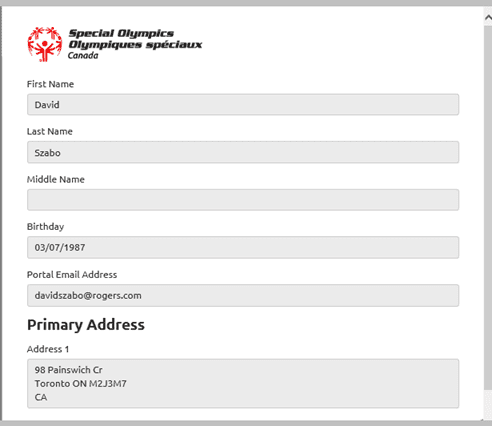
- Click on little pencil to find out basic info for the member you have selected like DOB, Email and address. This will help you to double check that you have selected right athlete (if you have 2 with same name). Close this window to proceed this enrollment.
- Next step – search program – to start athlete’s enrollment in a program
- Steps 4 & 5 are meant for the athlete to whom you don’t have access to, but you know that it is registered. Reasons could be:
Athlete is inactive but it is your athlete
Athlete currently involved in another community and you do not have access
Athlete is registered with a school and you don’t have access
In this case fill out the four fields and start process by clicking Next step – search program, and complete enrollment process. This enrollment will be looked after by DBA as you have sent this request to DBA to do list. You don’t have to send email to add this athlete to your program.
Steps to add Athlete in a program/club
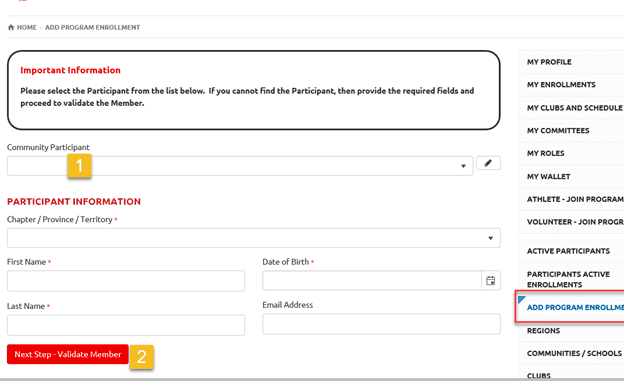
- Select the name of athlete
- click on Next Step – Program Search
Program search window will open with your District, community selected and a list of your clubs in a window.
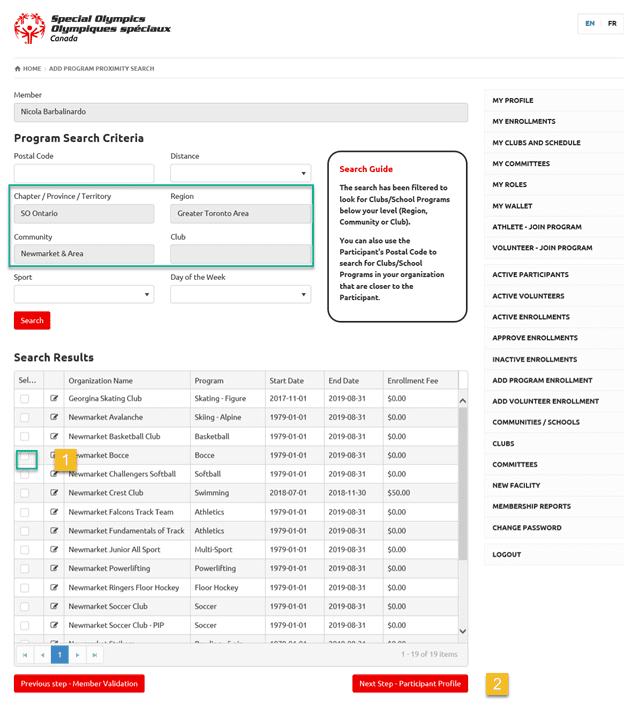
If you want to see the details of the club session, click on the Edit button beside the name of club, new window will open with info.
- Select appropriate club from the list (will allow one at a time)
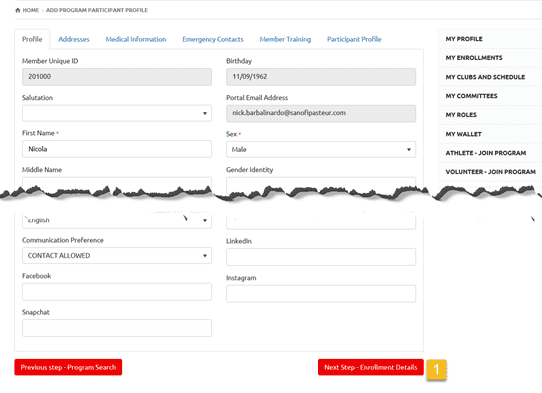
- Click on Next Step – participant Profile (if you want to update any info, you will be able to do here).
- Note: all mandatory fields have to be filled in before moving to next step so it is recommended to go through each to make sure they are filled in. otherwise next window will not show.
2. Click Next Step – Enrollment Details
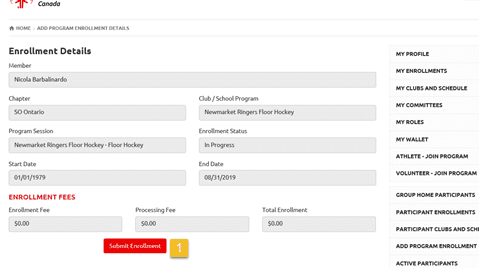
After reviewing all details,
- Click Submit Enrollments. Following confirmation window will open, and athlete will get confirmation email.
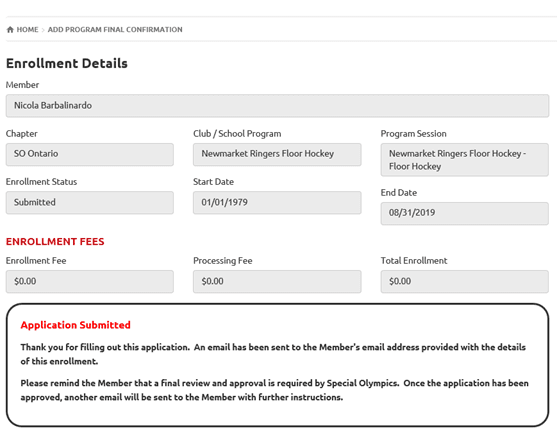
You will find this member in Approve Enrollments Tab, open the record and change status from Submitted to Approved.
Add Volunteer Enrollments
This tab can be used to find out all your active, expired and dormant Volunteers

There will be two types of volunteers to be added in clubs/programs.
- Active volunteers
- Inactive volunteers
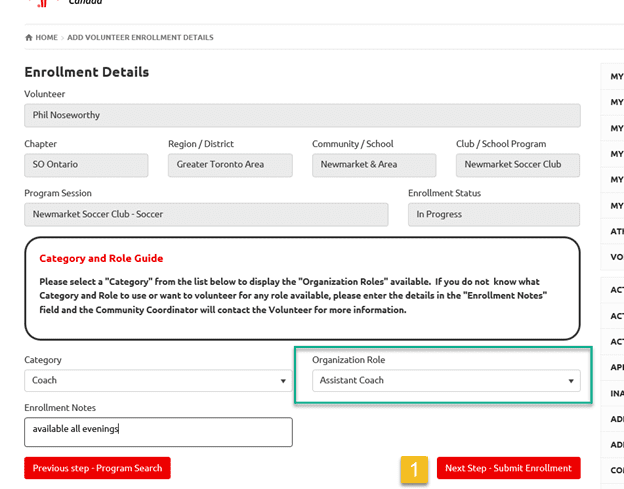
For Active volunteers, please follow the instructions as provided for Add Program Enrollment. Then only difference will be in the Enrollment Details window where you have to enter Category and Role for them.
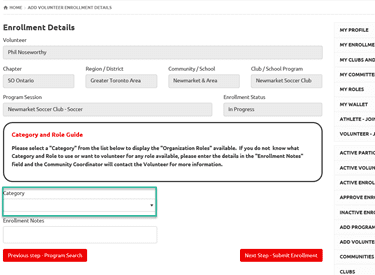
Once you will select Category, Organization Role Field will appear. Select the Role for volunteer and click on Next Step – Submit Enrollment. An email will be sent to the volunteer and you will find this enrollment in you Approve Enrollments tab.
You can approve enrollment as mentioned for athletes.
Inactive volunteers
- Inactive for less than a year – no need of new police check
- Inactive for a year or more – need new police check
How to find out Inactive time period for a volunteer:
- Click the Inactive Enrollments Tab
- Search for volunteer, you may find one or more expired enrollments based on involvement of programs in the past.
- Check the End Date field of enrollments. Calculate the time period based on the latest end date.
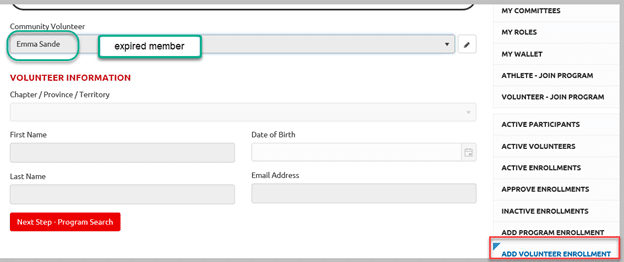
To add in new program
- Click on the Add Volunteer Enrollment
- Search the name of inactive member
- Follow the procedure to add new enrollment as described above
- Approve enrollment for both type of volunteers as:
- Inactive for less than a year – change status from Submitted to Approved, volunteer will be activated within 24 hours
- Inactive for more than a year – Change status from Submitted to Pending Documents, volunteer will be activated upon the receipt of police check.
Communities / Schools
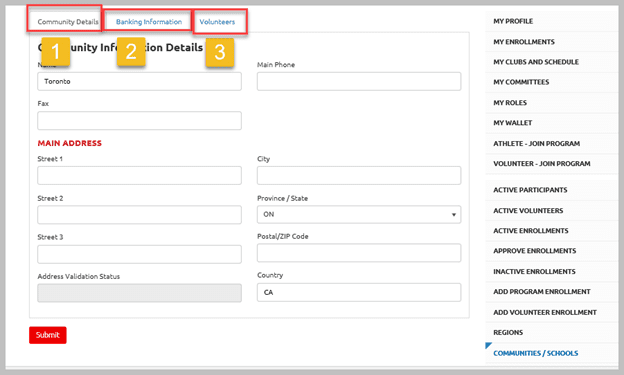
This tab will provide community info:
- Community Details – if need to update, enter the info and Submit
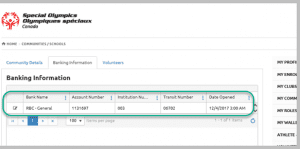
- Banking info tab will provide you the details of community centralized bank accounts info. For more info click on the edit button beside the account name.
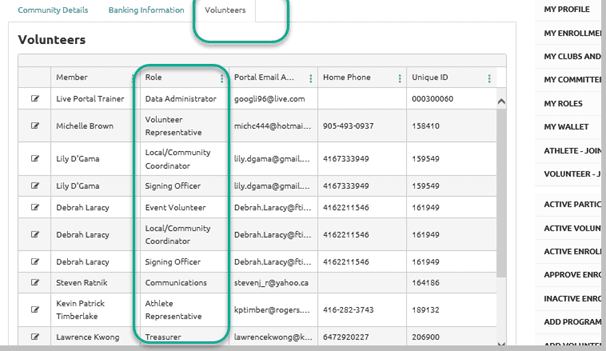
3. Volunteer list tab will provide the list of community council members. You can keep up to date your council members list by adding/removing volunteers.
Clubs
This tab will provide you list of Active & Inactive clubs of your community.
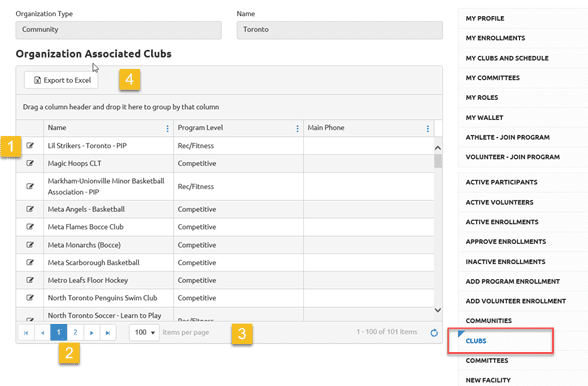
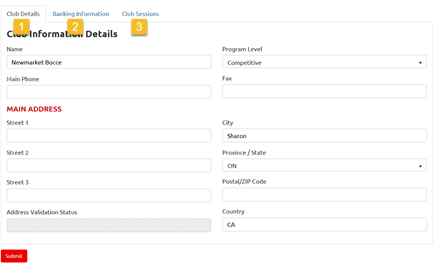
- Click edit to view/update the club details, Banking info & Club Sessions (1, 2 & 3 in the window below).
- To navigate the list use 2 & 3 tools
- To get excel list of clubs, use export to excel tool
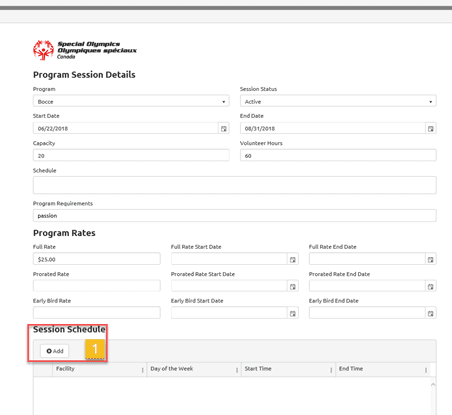
Add New Session & Schedule
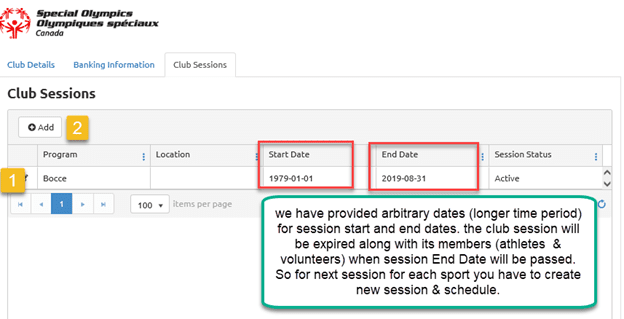
- To view/update existing session click on the edit button beside the Program
- To add new session, click on Add Add info in the window as shown below:
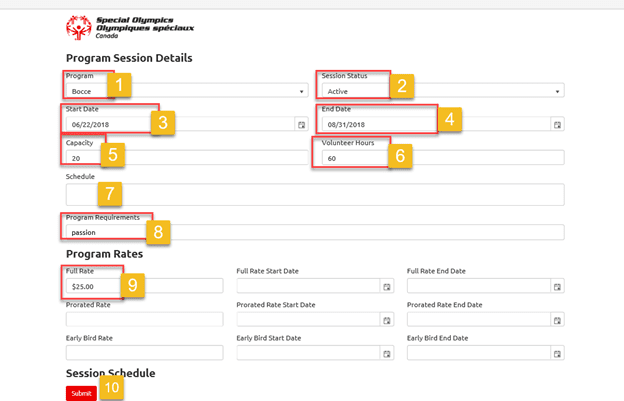
- Select Sport/program of the club
- Select Session Status – Active
- Enter Start Date of the Session – on this date club will be available for proximity search. This is the date when actual sport practice will take place at the facility you will enter in this session
- Enter the End Date of the Session – on this date this club session will be expired and will not be available for proximity search. This is the date when sport session will expire for this season.
- Add Capacity of athletes, once enrollments will exceed this number, new enrollments will get Waiting List Status.
- Enter the volunteer hours – volunteers will earn in this session
- Schedule will be auto populated once you will add facility and schedule for this session
- Program Requirements – enter if any
- Registration Fee – enter the registration fee that athletes have to pay before actual practice/session starts. There are prorated / early birds options as well if some community wants to use them. (if you wish your session be available earlier to the athletes to get registered Set the Full Rate Start Date to 6/1/2018 and set the Full Rate end date to either 10/31/2018 or whatever date you want that to be. It will be available to athletes/volunteers on proximity search or to returning athletes/volunteers as well)
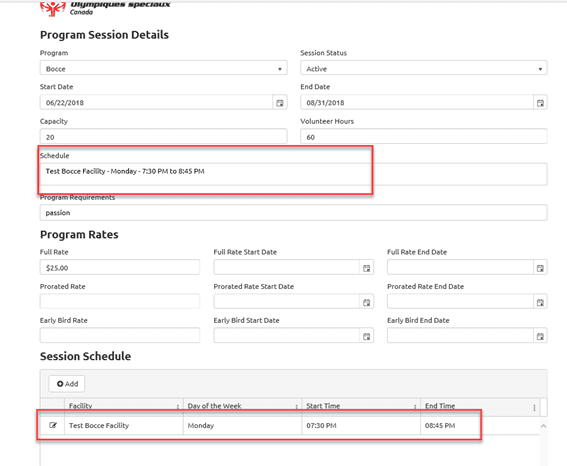
- After filling all above info, click Submit to register this session. Once the session is created, now you will be able to add Session Schedule
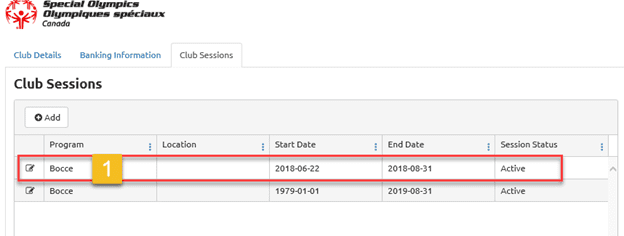
- Open the newly created club session
- In the Session Schedule section click Add to add new schedule
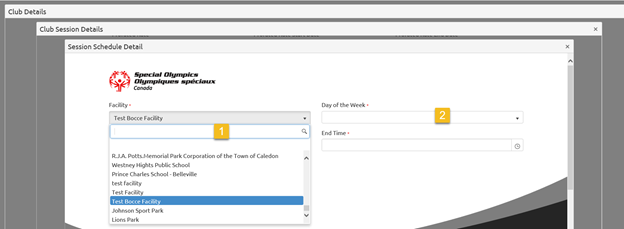
- Search for the facility name where the practice for this session will occur (Facilities for all registered clubs are registered in database, you have to search the name of facility)
- Select appropriate name from the list
- Select day of practice
- Select Start & End Time (time is provided with 30 minutes interval, if you have to write 7:45 just type in the time) and Submit
Close the session window and open it. See the window below for complete session. Contact your district developer or DBA to activate this session. After activation this session will be ready for member enrollments.
Committees
Select Committees Tab from the side menu, you will see active committees list if your community have, if not, the Active Committees window will be blank.
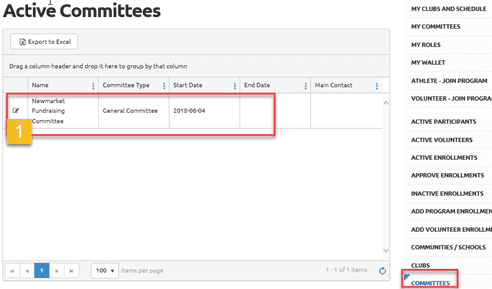
- Click on Edit button beside the name of the committee, a new window will open, you will be able to
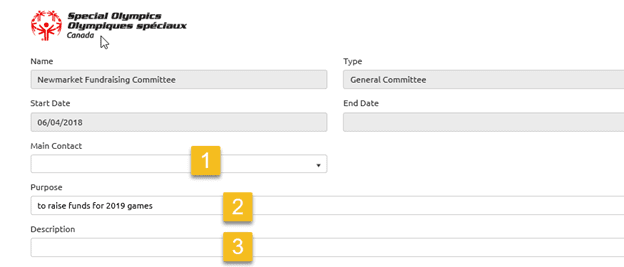
- Add Main Contact
- Update purpose of the committee
- Add Description if any
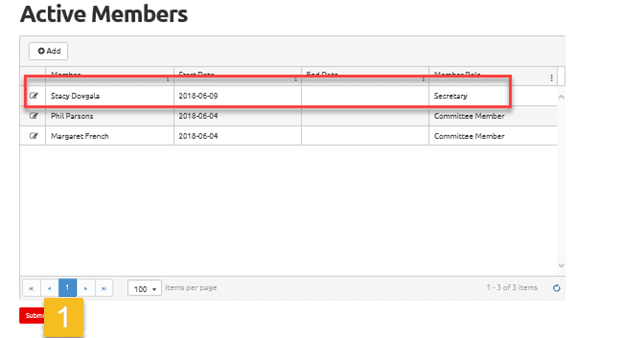
In Active Members window you can see a list of active members.
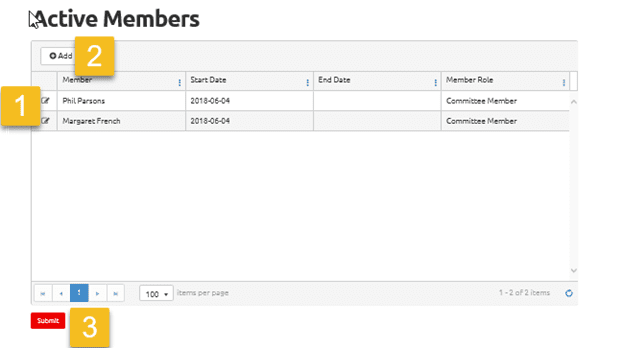
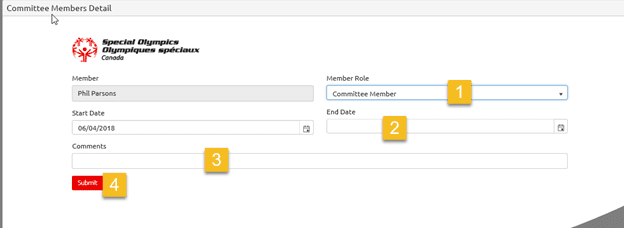
- Click Edit button beside the name of the Member, You should be able to update
- Member Role
- End Date
- Comments and click Submit.
- Add New Committee Member
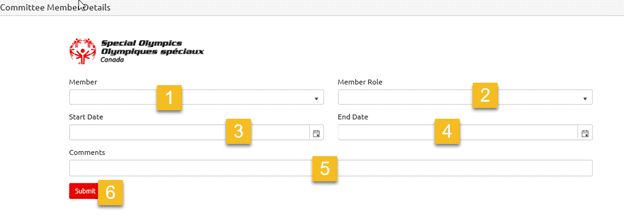
In the window above
- Select Member from Dropdown list
- Add Member Role
- Add Start Date
- Add End Date if it is 6 month or 1 year term, if not, leave it blank
- Add Comments if any
- Click Submit, new member will be added on the committee list.
- Click Submit to complete the process.
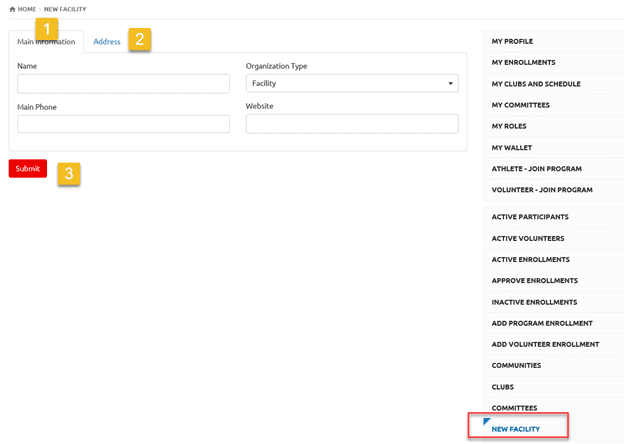
Add New Facility
Click New Facility button from side menu, a new window will open.
- Fill out fields for main information tab
- Fill out address info on address tab,
- Click Submit, you will get a success message.
Change Password
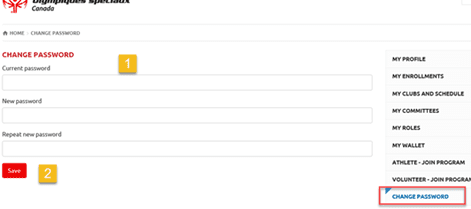
- Enter current password, then new password twice
- Click Save
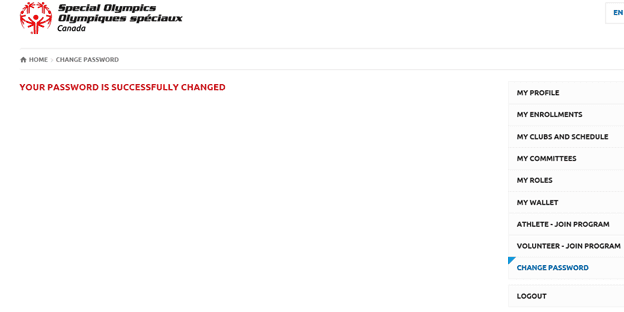
You will get success message, logout and login with New Password
Membership Reports
Detail of Reports
02 – Sports Stats
It will provide athlete age stats at different time periods for your community/club. Below is selection criteria.
10 – CRC Detail
This report will provide information on volunteer police checks. Select your region, community and one Club/all clubs, submit, save
It will tell if police check is going to be expired within 3 months, missing PC, CRC not completed or PC is previously expired. Based on this report you can advise your volunteers to get/renew their PC’s.
13- All Members Report Detail
Note: To get club verification report, use this Report:
Select Region, Community and your club name, select Participant type Athlete and report type Excel. Then click Submit.
Excel report will pop up prompting to save it. If you will click on Save, it will save in downloads folder by generic name as Report 1, 2, 3…. To save in appropriate folder click on dropdown arrow and select Save as. After saving open this report to view.
Note: if report does not pop up, check your pop up block settings of your browser.
Here is screen shot of excel repot.
54 – Detailed Member Listing for Athletes
It will provide you the detailed report of your volunteers. Pick any criteria for your community athletes. Like gender, age… submit, save.
56 – Detailed Member Listing for Volunteers
Same as 54, for Volunteers
57 – Individual Profile Report.
More Topics In Community Admins
- Usability Membership Portal - Volunteer Self-Enrollment and Waivers Update Instructions
- Add New Club Session
- How to upload Atlanto Axial Form or Medical Document
- How to Enroll registered Volunteer to another Sport?
- Template - Invitation to Membership Portal for already registered Volunteer
- Steps to follow by club admins to create and manage yearly new sessions
- Template - Invitation to Membership Portal for already registered Athletes
- Usability Membership Portal Login Instructions
- Usability Membership Portal - New Volunteer - Registration Instructions
- Attendance Tracker Form - How to Record this Information
- Usability Membership Portal - New Group Home Coordinator and New Group Home Athlete Registration Instructions
- Usability Membership Portal - Bulk Entry Tool - To Add new Enrollments with Active Status
- Instructions to Add a course in Member Training section
- Concussion Awareness - Where and How to record this information
- Session Duplicator Tool - Instructions to duplicate Active or Expired session
- Waivers Data Entry by Data Admins on Membership Portal
- Membership Portal Account Creation Instructions for Already Registered Members
- How to approve enrollments by Community Data Admin, Head Coach & Team Manager - Submitted to Approved
- Covid Declaration Form Received - Where & How to Record this Information
- Manage My Account - All Registered Volunteers - Blue Menu
- Member Enrollment Status - Full Explanation
- Membership Reports
- How to upload your Police Check
- Enrollments with In Progress Status
- New Volunteer - Community Approval Instructions
- Family Administrator - Introduction
- How to add Community/School Level enrollment for a volunteer
- Athlete not found in Database - Instructions to register New Athlete by Data Admins
- Instructions to add a Session
- Program Sessions - Introduction
- How to change my Password?
- How to Cancel Athlete/Volunteer Enrollment?
See Also
- Toronto Volunteers - Instructions to get Police Check
- Membership Portal - Family Admin Role Instructions to update your Athlete Information
- Membership Portal Account Creation Instructions for Already Registered Members
- New Junior Volunteer Registration Instructions
- Waivers Data Entry by Data Admins on Membership Portal