Upgrading GMS
BEFORE YOU BEGIN: This page was designed as a simplified step by step guide to upgrading to GMS 7.10 from previous versions of the software.
Special Olympics International has created a more detailed guide for different types of upgrade scenarios. While the instructions below should suffice for most installations, if you would like to review this document please click on this link.
For users upgrading from GMS 5.6 it is strongly advised that you review this information before proceeding.
1 New Features in GMS 7
Upgrading to GMS 7 is easy for most Programs. The user interface and overall functionality is the same as GMS 6. In addition to some added features, we have made a large amount of changes in the programming to address bugs and open doors to future development.
If you are transitioning from an older Version of GMS such as GMS 5.6 or GMS 6 you will notice a significant difference in both look and performance. Some of these changes are listed below.
2 System Requirements
Windows XP and newer can run GMS with minimal problems. However, we recommend Windows 7 and newer, with an Intel i5 processor, 4GB RAM, and at least 128GB of hard drive space.
GMS is not compatible with Apple OSX. If you wish to run GMS on a Mac, emulation must be performed (i.e. Bootcamp).
3 Downloading & Installing GMS
Special Olympics, Inc. (SOI) offers free GMS software licenses to all accredited Special Olympics Programs and their users. Understanding that many GMS users are volunteers, SOI distributes the software through each Program office.
IMPORTANT NOTE: GMS is offered in both 32-bit and 64-bit formats. To understand whether your computer can run the 64-bit version of GMS, read the answer to the second question at this link.
Please complete the following form to request your copy of the software and the registration key.
Upon review a series of follow up e-mails will be sent to you with links to your requested version and your registration key.
GMS 7.2 and onward have a built-in feature that prompts users to download new versions as they are released. This feature helps to 1) notify all users when there is an updated version available, and 2) make it easy for users to upgrade.
On your local drive, in the same folder you have GMS installed, replace your existing GMS.exe file with the new, updated version.
IMPORTANT: Once you upgrade to GMS 7, you can no longer use previous versions of GMS (5.6 or 6) on your database.
GMS 7.2 and onward have a built-in feature that prompts users to download new versions as they are released. This feature helps to 1) notify all users when there is an updated version available, and 2) make it easy for users to upgrade.
On your local drive, in the same folder you have GMS installed, replace your existing GMS.exe or GMS7_x64.exe file with the new, updated version.
IF YOU ARE USING GMS 5.6 or 6: Once you upgrade to GMS 7, you can no longer use previous versions of GMS (5.6 or 6) on your database.
IF YOU ARE UPGRADING FROM GMS 7.2 OR LATER: You may simply copy the files downloaded either through or form request or through the auto-update download (in GMS) to your local GMS Folder.
Remember: If you are running the 64-bit version of GMS please ensure that the ielib64.dll file is present in the same folder as your GMS7_x64.exe file. The ielib64.dll is found in the 64-bit install zip file.
4 Starting GMS
The new .exe file will reference the existing .ini file for the serial number and your existing database connections. This .ini file was generated in the same folder as the .exe file when the registration key was initially entered. It stores the registration key and related information, as well as database connection information and some system preference settings.
An .ini file extension is used for an initialized file format. These files are plain text and, in the case of GMS, used to set parameters for the software.
5 Database Selection on Start-Up
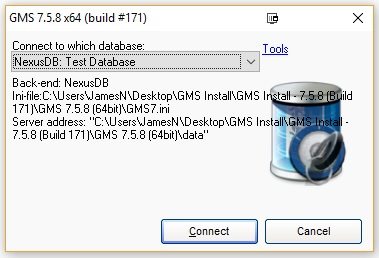
As previously mentioned, the .ini file stores database connection information. Therefore, when you open the database selection window, it will look similar to the one on the right. On the "Connect to which database" drop-down, select the database you wish to connect to, and then select "Connect". Some configurations bypass the database connection window and connect directly to a default database. In the next section we show you how to set this up.
GMS 6 Users: Please note that GMS 7 will automatically upgrade your GMS tables to the new version. Once this migration has occurred it is not possible to reverse the process. Please ensure that you backup your data.
GMS 5.6 Users: Please note that additional migration steps may be required if you are moving your data from GMS 5.6. We would strongly recommend that you consider starting with a fresh installation of the software.
If you do have data that requires migration please let us know when you complete the GMS download request form.

6 Database Connections Management
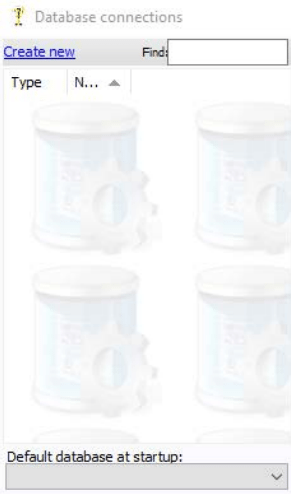
From the Database selection window, select "Tools" and "Setup database connections" to bring up the Database connections window. This is where you will manage all of your database connections. You can also access this window from within GMS. From the GMS Main Screen > Administrator Tools > Database Connections.
Existing databases will appear in the left column. Once you select that database, the database connection settings will appear on the right. On the bottom left, you can select your "Default database at startup" and the checkbox for "Automatically connect to this database when GMS 7 starts up" to bypass the Database Selection window the next time you open GMS.
If your existing database does not show up in the database connections menu. Click Create New and create a new database entry, when asked for a file location click on the browse button and locate the data directory that your existing GMS Installation is using (for example: C:\gms\data). This should allow you to connect to previous data.
Many people think that data is stored within GMS itself. GMS is a client that reads and writes data to a database. The database, Nexus for your purposes, is where the data is actually stored. GMS, as a client, brings data to and from the database so that the user can work with it.
7 Getting Started
1. Clicking Close in Database Connections should bring you back to your Database Selection Window.
2. Select the Nexus Database that you located or created in the previous step in the "Connect to which database" drop down list.
3. Click Connect and GMS will start.
4. If you are upgrading an existing database or this is the first time you are connecting to a new database GMS may identify missing tables or tables that require upgrading. Simply keep clicking Next and the necessary database tables will be created and GMS will finalize its installation.
5. You are now ready to begin working in the new GMS.
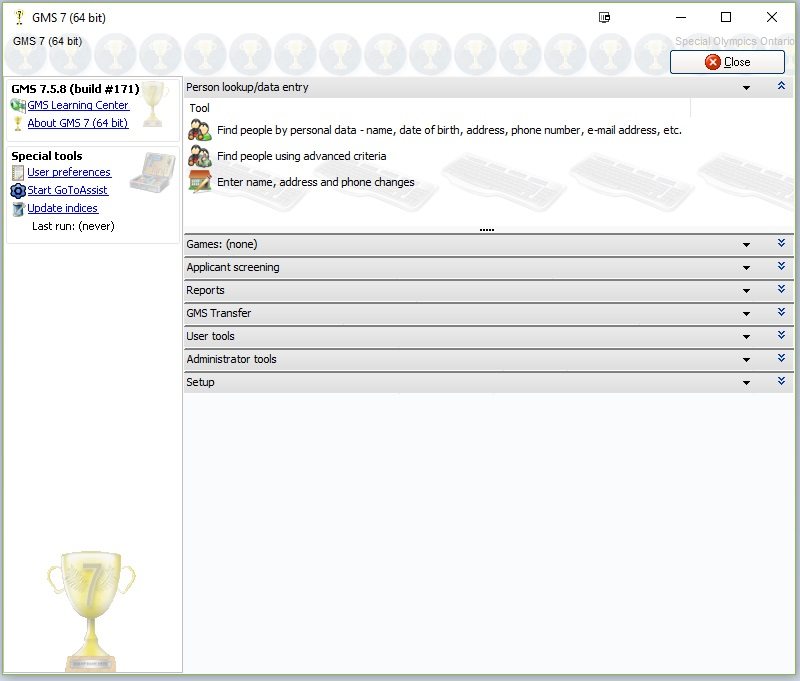
6. Once GMS is loaded you will be presented with the main menu.
- If you are upgrading from GMS 5.6 you will notice significant changes to the layout, please take a minute to familiarize yourself with the location of features and functions.
- If you have upgraded from a previous version of GMS you should notice that your previous games are now available in the Games Menu. Clicking on this menu and clicking on a games will allow you to open previous games.
7. As you get oriented to GMS the following are great resources and things to keep in mind.
- DO Click Here to download and import the Reports Set from the Resources Page these preset reports are standard for Special Olympics Ontario and will save you countless hours of report creation.
- Do check out the TRAINING PAGE to find Quick Guides, Cheat Sheets and other training resources that will help you navigate and get started using GMS.
- Do take a look around this GMS Support Site and its links to Special Olympics International's GMS Support Resources
- If you get stuck don't hesitate to Get In Touch with support for help.
- The context menu (Right Click) is your best friend. When in doubt, try right clicking on an item in GMS to see if there are options not displayed on the main screen.
- Finally remember the best way to get comfortable with GMS is to practice using it. Don't be afraid to create demonstration games, simulate competitions and test out new features and functions.
Have Fun and thank you for using GMS and your dedication to Special Olympics.